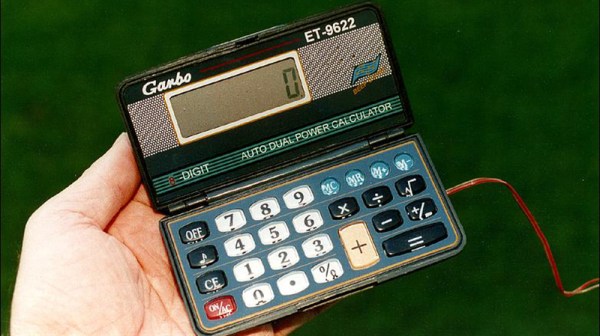
The Best NiMh Charger?

[Paul Allen] has been working on the latest iteration of his NiMh battery charger and it looks amazing!

We’ve covered [Paul Allen]s awesome hacks and tutorials before, but never this project. What makes his charger so special is it’s ability to monitor and log every aspect of the charging process. Not only does it have a SD card for data logging, but it also interfaces with a Windows application for real-time monitoring as well as analysis and visualization of the charging process (Linux users don’t fret it has a serial interface too).

[Paul] doesn’t say if he plans to open hardware or kickstart the charger, but some of his older posts give us a quick peak at the gerbers. Let’s hope this awesome project makes its way into the wild soon, and hopefully we’ll be able to try it for ourselves and see if it lives up to its name.

Coin-Op Weather

When you have access to your own CNC machine, you tend to make stuff first and ask questions later. That sounds like how [Rui Cabral] came up with a weather station stuffed into a miniature arcade game cabinet.

arcade28Standing only about 16 cm tall, the cabinet is quite detailed and resembles the familiar arcade form factor that has consumed countless quarters. It even appears to be made of particle board like the big boys. The screen cutout is filled by a 84×48 monochrome Nokia display, and the rest of the cabinet’s interior is stuffed with a CNC-milled PCB, temperature and humidity sensors, an RTC, and a Bluetooth module for uploading data to a phone. [Rui] even manages to work in an homage to the grand-daddy of all arcade games with a Pong splash screen.

Another good-looking display for this project might have been this ePaper badge made into a weather station. And we’ve featured even tinier arcade cabinets too, though perhaps not as functional.

[Rui] takes us on a video tour of his build after the break.

Continue reading “Coin-Op Weather”

Micro:bit — BBC Gets A Million Kids Into Embedded Dev

In the Early 1980s, the BBC launched a project to teach computer literacy to a generation of British schoolchildren. This project resulted in the BBC Micro, a very capable home computer that showed a generation exactly what a computer could do. These children then went home, turned on their ZX Spectrums, and became a generation of software engineers. Still, the BBC Micro is remembered fondly.

The computer revolution is long over, but today we suffer a sea change of embedded processors and microcontrollers. With Arduinos and Raspberry Pis, the BBC has decided it’s time to put the power of an ARM microcontroller into the hands of a million 11- and 12-year olds. The result is the Micro:bit. It’s a small microcontroller board with an ARM processor, an IMU, buttons, Bluetooth and a 5×5 LED array – exactly what you need if you’re teaching a million kids how to blink an LED.

Although the BBC has finalized the design for the Micro:bit, there are no specs at all. However, a few educated guesses can be made. The USB controller is provided by Freescale, who also provide the digital compass and magnetometer. Programming is done through a web-based, Arduino-like IDE with what appears to be a decent Micro:bit specific library. The board is also mbed compatible. Bluetooth, and apparently the ARM Cortex M0 core, is provided by a Nordic nRF51822. There are only three alligator clip-compatible I/Os, and its doubtful any student will be building anything that would be too complex for an entry level ARM. It’s also 3V logic; finally, the tyranny of 5V has fallen.

The Micro:bit is best seen as a tool that enables the relatively recent addition of a computer science curriculum in UK schools. There is now a requirement for seven-year-olds to understand algorithms and create simple programs. Previously computer education in the UK has consisted of PowerPoint. Now, secondary school students will be learning Boolean logic.

While the Micro:bit is utterly useless as a tool for doing real work, education is not real work. For blinking a few LEDs, having a device react to movement, playing with Bluetooth, and other lesser evils of electronics, the Micro:bit is great. Not everyone will become the digital technologists this initiative is trying to create, but for those who have an inclination towards semicolons and electrons, this is a great introduction to technology.

On-Demand Paper Clips

3D Printers are great for printing out parts or items you need, but can they really help if you run out of paper clips? Yes, the all important and extremely overlooked bent metal fastener can put a serious damper on your day if not readily available. There is a solution to this problem, it’s called the Paper Clip Maximizer 1.0. The only consequence of using such a machine may be the destruction of mankind.

The machine takes a spool of wire and methodically bends it into a paper clip shape. Just like an extruder on a 3D Printer, there is a knurled drive wheel with a spring-loaded bearing pinching the wire. This drive wheel is powered by an RC servo that has been modified for continuous rotation. After the drive mechanism, the wire passes through a sturdy guide block. Upon exit, the wire finds the bending head, also powered by a servo. There is a bearing on the end of the bending head that is used to bend the wire around the guide block. After making several bends to form the paper clip, the bending head swings around to cut off the newly manufactured clip with an abrasive wheel. Unfortunately, this part of the process doesn’t work well. The cutoff wheel motor is powered directly by the Arduino that controls the entire machine, the power output of which is not enough to easily cut the wire. It can also leave a sharp burr on the cut wire which is not a great feature for paper clips to have. But we just see these as future fodder for hacking sessions!

Continue reading “On-Demand Paper Clips”

World’s Greatest Bubble Machine Born Of Space Program

[GordonKirkwood] needs soap bubbles. Big soap bubbles. Why does he need soap bubbles? Because – soap bubbles!

Actually, [Gordon] is a photographer, and he wants to capture candid moments and fleeting expressions. What better way to inspire wonder and amazement than to be able to produce a giant soap bubble on demand? And what better way to do it than with an intricate, computer controlled giant bubble machine?

[Gordon’s] inspiration for the bubble producing mechanism comes from the end effector of the Canadarm robotic Space Shuttle arm, which used a cable-grapple design to snare and secure payloads. [Gordon] uses a similar principle to interweave bubble juice-soaked strings and pull them apart in a plane to form a soap film. A puff of wind or a quick shot from a fan inflates and launches the bubble, which the mechanism can pinch off for precise control of size.

The amount of work [Gordon] put into the machine is impressive. His Instructables post is incredibly detailed and goes into not only his build but also his design process and prototyping, the science of soap bubble instruments, and even a nod to the work of other pioneering bubble enthusiasts. And he thoughtfully includes a recipe for professional-grade bubble juice, with a secret ingredient that may surprise you.

You say your bubble-producing needs run more toward quantity than quality? Try using the juice in this homemade bubble robot.

Continue reading “World’s Greatest Bubble Machine Born Of Space Program”

High Voltage, Wood And Resin Result In Fractal Art

Wood burning, which goes by pyrography when it’s feeling fancy, has been an art form for centuries. [PapaJ06] puts a new twist on it by using a microwave oven transformer to generate fractal patterns in wood. We’ve seen these Lichtenberg figures before, but generally as electric discharges in acrylic sheets or crystal balls using multi-mega-electron volt accelerators. [PapaJ06]’s technique is considerably simpler and well within the reach of most would-be fractal artists, relying as it does on a transformer salvaged from a $20 Craigslist microwave.

But the extra twist that really brings the wow factor to the fractal patterns burned into the wood is the addition of some phosphorescent resin to fill the valleys carved by the electric discharge. [PapaJ06] carefully prepares the wood, fills the burns with glow powder mixed with epoxy resin, and finishes with a little sanding, linseed oil and polyurethane. The contrast between the charred and intact wood, and the way the resin fills the voids really brings out the fractal nature of the Lichtenberg figures.

[PapaJ06] doesn’t really show us too much about his process, but luckily [TheBackyardScientist] recently posted a video of his process for riding the lightning. Check it out after the break.

Continue reading “High Voltage, Wood And Resin Result In Fractal Art”

Logic Noise: Ping-pong Stereo, Mixers, And More

So far on Logic Noise, we’ve built up a bunch of sound-making voices and played around with sequencing them. The few times that we’ve combined voices together, we’ve done so using the simplest possible passive mixer — a bunch of resistors. And while that can work, we’ve mostly just gotten lucky. In this session, we’ll take our system’s output a little bit more seriously and build up an active mixer and simple stereo headphone driver circuit.

For this, we’ll need some kind of amplification, and our old friend, the 4069UB, will be doing all of the heavy lifting. Honestly, this week’s circuitry is just an elaboration of the buffer amplifiers and variable overdrive circuits we looked at before. To keep things interesting we’ll explore ping-pong stereo effects, and eventually (of course) put the panning under logic-level control, which is ridiculous and mostly a pretext to introduce another useful switch IC, the 4066 quad switch.

At the very end of the article is a parts list for essentially everything we’ve done so far. If you’ve been following along and just want to make a one-time order from an electronics supply house, check it out.

klangoriumIf you’re wondering why the delay in putting out this issue of Logic Noise, it’s partly because I’ve built up a PCB that incorporates essentially everything we’ve done so far into a powerhouse of a quasi-modular Logic Noise demo — The Klangorium. The idea was to take the material from each Logic Noise column so far and build out the board that makes experimenting with each one easy.

Everything’s open and documented, and it’s essentially modular so you can feel free to take as much or as little out of the project as you’d like. Maybe you’d like to hard-wire the cymbal circuit, or maybe you’d like to swap some of the parts around. Copy ours or build your own. If you do, let us know!

OK, enough intro babble, let’s dig in.

Continue reading “Logic Noise: Ping-pong Stereo, Mixers, And More”