Usually when we see a project using a software-defined radio (SDR), the SDR’s inputs and outputs are connected to antennae, but [FromConceptToCircuit]’s project connected an ADALM-Pluto SDR to an RF bridge and a few passive components to make a surprisingly effective network analyzer (part two of the video).
The network analyzer measures two properties of the circuit to which it is connected: return loss (S11) and insertion gain or loss (S21). To measure S21, the SDR feeds a series of tones to the device under test, and reads the device’s output from one of the SDR’s inputs. By comparing the amplitude of the input to the device’s output, a Python program can calculate S21 over the range of tested frequencies. To find S11, [FromConceptToCircuit] put an RF bridge in line with the device being tested and connected the bridge’s output to the SDR’s second input. This allowed the program to calculate the device’s impedance, and from that S11. Continue reading “Turning The Pluto SDR Into A Network Analyzer”
Radio Hacks1455 Articles
Intercepting And Decoding Bluetooth Low Energy Data For Victron Devices
[ChrisJ7903] has created two Ardiuno programs for reading Victron solar controller telemetry data advertised via BLE. If you’re interested in what it takes to use an ESP32 to sniff Bluetooth Low Energy (BLE) transmissions, this is a master class.
The code is split into two main programs. One program is for the Victron battery monitor and the other is for any Victron solar controller. The software will receive, dissect, decrypt, decode, and report the data periodically broadcast from the devices over BLE.
The BLE data is transmitted in Link-Layer Protocol Data Units (PDUs) which are colloquially called “packets”. In this particular case the BLE functionality for advertising, also known as broadcasting, is used which means the overhead of establishing connections can be avoided thereby saving power.
Continue reading “Intercepting And Decoding Bluetooth Low Energy Data For Victron Devices”
Field Testing An Antenna, Using A Field
The ARRL used to have a requirement that any antenna advertised in their publications had to have real-world measurements accompanying it, to back up any claims of extravagant performance. I’m told that nowadays they will accept computer simulations instead, but it remains true that knowing what your antenna does rather than just thinking you know what it does gives you an advantage. I was reminded of this by a recent write-up in which the performance of a mylar sheet as a ground plane was tested at full power with a field strength meter, because about a decade ago I set out to characterise an antenna using real-world measurements and readily available equipment. I was in a sense field testing it, so of course the first step of the process was to find a field. A real one, with cows. Continue reading “Field Testing An Antenna, Using A Field”
Mylar Space Blankets As RF Reflectors
Metalized Mylar “space blankets” are sold as a survivalist’s accessory, primarily due to their propensity for reflecting heat. They’re pretty cheap, and [HamJazz] has performed some experiments on their RF properties. Do they reflect radio waves as well as they reflect heat? As it turns out, yes they do.
Any antenna system that’s more than a simple radiator relies on using conductive components as reflectors. These can either be antenna elements, or the surrounding ground acting as an approximation to a conductor. Radio amateurs will often use wires laid on the ground or buried within it to improve its RF conductivity, and it’s in this function that he’s using the Mylar sheet. Connection to the metalized layer is made with a magnet and some aluminium tape, and the sheet is strung up from a line at an angle. It’s a solution for higher frequencies only due to the restricted size of the thing, but it’s certainly interesting enough to merit further experimentation.
As you can see in the video below, his results are derived in a rough and ready manner with a field strength meter. But they certainly show a much stronger field on one side resulting from the Mylar, and also in an antenna that tunes well. We would be interested to conduct a received signal strength test over a much greater distance rather than a high-level field strength test so close to the antenna, but it’s interesting to have a use for a space blanket that’s more than just keeping the sun away from your tent at a hacker camp. Perhaps it could even form a parabolic antenna.
Radio Apocalypse: Meteor Burst Communications
The world’s militaries have always been at the forefront of communications technology. From trumpets and drums to signal flags and semaphores, anything that allows a military commander to relay orders to troops in the field quickly or call for reinforcements was quickly seized upon and optimized. So once radio was invented, it’s little wonder how quickly military commanders capitalized on it for field communications.
Radiotelegraph systems began showing up as early as the First World War, but World War II was the first real radio war, with every belligerent taking full advantage of the latest radio technology. Chief among these developments was the ability of signals in the high-frequency (HF) bands to reflect off the ionosphere and propagate around the world, an important capability when prosecuting a global war.
But not long after, in the less kinetic but equally dangerous Cold War period, military planners began to see the need to move more information around than HF radio could support while still being able to do it over the horizon. What they needed was the higher bandwidth of the higher frequencies, but to somehow bend the signals around the curvature of the Earth. What they came up with was a fascinating application of practical physics: meteor burst communications.
Continue reading “Radio Apocalypse: Meteor Burst Communications”
All-Band Radio Records Signals, Plays MP3s
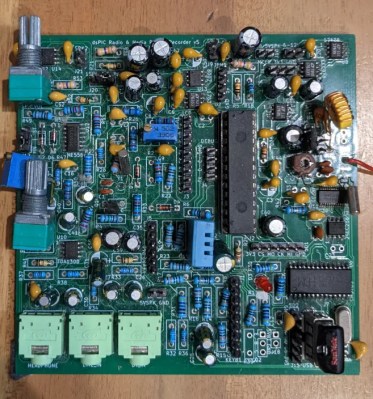
In these days of everything-streaming, it’s great to see an old school radio build. It’s even better when it’s not old-school at all, but packed full of modern ICs and driven by a micro-controller like the dsPIC in [Minh Danh]’s dsMP3 build. Best of all is when we get enough details that the author needs two blog posts — one for hardware, and one for firmware — like [Minh Danh] has done.
This build does it all: radio, MP3 playback, and records incoming signals. The radio portion of the build is driven by an Si4735, which allows for receiving both in FM and AM — with all the AM bands, SW, MW and LW available. The FM section does support RDS, though because [Minh Danh] ran out of pins on the dsPIC, isn’t the perfect implementation.

The audio section is a good intro to audio engineering if you’ve never done a project like this: he’s using a TDA1308 for headphones, which feeds into a NS8002 to drive some hefty stereo speakers– and he tells you why he selected those chips, as well as providing broken-out schematics for each. Really, we can’t say enough good things about this project’s documentation.
That’s before we get to the firmware, where he tells us how he manages to get the dsPIC to read out MP3s from a USB drive, and write WAVs to it. One very interesting detail is how he used the dsPIC’s ample analog inputs to handle the front panel buttons on this radio: a resistor ladder. It’s a great solution in a project that’s full of them.
Of course we’ve seen radio receivers before, and plenty of MP3 players, too — but this might be the first time we’ve seen an electronic Swiss army knife with all these features, and we’re very glad [Minh Danh] shared it with us.
Continue reading “All-Band Radio Records Signals, Plays MP3s”
A Gentle Introduction To Impedance Matching
Impedance matching is one of the perpetual confusions for new electronics students, and for good reason: the idea that increasing the impedance of a circuit can lead to more power transmission is frighteningly unintuitive at first glance. Even once you understand this, designing a circuit with impedance matching is a tricky task, and it’s here that [Ralph Gable]’s introduction to impedance matching is helpful.
The goal of impedance matching is to maximize the amount of power transmitted from a source to a load. In some simple situations, resistance is the only significant component in impedance, and it’s possible to match impedance just by matching resistance. In most situations, though, capacitance and inductance will add a reactive component to the impedance, in which case it becomes necessary to use the complex conjugate for impedance matching.
The video goes over this theory briefly, but it’s real focus is on explaining how to read a Smith chart, an intimidating-looking tool which can be used to calculate impedances. The video covers the basic impedance-only Smith chart, as well as a full-color Smith chart which indicates both impedance and admittance.
This video is the introduction to a planned series on impedance matching, and beyond reading Smith charts, it doesn’t really get into many specifics. However, based on the clear explanations so far, it could be worth waiting for the rest of the series.
If you’re interested in more practical details, we’ve also covered another example before. Continue reading “A Gentle Introduction To Impedance Matching”


