Using The Raspi As An Ethernet Shield

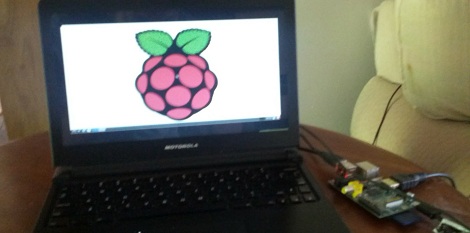
[Alexandre] wanted to set up a web-based temperature logger with his Arduino, but found the Arduino Ethernet shield a little finicky. Since his Raspberry pi was just delivered, he figured he could use the Raspi as an Ethernet shield with just a little bit of coding.

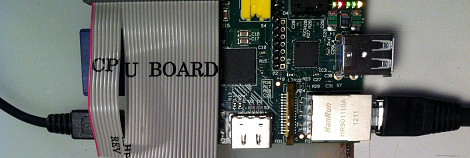
After [Alexandre] set up his Arduino to send a thermocouple through the USB, the only thing left to do was to add node.js to the Raspi’s Debian installation. Every five minutes, the Arduino wakes up, takes a temperature reading, and sends it over to the Raspberry pi. From there, it’s easy parse the Arduino’s JSON output and serve it up on the web.

In the end, [Alexandre] successfully set up his Raspberry pi as an Ethernet shield to serve a web page displaying the current temperature (don’t F5 that link, btw). One interesting thing we have to point out is the cost of setting up this online temperature logger: the Arduino Ethernet shield sells for $45 USD, while the Raspberry pi is available for $35. Yes, it’s actually less expensive to use a Raspberry pi as an Ethernet shield than the current Arduino offerings. There you have it, just in case you were still on the fence about this whole Raspi thing.

Checking Out The Temperature Of A Raspberry Pi

[Remy] has access to a very nice Fluke thermal camera, so when his Raspberry pi came in he pointed the thermal camera at the Raspi (Spanish, Google translation) to see how far this neat computer could be pushed before it overheated.

There are three main sources of heat on the Raspberry Pi: the voltage regulator, the USB/Ethernet controller and the Broadcom SoC. At idle, these parts read 49.9° C, 48.7° C and 53° C, respectively; a little hot to the touch, but still well within the temperature ranges given in the datasheets for these components.

The real test came via a stress test where the ARM CPU was at 100% utilization. The Broadcom SoC reached almost 65° C while the Ethernet controller and regulator managed to reach the mid-50s. Keeping in mind this test was performed at room temperature, we’d probably throw a heat sink on a Raspberry Pi if it’s going to be installed in an extreme environment such as a greenhouse or serving as a Floridian or Texan carputer.

Thanks [Alberto] for sending this in.

Bringing Chromium To The Raspberry Pi

If you’re in possession of a Raspberry Pi, you may want to check out the new Chromium support for your tiny pocketable computer. With its terrifically minimal hardware requirements, the Chromium OS seems like just the thing for this $35 computer.

The new Raspberry Pi supported Chromium build comes from the fruitful desktop of [Hexxeh], a.k.a. [Liam McLaughlin]. In the world of Chromium devs, [Hexxeh] has already made a name for himself by getting Chromium working on a Macbook Air, putting it in a VirtualBox, and generally being the resident wizard of the Chromium project

The Chromium OS should provide a much faster computing experience for the Raspi compared to the current Debian and Arch Linux-based builds.   Right now, the Chromium support for the Raspberry Pi is very much a work in progress but a slimmed-down, browser-only operating system may be just what the underpowered but useful 700 MHz ARM computer with 256 MB of RAM needs.

Turning A Raspberry Pi Into A Laptop With A LapDock

Being a $35, full-fledged Linux computer, the Raspberry Pi brings a lot to the table. There’s one problem, though: this computer doesn’t come with a keyboard, mouse, display, or even a battery. Luckily, it’s pretty easy to add these devices with the help of a Motorola LapDock and turn a RasPi into a fully portable computing platform.

The Motorola LapDock is the latest take on the dumb terminal. Consisting of only a 1366 x 768 display, keyboard, touch pad and 38Wh battery, the LapDock is meant to serve as a docking station and breakout for a few select Motorola cell phones. There are only two connections on the LapDock – a micro USB and micro HDMI port – connecting the peripherals to the cell phone. With just a few adapters, it’s possible to plug the Raspi into the LapDock, and have a Raspberry Pi-based laptop for under $100.

Interestingly, the Raspi can also be powered over the USB connection to the LapDock, meaning an external power supply isn’t required. Right now the state of a LapDock-ified Raspi is a bit inelegant, but we’ll expect someone to come up with a proper docking adapter to get rid of all the wires and add a WiFi module shortly.

via adafruit

Using The GPIO Pins On A Raspberry Pi

In addition to being a serviceable single board computer, the Raspberry Pi also has a header full of GPIO pins at your beck and call. [Tedbot] sent in a great tutorial on using these pins with Python, Bash, and C.

The GPIO pins on the Raspi are arranged in a 2×13 header. Until Sparkfun manages to manufacture a decent Raspi protoboard, the easiest way to break these pins out is with an old IDE ribbon cable. After plugging the other end into a breadboard, [Tedbot] had an easily accessible set of Raspi pins.

To control these pins, [Tedbot] found two libraries: the first is WiringPi that implements a C-style, Arduino-like programming environment on the Raspi. The second is the RPi.GPIO Python package. Since the Raspi runs Linux, and everything in Unix is a file, [Tedbot] used a shell script to blink a LED.

One word of warning if you’re building a board to extend the capabilities of the Raspi: these pins aren’t 5 V tolerant, so you’ll need to throw in a buffer or level converter when building a Raspi circuit.

Edit: Adafruit is releasing a Pi Plate prototyping board in a few weeks. Neat, huh?

Adding Wireless To The Raspberry Pi

For those of us who haven’t received their Raspberry Pis yet, it may come as a bit of a shock to realize the RasPi doesn’t have an on board WiFi adapter. While the Model B RasPi has an RJ45 Ethernet plug, but the Model A must rely on USB-bound networking dongles. [Mike] over at Mitch Tech put up a great guide to using a Realtek WiFi dongle with his Raspberry Pi.

Stock, the standard Debian install recommended by the folks at Raspberry Pi has the drivers for the Realtek WiFi adapter, but no firmware. [Mike] goes over how to get the firmware for this series of WiFi adapters to keep the kernel from complaining. Interestingly, [Mike]’s instructions also work for a slew of Realtek-based wireless dongles, so the installation instructions should work for a bunch of adapters available from DealExtreme or eBay.

[Mike] also has a guide for installing Quake 3 on a RasPi. Combine these two builds and you’ve got the perfect setup for a Raspberry Pi LAN party. Anyone want to host?

Using Arduino Shields With The Raspberry Pi

Since the Arduino was launched years ago, many ‘shields’ or add-on boards providing additional functionality have been released. There are hundreds of different shields, from video capture shields to touch screen shields. Now that the Raspberry Pi is out in the wild, it was only a matter of time before a RasPi to Arduino shield bridge was created.

[Omer] calls his bridge ‘Ponte’ and it allows Arduino shields to be used with the incredible  horsepower of an embedded Linux system. While [Omer] originally expected to write the RasPi to Arduino software converter himself, but found WiringPi halfway through the build. Of course this build comes just a day after we saw a tutorial on controlling the GPIO pins on the RasPi, and we expect to see similar GPIO-hacking builds in the future.

Right now, the Ponte only supports Arduino Uno-sized shield, so the possibility of an all-in-one RepRap controller using the RAMPS motor driver is impossible for now. We expect that to change very quickly as more people get their RasPis delivered.