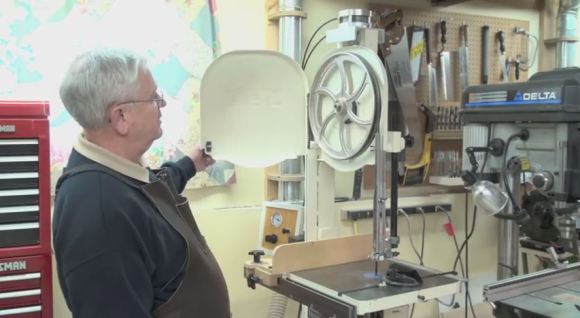
Measuring 185 µΩ In Circuit

meter

To measure resistance, you usually have to take the resistor to be tested out of the circuit, and sometimes that’s impossible. If you’re using a multimeter, measuring very small resistances is difficult to say the least. Combine both these problems – measuring microOhms in-circuit – and you have a problem that’s perfectly suited for the Mooshimeter.

Announced just a few weeks ago, the Mooshimeter is a two-channel multimeter that communicates with your cell phone over Bluetooth. It’s perfect for measuring current and voltage simultaneously, all while being tucked away in some place that’s either dangerous, inaccessible, or mobile.

The Mooshimeter team put together a great example of what can be done with their meter by measuring the resistance of a car battery grounding strap while behind the steering wheel. To do this, they put alligator clips across the grounding cable and clamped on a current meter.

Inside the car, they whipped out their cell phone and looked at the Mooshimeter’s output for the voltage and current measurement. The Mooshi app has an IV curve (with linear regression in the works), so simply dividing the current and voltage gives them the resistance of the battery’s grounding cable.

It’s a very cool and extremely simple demonstration of how cool the Mooshimeter actually is. Video of the demo below.

Continue reading “Measuring 185 µΩ In Circuit”

Toner Transfer PCBs, Double Sided, With Color Silkscreen

Silk

Making a few PCBs with the toner transfer method is a well-known technique in the hacker and maker circles. Double-sided PCBs are a little rarer, but still use the same process as their single-sided cousins. [Necromancer] is taking things up a notch and doing something we’ve never seen before – double-sided PCBs made at home, with color silkscreens, all make with a laser printer.

For laying down an etch mask, [Necro] is using a Samsung ML-2167 laser printer and the usual toner transfer process; print out the board art and laminate it to some copper board.

The soldermasks use a similar process that’s head-slappingly similar and produces great results: once the board is etched, he prints out the solder mask layer of his board, laminates it, and peels off the paper. It’s so simple the only thing we’re left wondering is why no one thought of it before.

Apart from the potential alignment issues for multiple layers, the only thing missing from this fabrication technique is the ability to do plated through holes. Still, with a laser printer, a laminator, and a little bit of ferric or copper chloride you too can make some very nice boards at home.

DIY Foam Cutter Makes It Too Easy

Cutting foam is pretty tricky without a hot wire cutter. Don’t have one? Well, lucky for you, [Darcy Whyte] has a guide on how to make one. It takes just over an hour to build, and it costs next to nothing in supplies!

[Darcy] is using an old 9V power wart that he had lying around, but you can probably use any DC power supply. He designed the frame in SketchUp and cut it out with his CNC router, although a saw will work just as well for MDF. A piece of 40 gauge nickel chromium wire was strung taught between two 1/4-20 bolts, with one held back by a spring. The spring acts as a safeguard to prevent snapping the wire during overly aggressive cuts. This may be a simple build, but it does produce a handy tool.

[Darcy] demonstrates cutting foam with his creation in a video after the break. We think he could cut thin plastic with it as well—modify your 3D prints, anyone?—though he may need to crank up the voltage a bit.

Continue reading “DIY Foam Cutter Makes It Too Easy”

DIY Scroll Saw

Scroll saws are super handy tools, but it’s sometimes hard to justify buying one for a single project. So why not make it your project? [SDX42] shows us how, using a…wait a second, is that an old sewing machine?

First a little back story. He picked up an old sewing machine that had been thrown out by its previous owner: they said it didn’t work right. He took it anyway and decided to fix it up. He encountered two problems. First, it turned out to be a lot harder to fix than he first imagined. Second, he realized he had no use for a sewing machine. What he did need, however, was a scroll saw.

A sewing machine is actually fairly similar to a scroll saw. They both work by converting rotary movement into linear reciprocation. The only difference is the layout. [SDX42] flipped the mechanism upside down and built a scroll saw frame on top of the stripped-down sewing machine. It’s a bit more complicated than that, but we’ll let him explain it to you in the video after the break.

Continue reading “DIY Scroll Saw”

Refurbishing A Vibratory Tumbler With A Dryer Motor

vibe

[Jake von Slatt] of the Steampunk Workshop is at again, this time refurbishing a cheap vibratory tumbler that had died after just one project.

The original Eastwood tumbler looked nice, but obviously didn’t go through much life-cycle testing at the company that designed it. Upon taking it apart, [Jake] discovered that the bearings in the motor were shot — after only a few hours of operation! Because of this he decided to start from scratch, keeping only the bowl, lid, and of course, the tumbling media.

[Jake’s] redesign makes use of Volkswagen brake drums for a very heavy duty base, a custom machined ball bearing plate made out of scrap aluminum, a flexible motor coupling made by welding a heavy spring onto two shafts, some more springs to balance the bowl, and a reclaimed dryer motor. It might not look pretty, but we think it’ll last a wee bit longer than the original.

He’s calling it his latest feat of post-apocalyptic engineering by using only parts on hand, and while we’d have to agree that his use of scrap material is impressive, we’d like to see him be able to power his rebuilt Bridgeport Mill off the grid when the apocalypse hits!

As always, he’s made an excellent video describing the project — don’t forget to check it out after the break.

Continue reading “Refurbishing A Vibratory Tumbler With A Dryer Motor”

Bicycle Powered Sander

sanding

[Andy] does a lot of framing and needed a way to sand down pieces at proper angles. He goes by the moniker [Organikmechanic] on YouTube, and as such is trying to rely less and less on electricity — so he’s created this hand-powered sander using components from a bicycle.

His first iteration just used the spindle off of a bicycle wheel as the main axle, but he quickly found it wasn’t rigid enough for the sanding disk. Instead he decided to make use of the entire crankshaft assembly off of an old bicycle. He cut the frame down to size, removed one of the pedals, and shortened the other one to a more useful hand cranking length. The main gear of the bicycle provides a large and sturdy mounting surface for his home-made sanding disk which consists of a large piece of rounded chipboard.

It’s a pretty clever use of recycled parts — but what do you think? Are you environmentally inclined enough to give up your power tools? A full video explanation of the project is after the break.

Continue reading “Bicycle Powered Sander”

A Simple (and Dirty) Bill Of Materials And Stock Management Utility

As many readers may already know, when I’m not featuring your projects or working on the mooltipass I try to make simple things that may be useful to electronics enthusiasts. My latest creation is a simple bill of materials generation tool, which can also do simple stock management. Unfortunately for Linux users, this utility is made using Visual Basic functions in an Excel file.

It works fairly simply: just enter your schematics’ components references in the excel sheet, along with the corresponding Digikey webpage address. Click on the “fetch” button and the script will automatically get all your component characteristics from the internet and tell you the component costs depending on the number of prototypes you want to make. Then click the “sort BoM” button and your BoM will automatically be sorted by component type and value. Another functionality allows you to check that all the components present in your BoM are also present on the (very simple) Kicad generated one. Finally, using another Excel sheet containing your current stock, the Bill of Materials will let you know if you have enough components for the assembly stage. A video of the tool in action is embedded after the break, and you can download the BoM template here (.XLSM file) and the corresponding stock file there (.XLSM file).

Continue reading “A Simple (and Dirty) Bill Of Materials And Stock Management Utility”