Unless you are above a certain age, the only time you may have seen a slide rule (or a slip stick, as we sometimes called them) is in the movies. You might have missed it, but slide rules show up in Titanic, This Island Earth, and Apollo 13. If you are a fan of the original Star Trek, Mr. Spock was seen using Jeppesen CSG-1 and B-1 slide rules in several episodes. But there was a time that it was common to see an engineer with a stick hanging from his belt, instead of a calculator or a cell phone. A Pickett brand slide rule flew to the moon with the astronauts and a K&E made the atomic bomb possible.
Slide rules are a neat piece of math and history. They aren’t prone to destruction by EMP in the upcoming apocalypse (which may or may not include zombies). Like a lot of things in life, when it comes to slide rules bigger is definitely better, but before I tell you about the 5 foot slide rule in my collection, let’s talk about slide rules in general. Continue reading “Slide Rules Were The Original Personal Computers”→
A Complex Programmable Logic Device (CPLD) is a great piece of hardware to have in your repertoire. As its name implies, you can program these chips to serve the logic functions you need. This might be replacing an obsolete chip, or maybe just a way to learn and try different techniques. What better way to learn than to get your hands on a CPLD and give it a try?
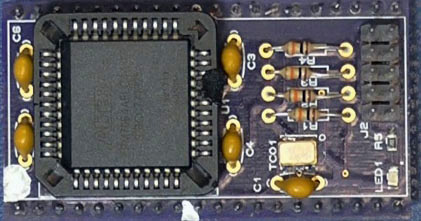
I created a CPLD module with the intent of being able to plug it into lots of things including solderless breadboards, but I screwed up. It seems that the plugin space available on a solderless breadboard is 1.1”, I had made the footprint 1” wide leaving no room for a row of wires on both sides. Duh.
But let me back up and show more about what I’m doing , I wanted to make a programmable piece of logic that could be built as a kit one could easily solder at home, could be programmed in-circuit, and could work at 3.3 or 5 volts.
To implement an easily solderable kit I went with an older CPLD part that also has 3.3v and 5v versions that will maintain its programming regardless of power. The logic itself is a CPLD IC from the Altera Max family with two versions that fit the board with either 32 or 64 macrocells. A macrocell is the basic logic building block and it is programmed with logic “terms” and then interconnected to other macrocells through a programmable interconnect.
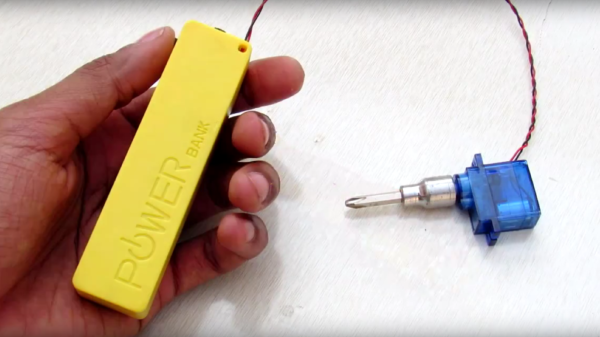
If you have a few hobby servos lying around, here’s a hack that let’s you recycle them and put them to good use. [Kedar Nimbalkar] took a micro servo and converted it into an electric screwdriver. It is simple enough to deserve a short video showing how he did it.
He starts by opening up a 9G micro servo and removing the electronics. All that’s needed is the DC motor and the gears. The two motor wires go directly to the battery via a polarity reversal switch to allow the motor to turn in both directions. The servo horn is cut to size so that it is a tight fit inside the screwdriver socket. A liberal amount of glue is used to make sure it stays in place. The horn is then attached to the modified servo, ready to take interchangeable bits. One last mod before closing up the servo is to convert it to continuous rotation by cutting off the stopper in the drive gear.
He built the power supply from scratch, using a 18650 Li-Po battery, a 5V USB charger, a DPDT switch to allow direction control and a push button to actuate the screw driver. A pair of LED’s connected back to back serve as direction indicators as well as some local illumination.
There’s lot’s of scope to improvise and do everything differently, but the basic premise of using unused servos for a handy electric screwdriver is pretty neat.
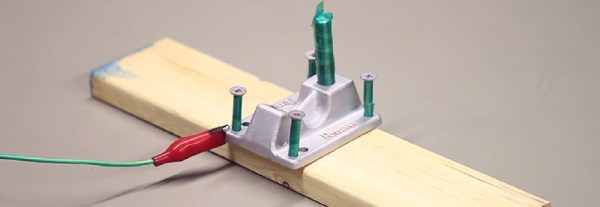
If you don’t yet have a toaster oven you can’t use with food, here’s yet another reason: DIY powder coating. Powder coating is much harder and more durable than paint – a property imbued to it by the fact that it’s baked on to a part. [Thomas] had a go at powder coating some skateboard trucks, and with the right tools, found the process downright easy.
[Thomas] only needed a few things to powder coat his parts, the first and most important being a powder coat gun. A few years ago, Craftsman produced a powder coat gun that’s still available on Amazon and eBay for about $50. Powders are plentiful and cheap in small quantities. The only other tools needed were an N95 or better respirator, some high temperature tape for masking off the part and a toaster oven. If you want to coat big parts, there are DIY oven options for that.
After the part was sandblasted down to bare metal, [Thomas] masked off all the holes and threads of the part with polyimide tape. Any tape that’s capable of withstanding high temperatures will do, and most of us have a roll of Kapton sitting next to a 3D printer, anyway.
The part is coated with powder via an electrostatic charge, and this means attaching a ground lead from the gun to the part. After that, it’s just filling the gun with powder, putting it in the oven set at 450°F, and letting the powder liquefy.
In the video below, you can see [Thomas] sandblasting, powdering, and baking a set of aluminum skateboard trucks using his method. Compared to other methods of finishing metal parts – anodizing or plating, for instance, powder coating is remarkably easy and something anyone can do in a garage.
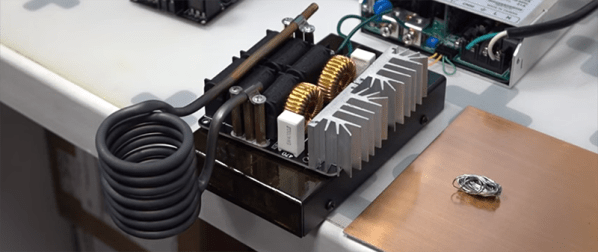
[Proto G] built a small, desktop induction heater that is capable of making small castings, melting small amounts of metal, and functioning as one of the best solder pots we’ve ever seen.
The induction heater is built from a custom Zero Voltage Switching (ZVS) driver and powered by a small 48V, 1000W power supply. While this makes for an exceptionally small induction heater, it’s still very capable. In the video below, it only takes a few seconds to heat a screwdriver up to a temperature that will melt solder.
While an induction heating machine is essentially useless for irons unless you have a few antique, unpowered, blowtorch-powered soldering irons, it does make for a great solder pot. [Proto G] replaced the working coil in his induction heater with litz wire. The actual solder pot is made out of steel conduit wrapped with aerogel-infused fiberglass insulation. Compared to his old solder pot, this machine heats up instantly, and is more than capable of wetting a few wire connections.
The future plan for this inductive heater is to make a few more attachments for different metals, and a [Proto G] has a few aerogel blankets he could use to make some small metal castings.
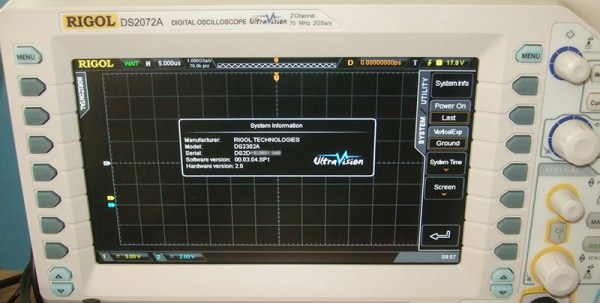
[mosaicmerc] over on hackaday.io has upgraded his Rigol DS2072A oscilloscope to a DS2302A, turning an $800 oscilloscope into one that sells for $2500, with all the bandwidth, storage depth, and options of the more expensive model.
Rigol o-scopes have a long and storied history of unlocking, hacking, and upgrading. The original hack that put Rigol on the map was the DS1052E upgrade that turned a 50MHz scope into a 100MHz scope. The latest low-end Rigol scope, the 1054Z can be unlocked in software to become an 1104Z with 100MHz of bandwidth, SPI, I2C, and RS232 decoders, twice the storage depth, and more triggers. It appears Rigol’s engineers are designing their products to capitalize on the hacker’s proclivity to buy their tools to get the ‘free’ upgrade. This, of course, sounds just slightly insane, but no one seems to mind.
The process of upgrading the Rigol DS2072A scope is documented over on the EEVBlog, and requires only a USB cable and a computer with the Labview Runtime Engine installed. It’s literally as simple as pressing a few buttons; a far cry from the previous keygen method that was also engineered over on the EEVBlog.
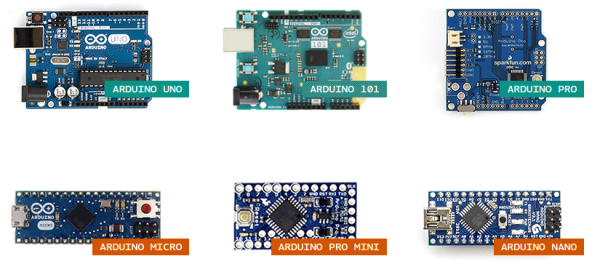
For over ten years, Arduino has held onto its popularity as “that small dev-board aimed to get both artists and electronics enthusiasts excited about physical computing.” Along the way, it’s found a corner in college courses, one-off burning man rigs, and countless projects that have landed here. Without a doubt, the Arduino has a cushy home among hobbyists, but it also lives elsewhere. Arduino lives in engineering design labs as consumer products move from feature iterations into user testing. It’s in the chem labs when scientists need to get some sensor data into their pc in a pinch. Despite the frowns we’ll see when someone blinks an LED with an Arduino and puts it into a project box, Arduino is here to stay. I thought I’d dig a little bit deeper into why both artists and engineers keep revisiting this board so much.
Arduino, do we actually love to hate it?
It’s not unusual for the seasoned engineers to cast some glares towards the latest Arduino-based cat-feeding Kickstarter, shamelessly hiding the actual Arduino board inside that 3D-printed enclosure. Hasty? Sure. Crude, or unpolished? Certainly. Worth selling? Well, that depends on the standards of the consumer. Nevertheless, those exact same critical engineers might also be kicking around ideas for their next Burning Man Persistence-of-Vision LED display–and guess what? It’s got an Arduino for brains! What may seem like hypocrisy is actually perfectly reasonable. In both cases, each designer is using Arduino for what it does best: abstracting away the gritty details so that designs can happen quickly. How? The magic (or not) of hardware abstraction.
Meet HAL, the Hardware-Abstraction Layer
In a world where “we just want to get things blinking,” Arduino has a few nifty out-of-the-box features that get us up-and-running quickly. Sure, development tools are cross-platform. Sure, programming happens over a convenient usb interface. None of these features, however, can rival Arduino’s greatest strength, the Hardware Abstraction Layer (HAL).
A HAL is nothing new in the embedded world, but simply having one can make a world of difference, one that can enable both the artist and the embedded engineer to achieve the same end goal of both quickly and programmatically interacting with the physical world through a microcontroller. In Arduino, the HAL is nothing more than the collection of classes and function calls that overlay on top of the C++ programming language and, in a sense, “turn it into the Arduino programming language” (I know, there is no Arduino Language). If you’re curious as to how these functions are implemented, take a peek at the AVR directory in Arduino’s source code.
With a hardware abstraction layer, we don’t need to know the details about how our program’s function calls translate to various peripherals available on the Uno’s ATMEGA328p chip. We don’t need to know how data was received when Serial.available() is true. We don’t “need to know” if Wire.begin() is using 7-bit addressing or 10-bit addressing for slave devices. The copious amounts of setup needed to make these high-level calls possible is already taken care of for us through the HAL. The result? We save time reading the chip’s datasheet, writing helper functions to enable chip features, and learning about unique characteristics and quirks of our microcontroller if we’re just trying to perform some simple interaction with the physical world.
Cross-Platform Compatibility
Teensy 3.2 keeps form factor but adds on-chip hardware features compared to 3.1
There are some cases where the HAL starts to break down. Maybe the microcontroller doesn’t have the necessary hardware to simultaneously drive 16 servos while polling a serial port and decoding serial data. In some cases, we can solve this issue by switching Arduino platforms. Maybe we actually do need three serial ports instead of one (Teensy 3.2). Maybe we do need pulse-width-modulation (PWM) capability on every pin (Due). Because of the hardware abstraction layer, the rest of the source code can remain mostly unchanged although we may be switching chip architectures and even compilers in the process! Of course, in an environment where developing code for the target platform does matter, it doesn’t make sense to go to such efforts to write the general-purpose code that we see in Arduino, or even use Arduino in the first place if it doesn’t have the necessary features needed for the target end-goal. Nevertheless, for producing an end-to-end solution where “the outcome matters but the road to getting there does not,” writing Arduino code saves time if the target hardware needs to change before getting to that end goal.
HAL’s drawbacks
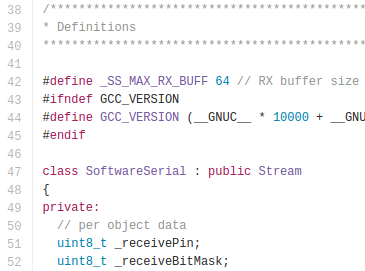
Of course, there’s also a price to pay for such nice things like speedy development-time using the HAL, and sometimes switching platforms won’t fix the problem. First off, reading the Arduino programming language documentation doesn’t tell us anything about the limitations of the hardware it’s running on. What happens, let’s say, if the Serial data keeps arriving but we don’t read it with Serial.read() until hundreds of bytes have been sent across? What happens if we do need to talk to an I2C device that mandates 10-bit addressing? Without reading the original source code, we don’t know the answers to these questions. Second, if we choose to use the functions given to us through the HAL, we’re limited by their implementation, that is, of course, unless we want to change the source code of the core libraries. It turns out that the Serial class implements a 64-byte ring buffer to hold onto the most recently received serial data. Is 64 bytes big enough for our application? Unless we change the core library source code, we’ll have to use their implementation.
Both of the limitations above involve understanding how the original HAL works and than changing it by changing the Arduino core library source code. Despite that freedom, most people don’t customize it! This odd fact is a testament to how well the core libraries were written to suit the needs of their target audience (artists) and, hence, Arduino garnered a large audience of users.
Pros of Bare-Metalspeak
digitalWrite takes a whopping 52-55 cycles to change pin direction! [image source]Are there benefits to invoking the hardware directly? Absolutely. A few curious inquirers before us have measured the max pin-toggling frequency with digitalWrite to be on the order of ~100 KHz while manipulating the hardware directly results in a pin-toggling frequency of about 2 MHz, about 20 times faster. That said, is invoking the hardware directly worth it? Depends, but in many cases where tight timing isn’t a big deal and where the goal of a functional end-to-end system matters more than “how we got there,” then probably not! Of course, there are cases when tight timing does matter and an Arduino won’t make the cut, but in that case, it’s a job for the embedded engineer.
Use the HAL, Luke!
To achieve an end-to-end solution where the process of “how we got there” matters not, Arduino shines for many simple scenarios. Keep in mind that while the HAL keeps us from knowing too many details about our microcontroller that we’d otherwise find in the datasheet, I don’t proclaim that everyone throw out their datasheets from here on out. I am, however, a proponent of “knowing no more than you need to know to get the job done well.” If I’m trying to log some sensor data to a PC, and I discover I’ll be saving a few days reading a datasheet and configuring an SPI port because someone already wrote SPI.begin(), I’ll take an Arduino, please.
If you’ve rolled up your sleeves and pulled out an Arduino as your first option at work, we’d love to hear what uses you’ve come up with beyond the occasional side-project. Let us know in the comments below.


 It’s not unusual for the seasoned engineers to cast some glares towards the latest Arduino-based cat-feeding Kickstarter, shamelessly hiding the actual Arduino board inside that 3D-printed enclosure. Hasty? Sure. Crude, or unpolished? Certainly. Worth selling? Well, that depends on the standards of the consumer. Nevertheless, those exact same critical engineers might also be kicking around ideas for their next Burning Man Persistence-of-Vision LED display–and guess what? It’s got an Arduino for brains! What may seem like hypocrisy is actually perfectly reasonable. In both cases, each designer is using Arduino for what it does best: abstracting away the gritty details so that designs can happen quickly. How? The magic (or not) of hardware abstraction.
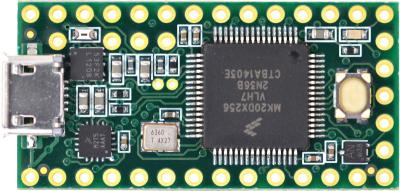
 Of course, there’s also a price to pay for such nice things like speedy development-time using the HAL, and sometimes switching platforms won’t fix the problem. First off, reading the Arduino programming language documentation doesn’t tell us anything about the limitations of the hardware it’s running on. What happens, let’s say, if the Serial data keeps arriving but we don’t read it with Serial.read() until hundreds of bytes have been sent across? What happens if we do need to talk to an I2C device that mandates 10-bit addressing? Without reading the original source code, we don’t know the answers to these questions. Second, if we choose to use the functions given to us through the HAL, we’re limited by their implementation, that is, of course, unless we want to change the source code of the core libraries. It turns out that the Serial class implements a 64-byte ring buffer to hold onto the most recently received serial data. Is 64 bytes big enough for our application? Unless we change the core library source code, we’ll have to use their implementation.
![digitalWrite takes a whopping 52-55 cycles to change pin direction! [image source]](https://hackaday.com/wp-content/uploads/2015/10/arduino-digital-write-pin-toggle.jpg?w=400)


