Big Head Costume Would Make Max Headroom Jealous

big-head-halloween

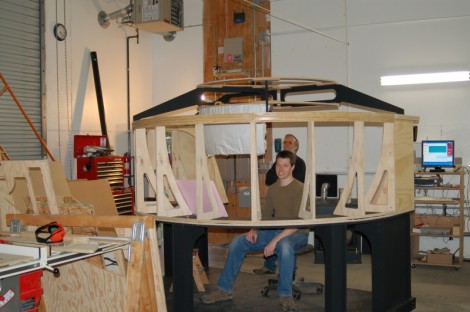
[Dan Rosenfeld] does a lot of thinking in his spare time, and one thing he returns to pretty often is videoconferencing. He’s often wondered why it hasn’t caught on enough to become a ubiquitous piece of technology, and his examination of the topic in regards to eye contact and spatial awareness inspired him to create a very unique Halloween costume.

His “Big Head” costume consists of a front-mounted 24” LCD panel that displays the wearer’s face in real time. Inside the large headpiece [Dan] installed a microphone, another LCD screen, a half silvered mirror, and a video camera – not to mention all of the power-related goodies required to keep it running. While the main LCD displays his face, the internal monitor is fed by an externally mounted camera that shows him everything going on outside the box. This image is reflected off the half silvered mirror, allowing him to gaze directly at the camera, while also seeing what’s going on in front of him.

As you can see in the video below, the effect is pretty cool, and devoid of the ‘disconnected’ look most people have when talking to others via a camera and computer screen.

Continue reading “Big Head Costume Would Make Max Headroom Jealous”

Video: Analog To Digital Conversion On The ATmega328p

In this week’s video, we continue on where we left off last week with another in our series of videos where we discuss how to program for the ATmega328p processor. This week, [Jack] takes a look at the analog to digital converter and takes us through how to set things up and then how to perform a conversion using the potentiometer on the 3pi as the analog source. Playing with potentiometers isn’t the most interesting thing in the world, but after watching this video, you will be able to do things like take light readings using a cadmium sulfide cell, read the weight applied to a sensor, calculate the temperature from a resistor and a thermistor, or interface with an analog gyroscope.

If you have missed our previous videos, here are some links:
Part 1: Setting up the development environment
Part 2: Basic I/O
Part 3: Pulse Width Modulation

Stay tuned for next week’s* video where we will take a look at how to interface with the 3pi’s line sensors.

Video is after the break…

* HAD is in the process of moving our secret headquarters so next week’s video may come some time later than next week.

Continue reading “Video: Analog To Digital Conversion On The ATmega328p”

Interactive Digital Fireplace Is Great For Those Chilly Winter Evenings

video-fireplace

We’ve all seen them – those fireplace DVDs that seem to pop up on grocery store endcaps and get traded in white elephant gift exchanges. If you don’t happen to have a fireplace in your home they might make a reasonable solution, but [Nick] from the Gadget Gangster thought it would be far better if you could create your own interactive digital fireplace instead.

Using the Gadget Gangster Propeller USB platform and ProtoPlus board, his fireplace merges various video segments together based on user input, and plays them on any TV that comes equipped with RCA jacks. The process is fairly straightforward, and involves wiring up switches along with audio and video output to the Propeller board via the ProtoPlus board. The remainder of the work is done using software, requiring the user to select and encode video segments for storage on an SD card. [Nick] does however provide a whole set of clips for download, should you want to take the quicker route.

After encoding and categorizing the video clips to coincide with the “stoke” and “add wood” user input buttons, the Propeller does the rest of the work, randomly selecting clips from the appropriate category when requested.

The result is admittedly a bit Lo-Fi, though we thinks it’s cool and prefer to call it “retro” instead. It might not be a Hi-Def fireplace recording, but it’s far nicer to snuggle up to a hand made fireplace rather than a DVD you picked up as an afterthought.

Continue reading to see a quick demo video of the digital fireplace in action.

Continue reading “Interactive Digital Fireplace Is Great For Those Chilly Winter Evenings”

Synthesizing Sound With A Light Sensitive Pen And CRT Television

Here’s the latest project from [Niklas Roy’s] workshop. Lumenoise is an audio synthesizer controlled by drawing with a light-sensitive pen on a CRT television.

The pen is a self-contained module which connects to the TV via audio and composite video RCA plugs. Inside the clear pen housing you’ll find a microcontroller which generates the audio and video. The business end of the pen contains a phototransistor which lets the ATmega8 take a reading from the video screen. Since the chip is generating that video signal, it’s possible to calculate the pen tip’s position on the screen and modulate the sound output based on that data. You can watch a recording of the results in the video after the break.

This is a very simple circuit to build, and [Niklas] makes the point that most of us have a CRT hanging around in a dark corner somewhere. We think this would be a fantastic soldering project to do with the kids, and that this would be right at home as a children’s museum piece because of the wow factor involved in playing around with it.

We can really tell from this and some of his past projects that [Niklas] just loves the 8-bit audio.

Continue reading “Synthesizing Sound With A Light Sensitive Pen And CRT Television”

Video: PWM On The ATmega328p

This week we continue on with another video in our series about how to program for the ATmega328p processor using C. The ATmega328p is at the heart of many Arduino boards. If you have been using them but want to add some more horsepower to your projects, this series of videos is for you. In this video, [Jack] talks about various types of pulse width modulation (PWM). You can use PWM to control the speed of a motor, the brightness of a LED, or to generate analog waveforms. [Jack] shows how to set up the processor to do locked anti-phase PWM to drive the wheels of the 3pi robot and then demos a short program that shows the code in action.

If you missed the previous posts in this series and would like to check them out…
Intro and how to set up the development environment : Click Here
Working with I/O pins: Click Here

Video is after the break…
Continue reading “Video: PWM On The ATmega328p”

Using An LCD’s Poor Viewing Angle To Your Advantage

Early LCD monitors had some pretty awful issues when not viewed from directly in front of the screen. These days the technology has really minimized this flaw, but if you still have a cheap monitor on hand you might want to pull it out and give this hack a try. [Chris Harrison] is using oblique viewing angles to display additional information on cheap montiors.

Take a look at the two images above. The one on the left is taken from directly in front of the monitor and looks normal. But if you view the same screen from the side, the financial information is obscured. This is by design. Using very light colors, the obscuring characters are almost indiscernible from straight on, but you can just see them there a little bit (they look like burn-in does on a CRT screen). But from the side, these light colors become quite bold and blend with the rest of the data on the screen.

This works because of the polarizing filters on an LCD screen. You might want to watch [Bill Hammack] explain how an LCD works if you’re not familiar. Because the viewing angle color changes are a flaw and not a feature, manufacturers make the up-and-down angles the worst to improve on side-to-side viewing. [Chris’] experiments play into that by using a computer monitor on its side. Check out the video after the break to see some of the different applications that he uses this for.

Continue reading “Using An LCD’s Poor Viewing Angle To Your Advantage”

Video: Performing I/O With The ATmega328p

Today we continue on with part 2 of our series where [Jack] shows how to program for the ATmega328p processor using the Pololu 3pi robot. In this video, he starts to dig deeper than last week’s video by showing you how to program in C so that you are directly reading inputs and directly sending data to outputs. Specifically, this video shows how to set up your I/O pins and then how to interface with LEDs, buttons, and a beeper.

There were a few comments on last week’s video about not wanting to buy a 3pi robot to learn on. That’s fine. For this series there really is no reason that you need to use the 3pi robot. We picked it because it is a great device to learn about the ATmega processors since it has so many things that you can play around with to get your feet wet but there really is no reason that you couldn’t wire up a DIP version on a perfboard and still follow along with these videos. In fact, if you have a good writeup about the cheapest possible way to get started with the ATmega series of processors, we’d love to hear about it.

Looking for part 1 of this series? [Click Here]

Video is after the break.
Continue reading “Video: Performing I/O With The ATmega328p”