NASA is going back to the Moon! We’ll follow the crew of Artemis II every step of the way.
Continue reading “Following Artemis II’s Journey Around The Moon”

NASA is going back to the Moon! We’ll follow the crew of Artemis II every step of the way.
Continue reading “Following Artemis II’s Journey Around The Moon”

From outer space to down here on Earth, there are many places where ionizing radiation levels are high enough that they effectively bar access for humans, but also make life miserable for anything containing semiconductor technology. This is especially true for anything involving wireless communications, such as Wi-Fi. However, recently Japanese researchers have created a Wi-Fi chip that is claimed to be so radiation-hardened that it can be used even in gamma ray-rich environments, such as in the worst contaminated depths of the Fukushima Daiichi nuclear reactor.
The indicated dose exposure of 500 kilograys that the chip survived during testing is quite significant. A single gray (Gy) is the absorption of one joule of energy per kilogram of matter. In radiation therapy, a solid epithelial tumor can receive as much as 60 to 80 Gy in a single dose, for example.
Continue reading “Exposing A Radiation-Hardened 2.4 GHz Wi-Fi Receiver To 500 Kilograys”

Today, fireplaces, their cozy glow once a household staple, are mostly a thing of the past. In fact, a decent amount of old fireplaces are completely blocked up! [David Capper] brings back the atmosphere without the actual flames, with his RP2040-based fireplace glow simulator.
It’s not just a string of LEDs with some PWM brightness control, either. No, [David] goes into detail about the black body radiation that gives these fires their colors. He then uses the theory of black-body radiation to determine the colors that the LEDs glow to simulate the colors of a real fire.
But the colors alone don’t make for a good simulated fire, so [David] adds the heat equation. It starts with a grid wherein each cell has a temperature. Over time, cells are randomly selected to have heat added to them (increasing the cell’s temperature), then he applies the heat equation to diffuse and decay the heat within the grid for a nice simulated crackling fire. Add in a custom PCB and a nice little 3D-printed case and you’re ready for a cozy hacker time.

This week, Hackaday’s Elliot Williams and Kristina Panos met up over assorted beverages to bring you the latest news, mystery sound results show, and of course, a big bunch of hacks from the previous seven days or so.
 In the news, there’s quite a bit to talk about. Regarding Hackaday Europe, you can rest assured that the talks will be announced soon. The Green-Powered Challenge is still underway, and we need your entry to truly make it a contest. You have until April 24th to enter, so show us what you can do with power you scrounge up from the environment!
As usual, we published a handful of April Fool’s posts, which you may or may not find amusing. And finally — no fooling — our own Tom Nardi wrote up the Artemis moon launch, and is going to update the post every day until the mission ends.
On What’s That Sound, we can score one for Kristina, which brings her record to approximately three wins and sixty-eight losses. She knew without a doubt that the dialogue was from the Day the Earth Stood Still (1951). Oh, what? There was a remake in 2008? Kristina should get bonus points, then.
After that, it’s on to the hacks, beginning with the basics of making clean enclosures that are decidedly not 3D-printed, a couple of sweet lo-fi cameras, and a nice way to tame the tape when it comes to SMT parts. We also discuss a clock that marks time in a mathematical way, watch an electro-permanent magnet in action, and improving soda by turning it into mead. Finally, we discuss the solar balconies taking Europe by storm, and Copilot’s terrifying terms of service.
Check out the links below if you want to follow along, and as always, tell us what you think about this episode in the comments!
Download in DRM-free MP3 and savor at your leisure.
Continue reading “Hackaday Podcast Episode 364: Clocks, Cameras, And Free Will”

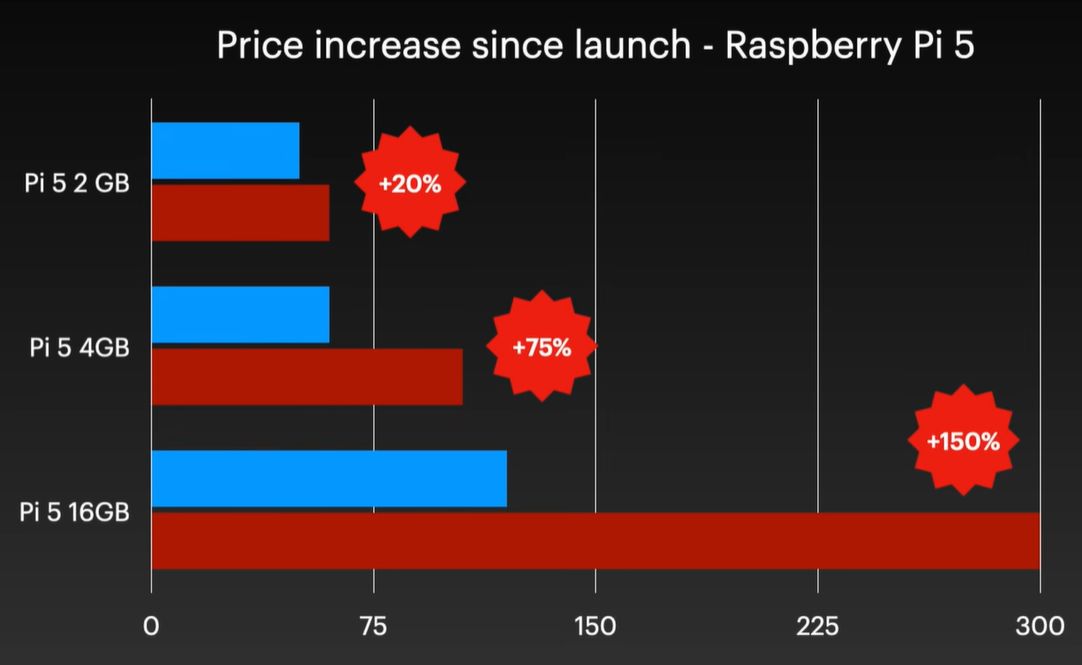
Although easily dismissed by some as another cruel April Fools joke, Raspberry Pi’s announcement of a new 3 GB model of the Raspberry Pi 4 along with (more) price increases for other models was no joke. Courtesy of the ongoing RAMpocalypse, supplies of LPDDR4 and LPDDR5 are massively affected, leading to this new RPi 4 model with two 1.5 GB LPDDR4 chips, as these are apparently cheaper to source.
Affected in this latest price increase across RP’s product range are RPi 4 and 5 models with 4 or more GB of RAM, with price bumps ranging from $25 on the low end to $150 for the Raspberry Pi 500+. If you wanted a Raspberry Pi 5 with 16 GB of RAM, you’re now paying $300 for the privilege.
Obviously, this news has got people like [Jeff Geerling] rather down in the dumps, essentially stating that using SBCs like the RPi is now beyond the means of many hobbyists. While you can still use SBCs that use e.g. LPDDR2 RAM, such as the older RPi Zero, 2 and 3 models, [Jeff] himself is now moving more towards wrangling with snakes on MCUs, as these boards are so far not significantly affected in terms of price.
With current projections in the RAM market being that this year will still see more price increases, it remains hard to tell exactly how ‘temporary’ this situation will be. That said, using readily available, powerful and cheap MCUs like the ESP32 variants for projects isn’t a bad idea if you really don’t need to be running more than perhaps FreeRTOS.
Continue reading “The Raspberry Pi 4 With 3 GB RAM Is No Joke”

Anyone who has ever played Nintendo 64 games is probably familiar with the ways that large worlds in these games got split up, with many loading zones. Another noticeable aspect is that of the limited drawing distance, which is why even a large open area such as in Ocarina of Time‘s Hyrule Field has many features that limit how far you can actually see, such as hills and a big farming homestead in the center. Yet as [James Lambert] demonstrates in a recent video, it’s actually possible to create an open world on the N64, including large drawing distances.
As explained in the video, the drawing distance is something that the developer controls, and thus may want to restrict to hit certain performance goals. In effect he developer sets where the far clipping plane is set, beyond which items are no longer rendered. Of course, there are issues with just ramping up the distance to the far clipping plane, as the N64 only has a 15-bit Z-buffer, after which you get ‘Z fighting’, where render order becomes an issue as it’s no longer clear what is in front of what.
One fix is to push the near clipping plane further away from the player, but this comes with its own share of issues. Ergo [James] fixed it by doing two render passes: first all the far-away objects with Z-buffer disabled, and then all the nearby objects. These far-away objects can be rendered back-to-front with low level-of-detail (LoD), so this is relatively fast and also saves a lot of RAM, as the N64 is scraping by in this department at the best of times.
In the video the full details of this rendering approach, as well as a new fog rendering method, are explained, with the code and such available on GitHub for those who wish to tinker with it themselves. [James] and friends intend to develop a full game using this engine as well, so that’s definitely something to look forward to.
Continue reading “Writing An Open-World Engine For The Nintendo 64”

If you have a 12 VDC power system, like the battery of a PV solar system or car, would it be more efficient to boil water for that cup of tea with that 12V straight from the battery, or use a 240 VAC mains kettle via a ~90% efficient inverter instead? That’s the question that [Cahn] decided to answer experimentally, using a bulky 3 kW inverter and a collection of electric kettles.
Although the used amount of 500 mL of water is boiled much faster in the 2,200 Watt mains kettle than in the 150 and 350 Watt low-voltage kettles, this obvious difference is somewhat irrelevant if you’re only concerned with efficiency. To measure the power used a Victron smart shunt was used with each run, keeping in mind that a perfect efficiency for heating 500 mL from room temperature to boiling is around 43-44 Wh.
With two runs per kettle, the 240 VAC kettle used 65-70 Wh. The first ‘150 Watt’ kettle pulled nearly 200 Watt to boil the water after about 20 minutes, using 62-64 Wh. The second ‘150 Watt’ kettle pulled around 180 Watt, took 23-25 minutes and used 68-74 Wh. Finally, the ‘350 Watt’ kettle drew over 420 Watt and used 50-56 Wh in just over 8 minutes.
Continue reading “Comparing The Power Usage Of 12 VDC And 240 VAC Kettles”

We’re used to electronic parts of the same type staying predictably the same, sometimes over many years. An early Z80 from the mid 1970s can be exchanged with one from the end of production a few years ago, for example. This week, we’ve had DMs from several readers who’ve found that this is not always the case, and the culprit is surprising. Espressif has released a new revision of their P4 application processor, and though it’s ostensibly the same, there are a couple of changes that have been catching people out.
The changes lie in both hardware and software, in that there’s a pin that’s changed from NC to a power rail, a few extra passives are needed, and firmware must be compiled separately for either revision. The problem is that they are being sold as the same device and appear in some places under the same SKU! This is leading to uncertainty as to which P4 revision is in stock at wholesalers. We’ve been told about boards designed for the old revision being assembled with the new one, a situation difficult to rework your way out of. Designers are also left uncertain as to which firmware build is needed for boards assembled in remote factories.
The ESP32-P4 is an impressive part for its price, and we’re sure that we’ll be seeing plenty of projects using this new revision over the coming years. We’re surprised that it doesn’t have a different enough part number and that the wholesalers have seemingly been caught napping by the change. We’re told that some of the well-known Chinese assembly houses are now carrying the two chips as separate SKUs, but that’s scant consolation for a designer with a pile of boards carrying the wrong part. If you’re working with the P4, watch out, make sure your board is designed for the latest revision, and ask your supplier to check which chips you’ll get.
If the P4 is new to you, we’ve already seen a few projects using it.


