However you sell your kits online, you’ll have to find a means of shipping them to the customer. For an online operation this unseen part of the offering is more important than any other when it comes to customer satisfaction, yet so many large players get it so wrong.
This is the final article in a series looking on the process of creating and selling a commercial kit from a personal electronic project (read all the posts in this series). We’ve looked at the market, assembling the kit and its instructions, and how to set up an online sales channel. In this part we’ll look at what happens when you’ve made the sale, how to get it safely to the customer and how to keep the customer happy after the sale by offering support for your products. We’ll also give a nod to marketing your site, ensuring a fresh supply of customers.
This article is the fifth in a series looking at the process of bringing an electronic kit to market from a personal project. We’ve looked at market research, we’ve discussed making a product from your project and writing the best instructions possible before stuffing your first kits ready for sale. In this article we’ll tackle the different means of putting your kits out there for sale.
Given a box of ready-to-sell kits, what next? You have to find some means of selling them, getting them in front of your customer, making the sale, sending them to the purchaser, and safely collecting their money. A few years ago this was an expensive and risky process involving adverts in print magazines and a lot of waiting, but we are fortunate. The Internet has delivered us all the tools we need to market and sell a product like an electronic kit, and in a way that needn’t cost a fortune. We’ll now run through a few of those options for selling your kits, before looking at shipping, marketing, and post-sales support in the final article in the series.
If you had made it this far in your journey from project to kit, you would now have a box of electronic components, a pile of printed instructions, and a box of plastic bags, thin card boxes, or whatever other retail packaging you have chosen for your kit. You are ready to start stuffing kits.
It’s All In The Presentation
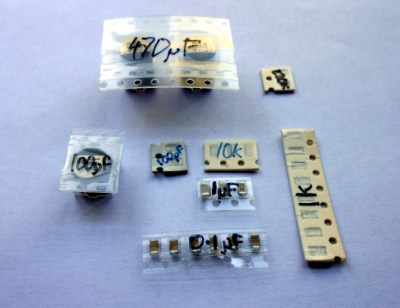
Label all your hard-to-identify components, your customers will appreciate it.
Your priorities when stuffing a kit are to ensure that your customer receives all the components they should, they can easily identify each component, and that the whole kit is attractively presented such that it invites them to buy or build it when they first see it. This starts before you have packed any components, you must carefully prepare each component into units of the required number and label them if they are otherwise not easy to identify. Pre-cut any components supplied on tape, and write the part number or value on the tape if it is not easily readable. You may even have to package up some difficult-to-identify components in individual labeled bags if they can not have their values written on them, though this incurs an extra expense of little bags and stickers. Some manufacturers will insist on using black tape on which an indelible pen doesn’t show up!
Take care cutting tapes of components, it is sometimes easy to damage their pins. Always cut the tape from the bottom rather than the side with the peelable film, and if necessary carefully bend the tape slightly to open up the gap between components for your scissors.
If you start by deciding how many kits you want to stuff in a sitting, list all the kit components and prepare that number of each of them in the way we’ve described. Then take the required number of packages or bags, and work through each component on the list, stuffing all the bags with one component before starting again moving onto the next. In time you will have a pile of stuffed kits ready to receive their instructions and labeling.
The next step will be to fold your instruction leaflet and pack it in the kit. Take a moment to consider how it can be most attractively presented. For example with a kit packaged in a click-seal plastic bag it makes sense to fold the leaflet such that the colour photo of a completed kit is visible from the front. And when you place it in the bag make sure that the PCB is visible top-outwards in front of it. A customer looking at your kit wants to immediately see what they are likely to create with it.
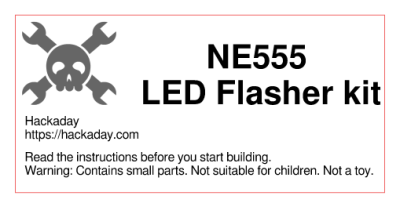
You can now seal the bag or box, the kit is packed. It only remains to give it a label that has all the pertinent information and is attractive to the customer. You will probably want to put your logo or web address on the label as well as any small print required, alongside the most important feature — the kit description. We’ve put a warning about small parts and curious children, you may also want to put any reglatory or compliance information here. For example in Europe you might have a CE mark and a WEEE logo. Once you have your design sorted you can run it up in your favourite label designing software – we used gLabels – and print as many as you like on sheets of sticky labels. We strongly suggest buying good quality branded labels, the extra money is well worth it when you consider that they will have much more reliable glue, and the extra cost per individual kit will be marginal. Pick a label size which fills a decent space and is easy to read on your packaging without being too big, we used 70mm x 37mm laser labels of which 24 can be had on a single sheet.
Your First Finished Product
If Hackaday made electronic kits, they might look a little like this.
It’s an exciting moment when you apply a label to your first fully packed kit and see for the first time what your customers will see: a finished product. You aren’t quite done though, because there is still the small matter of quality control. Take a kit or two from your batch at random, and count all their contents off against your list of what they should contain. This should help you ensure you are packing the kits correctly. Finally, give a completed kit to a friend who has never seen it before, and tell them to build it as a final piece of quality control. They are simulating your customer in every way, if they have no problems then neither should anyone who buys the kit.
Once you’ve built your batch of kits, you will now have the stock you will send out to your customers. Imagine yourself as a customer, if you order a kit you will expect it to arrive in pristine condition. You should therefore now take care of this stock of kits to ensure that it does not come to any harm, its packaging is as crisp and new when you send it out as when you packed it, and it has not attracted any dust while in storage. We would suggest having a separate plastic box for the stock of each kit in your range, and protecting the kits from dust with a lid, or by storing them inside a larger plastic bag.
As we’ve worked through this series of articles, we’ve tried to give you a flavour of the process of bringing an electronic kit from a personal project to the masses. We’ve looked at learning about the market for your kit, we’ve discussed turning a project into a product before writing the best instructions possible and now stuffing your first kits ready for sale. In the next article in the series we’ll talk about how you might sell your products, the different choices open to you for online shops, marketplaces, and crowdfunding.
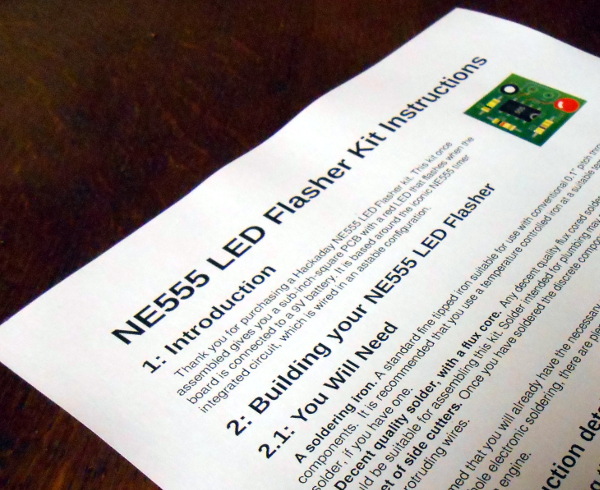
A printed copy of the instructions for our example kit
We’ve had two previous articles in this series on turning a personal electronic project into a saleable kit, in which we’ve examined the kit market in a broader context for a new entrant, and gone on to take a look at the process of assembling the hardware required to create a product. We’ve used an NE555 LED flasher as a simple example , from which we’ve gone through the exercise of setting a cost of production and therefore a retail price.
The remaining task required to complete our kit production is to write the documentation that will accompany it. These will be the instructions from which your customers will build the kit, and their success and any other customers they may send your way will hang on their quality. So many otherwise flawless kits get this part of the offering so wrong, so for a kit manufacturer it represents an easy win into which to put some effort. Continue reading “From Project To Kit: Instructions Are Everything”→
In the previous article in this series on making a personal electronic project into a saleable kit, we looked at the broader picture of the kit market for a new entrant, the importance of gauging whether or not your proposed kit has a viable niche and ensuring that it has a good combination of buildability, instructions, and quality. In this article we will look at specifying and pricing the hardware side of a kit, illustrating in detail with an example project. The project we’ve chosen is a simple NE555 LED flasher which we haven’t built and have no intention of assembling into a kit for real, however it provides a handy reference project without the circuit itself having any special considerations which might distract from the job at hand.
Many of us have enjoyed building electronic projects that come not from our own inspiration or ingenuity but from a ready-made kit. It makes sense, after all in buying a kit you should receive a tried-and-tested design that you can assemble without some of the heartache associated with getting a self-designed project right. And though in recent years the barriers to entry into the professional PCB market for small projects have lowered significantly, there is still an attraction to a kit that comes with a decent PCB and case.
The kit version of the Sinclair ZX81 microcomputer. By Smaddison (Own work) [CC BY-SA 3.0], via Wikimedia Commons.If you start your electronic odyssey through kit-building, you gain more than a set of electronic projects. You learn about the circuits you build, and you gain a feel for how a well-designed project should go together. Eventually this feeds into your own projects, and in time you are producing builds that equal or surpass those you can buy as kits.
From the point of having a nicely executed project to that of wondering whether it too could be sold as a kit is not a huge step. This is the first of a series of articles that will examine the kit manufacturing process from project to customer, and will with luck deliver some insight to those of you who have always wondered whether you could make it as a kit vendor.


 You can now seal the bag or box, the kit is packed. It only remains to give it a label that has all the pertinent information and is attractive to the customer. You will probably want to put your logo or web address on the label as well as any small print required, alongside the most important feature — the kit description. We’ve put a warning about small parts and curious children, you may also want to put any reglatory or compliance information here. For example in Europe you might have a CE mark and a WEEE logo. Once you have your design sorted you can run it up in your favourite label designing software – we used
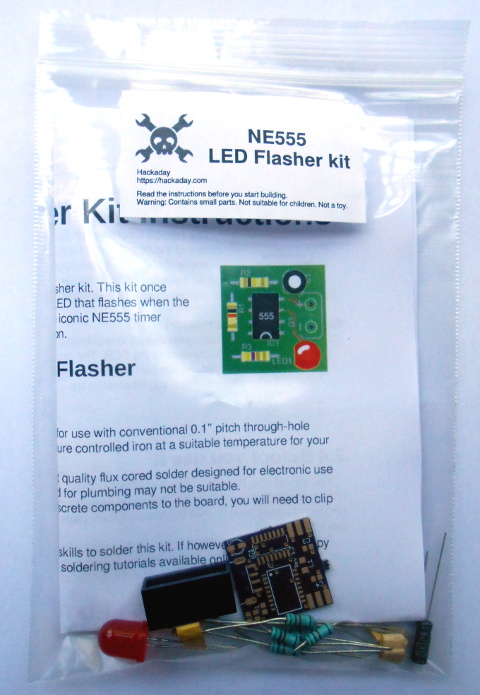


![The kit version of the Sinclair ZX81 microcomputer. By Smaddison (Own work) [CC BY-SA 3.0], via Wikimedia Commons.](https://hackaday.com/wp-content/uploads/2016/07/636px-zx81_kit.jpg)


