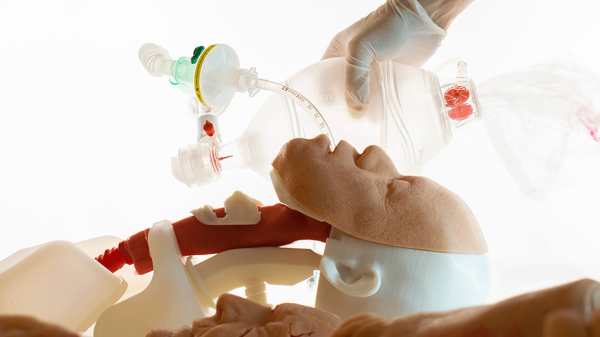
3D Printing Fabrics Is Easier Than You Think

Conventional textiles made of woven threads are highly useful materials. [Sara Alvarez] has had some success creating fabric-like materials through 3D printing, and though they’re not identical, they have some similar properties that make them unique and useful.

Fabrics are made by the weaving or knitting together many threads into a cohesive whole. [Sara]’s 3D-printed fabrics are different, since the printer can’t readily weave individual fibers together. Instead, a variety of methods are used to create similar materials.

The simplest is perhaps the chainmail method, where many small individual links join together to make a relatively rigid material. Alternatively, G-code or careful modelling can be used to create fabric-like patterns, which are printed directly in flexible material to become a fabric-like sheet. Finally, the infill method takes advantage of code inbuilt to a slicer to create a pattern that can be 3D-printed to create a fabric like material by removing the top and bottom layers of the print.

[Sara] demonstrates creating a simple “fabric” swatch using the slicer method, and demonstrates the qualities of the finished product. She also shows off various applications that can take advantage of this technique.

If you’re a 3D-printing enthusiast who also loves making clothes and apparel, consider printing up some shoes – like these we’ve seen before. Video after the break. Continue reading “3D Printing Fabrics Is Easier Than You Think”

3D Printing Hack Leverages Vase Mode Structurally

Conceptually, FDM 3D printing is quite a simple process: you define a set of volumes in 3D space, then the slicing software takes a cut through the model at ever-increasing heights, works out where the inner and outer walls are, and then fills in the inside volume sparsely in order to tie the walls together and support the top layers that are added at the end.

But as you will find quite quickly, when models get larger and more complex, printing times can quickly explode. One trick for large models with simple shapes but very low structural needs is to use so-called ‘vase mode’, which traces the outline of the object in a thin, vertical spiral. But this is a weak construction scheme and allows only limited modelling complexity. With that in mind, here’s [Ben Eadie] with a kind-of halfway house technique (video, embedded below) that some might find useful for saving on printing time and material.

This solid shape is mostly cut-through to make supporting ribs between the walls of the shell

The idea is to use vase mode printing, but by manipulating the shell of the model, adding partially cut-through slots around the perimeter, and critically, adding one slot that goes all the way.

First you need a model that has an inner shell that follows the approximate shape of the outer, which you could produce by hollowing out a solid, leaving a little thickness. By making the slot width equal to half the thickness of the nozzle size and stopping the slots the same distance from the outer shell, vase mode can be used to trace the outline of shape, complete with supporting ribs in between the inner and outer walls of the shell.

Because the slot is narrower than the extrudate, the slot walls will merge together into one solid rib, tying the objects’ walls to each other, but critically, still allowing it to be printed in a continuous spiral without any traditional infill. It’s an interesting idea, that could have some merit.

There are other ways to stiffen up thing printed parts, such as using surface textures, But if you’re fine with the thin shell, but want to have a little fun with it, you can hack the g-code to make some really interesting shapes.

Continue reading “3D Printing Hack Leverages Vase Mode Structurally”

Open Database Shares Resin 3D Printing Settings

3D printing is much like CNC milling or welding or just about any physical manufacturing process, in that good results fundamentally come down to having the right settings. In an effort to aid those working in the resin printing space, [Adam Bute] has put together a community database of resin printing settings.

The site has sections relevant to a variety of resin 3D printers, sorted by manufacturer. Those eager to find the right settings for their given resin and printer merely need to click through and look up the appropriate data. The settings are crowdsourced, provided by manufacturers, community members, and users of [Adam]’s Maker Trainer website.

While it’s still important to run validation tests on a resin printer to get the best results, having a community-sourced list of settings can help users get up and running much more quickly than they otherwise might. It appears that community contributions can’t directly be made yet, but we suspect such a feature is in the works.

We’ve seen similar material databases before for melty-plastic printers, and those have proven to be valuable to the community. We’re sure this resin database will be received in much the same way. If you know about other great resources for printing tips and tricks, do drop us a line!

3D Print Finishing By Spraying Glazing Putty

Finishing off 3D prints is a labour-intensive process, and getting a good looking, smooth surface suitable for painting takes a lot of time and plenty of practice. Deeper printing layer lines or minor surface defects can be smoother over with a variety of materials, from putties to resins, but the deeper the defect, the thicker the filler and that takes it toll on the surface details – smoothing those out and making fine details less distinct. [Darkwing dad] has another solution that looks pretty easy to achieve, by mixing acetone with glazing putty it can be airbrushed over the print surface in one go. After a little experimentation with the ratio of putty to acetone, a wide open nozzle and a low pressure, it was found that a nice even spray could be achieved. Importantly it dries in just a few minutes, enabling multiple coats to be applied in a short space of time.

Once sufficient thickness has been applied, the coating can easily sanded to get a smooth result with the worst of the gaps filled, and the layer lines nicely hidden. The final part of the filling process is more typical, with a few coats of filler primer applied straight from a rattle can, followed by a light sand and you’re good for painting.

We’ve covered smoothing 3D prints practically as long as we’ve been covering 3D printing itself, and there are multiple ways to do this, depending on the filament material, your budget and you tolerance for noxious fumes. Here’s a guide for smoothing using UV curable resins, using a special smoothable filament with IPA, and finally if this is just too fancy, smelly or expensive, just whip out the old butane torch and smooth those prints with good old fashioned fire.

Continue reading “3D Print Finishing By Spraying Glazing Putty”

bolt with maze threads

Maze Bolt Toy By Lost PLA Casting

Maze bolts, a bolt which has a maze along its shaft traversed by a pin on its nut, are great fun. Here’s a really beautiful metal version by [Robinson Foundry], made by a process more makers should know about – lost PLA casting.

His basic method is to 3D print in PLA, and then use more or less the same process as lost wax casting.

He 3D printed the part, along with the sprues and risers that go along with casting, in PLA, then dipped the parts in slurry ten (10) times.  He heated in a kiln to 500°F (260°C), the PLA melted and ran out or burned away. With the PLA gone, after repairing a few cracks, he raised the temperature to 1500°F (815°C) and vitrified the slurry into a ceramic. He now had molds.

The nut is bronze. The bolt is aluminum.  He poured the metal with the molds hot, held in heated sand, so the metal can flow into all the small details. The rest of the project is just cleanup, but we learned that you can vary the finish produced by glass bead blasting just by varying the air pressure.

A great demo of a useful technique and a fun toy at the end.

We covered a great technique for doing lost PLA casting using a microwave.

Continue reading “Maze Bolt Toy By Lost PLA Casting”

A Universal, Non-planar Slicer For 3D Printing Is Worth Thinking About

One may think that when it comes to 3D printing, slicing software is pretty much a solved problem. Take a 3D model, slice it into flat layers equal to layer height, and make a toolpath so the nozzle can create those layers one at a time. However, as 3D printing becomes more complex and capable, this “flat planar slicing” approach will eventually become a limitation because a series of flat slices won’t necessarily the best way to treat all objects (nor all materials or toolheads, for that matter.)

How a 20 mm cube looks when sliced in a cone-shaped plane.

[René K. Müller] works to re-imagine slicing itself, and shows off the results of slicing 3D models using non-planar geometries. There are loads of pictures of a 20 mm cube being sliced with a variety of different geometries, so be sure to give it a look. There’s a video embedded below the page break that covers the main points.

It’s all forward-thinking stuff, and [René] certainly makes some compelling points in favor of a need for universal slicing; a system capable of handling any geometry, with the freedom to process along any path or direction. This is a concept that raises other interesting questions, too. For example, when slicing a 20 mm cube with non-planar geometries, the resulting slices often look strange. What’s the best way to create a toolpath for such a slice? After all, some slicing geometries are clearly better for the object, but can’t be accommodated by normal hot ends (that’s where a rotating, tilted nozzle comes in.)

Such worries may not be an issue for most users at the moment, but it’s worth trying to get ahead of the curve on something like this. And lest anyone think that non-planar slicing has no practical purpose, we previously covered [René]’s demonstration of how non-planar slicing can reliably create 90° overhangs with no supports.

Continue reading “A Universal, Non-planar Slicer For 3D Printing Is Worth Thinking About”

Car Hacker Hacks Lawn Care Carb Into Hot Rod Car

Internal combustion engines have often been described (quite correctly) as air pumps, and because of this nature, they tend to respond very well to more air. Why? Because more air means more fuel, and more fuel means more power- the very nature of hot rodding itself. [Thunderhead289] is an accomplished car hacker, and he’s decided to take things the opposite direction: Less air, less fuel… more mileage? As you can see in the video below the break, [Thunderhead289] has figured out how to mount a single barrel carburetor from a lawn mower to the four barrel intake of a Ford 302– a V8 engine that’s many times larger than the largest single cylinder lawnmower!

The hacks start not just with the concept, but with getting the carburetor installed. Rather than being a downdraft carburetor, the new unit is a side draft, with the float bowl below the carb’s venturi. To mount it, a 3d printed adapter was made, which was no small feat on its own. [Thunderhead289] had to get quite creative and even elevate the temperature of his workshop to over 100 degrees Fahrenheit (38 Celsius) to get the print finished properly. Even then, the 34 hour print damaged his Ender printer, but not before completing the part.

The hackery doesn’t stop there, because simply mounting the carburetor is only half the battle. Getting the engine to run properly with such a huge intake restriction is a new task all its own, with a deeper dive into fuel pressure management, proper distributor timing, and instrumenting the car to make sure it won’t self destruct due to a poor fuel mixture.

While [Thunderhead289] hasn’t been able to check the mileage of his vehicle yet, just getting it running smoothly is quite an accomplishment. If silly car hacks are your thing, check out [Robot Cantina]’s 212cc powered Insight and how they checked the output of their little engine. Thanks to [plainspicker] for the tip!

Continue reading “Car Hacker Hacks Lawn Care Carb Into Hot Rod Car”