A Networked Analog Clock

Even in the face of an Internet of Things grasping for a useful use case, an Internet-connected clock is actually a great idea. With a cheap WiFi module and a connection to an NTP server, any clock can become an atomic clock. [Jim] decided to experiment with the ESP8266 to turn a cheap analog clock into something that will display network time using a bunch of gears and motors.

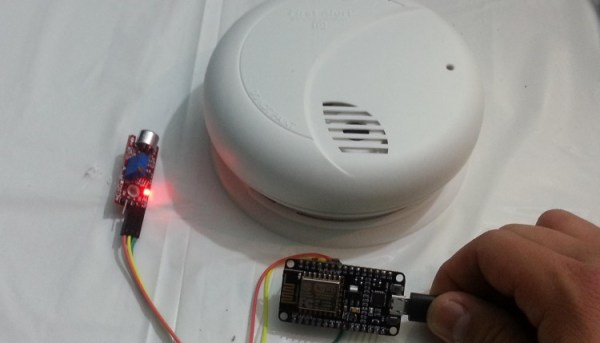
The clock [Jim] chose for this build is an extremely cheap clock pulled right from the shelves of WalMart. This clock uses a standard quartz clock mechanism, powered by a single AA cell. The coils in these quartz movements can be easily controlled by pulsing current through them, and with a few a few transistors and diodes set up in an h-bridge, an ESP8266 is quite good at setting the time on this clock.

The software for this clock first connects to the WiFi network, then checks an NTP server for the true time. Once the ESP8266 gets the time, it starts hammering the coil in the clock movement until the hands are where they should be.

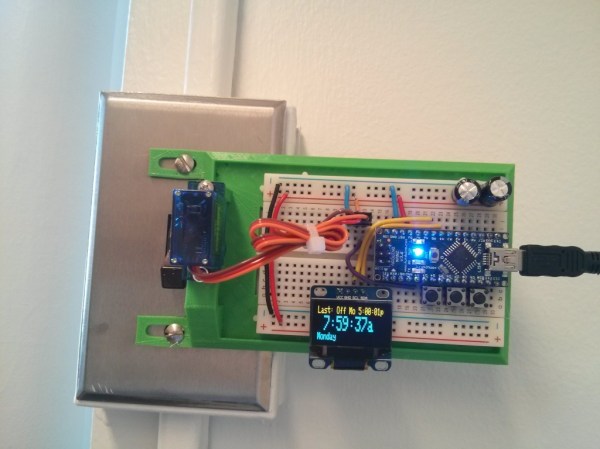
[Jim] says the project needs a bit of work – there is no feedback on the clock to determine the position of the hands. Instead, the time is just set assuming the clock hands started off at 12:00. Still, even with that small fault, it’s a great build and a great exploit of what can be done with a cheap quarts clock movement.

If you’d like to go to the opposite extreme of cost and complexity, how about a DIY retro atomic clock?  Or if you’re in need of a wakeup, we’ve seen a ton of alarm clock posts in the past few weeks.

Audio-coupled Smoke Alarm Interface Sends Texts, Emails

The Internet of Things is getting to be a big business. Google’s Nest brand is part of the trend, and they’re building a product line that fills niches and looks good doing it, including the Nest Protect smoke and CO detector. It’s nice to get texts and emails if your smoke alarm goes off, but if you’d rather not spend $99USD for the privilege, take a look at this $10 DIY smoke alarm interface.

The secret to keeping the cost of [Team SimpleIOThings’] interface at a minimum is leveraging both the dirt-cheap ESP8266 platform and the functionality available on If This Then That. And to keep the circuit as simple and universal as possible, the ESP8266 dev board is interfaced to an existing smoke detector with a simple microphone sensor. From what we can see it’s just a sound level sensor, and that should work fine with the mic close to the smoke detector. But with high noise levels in your house, like those that come with kids and dogs, false alarms might be an issue. In that case, we bet the software could be modified to listen for the Temporal-Three pattern used by most modern smoke detectors. You could probably even add code to send a separate message for a CO detector sounding a Temporal-Four pattern.

Interfacing to a smoke detector is nothing new, as this pre-ESP8266 project proves. But the versatile WiFi SoC makes interfaces like this quick and easy projects.

Continue reading “Audio-coupled Smoke Alarm Interface Sends Texts, Emails”

RFM69 To MQTT Gateway On The Super-Cheap

[Martin] is working on a RFM69-to-MQTT bridge device. If you’re at all interested in DIY home automation, this is going to be worth following. Why? When your home automation network gets big enough, you’re going to have to think seriously about how the different parts talk to each other. There are a number of ways to handle this messaging problem, but MQTT is certainly a contender.

MQTT is a “lightweight” publish-subscribe framework that’s aimed at machine-to-machine data sharing, and runs on top of a normal TCP/IP network. IBM has been a mover behind MQTT since the beginning, and now Amazon is using it too.

But most MQTT servers need a TCP/IP network, which pretty much means WiFi, and this can be a killer for remote sensors that you’d like to run on battery power, or with limited processing power. For these use cases, a low-power, simple sub-gigahertz radio module is a better choice than WiFi. But then how to do you get your low-power radios to speak to your MQTT devices?

That’s the point of [Martin]’s MQTT bridge. Previously he had built a sub-gig radio add-on for a Raspberry Pi, and let the Pi handle the networking. But it looks like there’s enough processing power in a lowly ESP8266 to handle the MQTT side of things (over WiFi, naturally). Which means that you could now connect your 868 MHz radio devices to MQTT for less than the cost of two pumpkin spice, double-pump lattes.

On the firmware side, [Martin] has enlisted the help of [Felix], who developed the Arduino-plus-RFM69 project, the Moteino. [Felix] has apparently ported his RFM69 library to the ESP8266. We’re dying to see this working.

For now, we’ve got some suggestive screenshots which hint at some LAN-exposed configuration screens. We’re especially interested in the RFM + MQTT debug console window, which should really help in figuring out what’s gone wrong in a system that spans two radio protocols.

The bottom line of all of this? Super-cheap, power-efficient RFM69-based radio nodes can talk with your sophisticated MQTT network. Keep your eyes on this project.

The Latest, Best WiFi Module Has Been Announced

A little more than a year ago, a new product was released onto the vast, vast marketplace of cheap electronics. It was the ESP8266, and this tiny and cheap WiFi module has since taken over the space of hobbyist electronics and become the de facto standard for connecting tiny microcontrollers to the Internet.

Now there’s an upgrade on the horizon. [John Lee], the public face of Espressif, the makers of the ESP8266, has announced the next product they’re working on. It’s called the ESP32, and if the specs given are correct, it looks to be the next great thing for the Internet of Things.

The ESP32 will now contain two Tensilica processors running at 160MHz, compared to the ‘8266’s one processor running at 80 MHz. The amount of RAM has been increased to 400 kB, Bluetooth LE has been added, WiFi is faster, and there are even more peripherals tucked away in this tiny piece of silicon.

The new ESP32 includes new, simplified APIs and unlike when the ESP8266 was announced, documentation in English.

Right now, Espressif is beta testing the ESP32, with about 200 boards manufactured so far. If you’re one of the few lucky people who have one of these boards on your workbench, we’d love to see your take on it.

The Robot Light Switch

Automating your home is an awesome endeavor — but playing with mains AC can be risky business if you don’t know what you’re doing. So why not play it safe and make use of your light switch?

Admittedly, it wasn’t because [Tyler Bletsch] didn’t want to mess around with AC directly, but rather out of necessity. You see, he just moved into a new office and his “smart” air conditioner… doesn’t turn itself off at night.

There’s a remote control to set the target temperature, but the unit isn’t smart enough to turn off at night. Instead, there’s a physical wall switch so you can turn it off with your actual physical hands, like a barbarian.

Refusing to be a barbarian (and to stay at work late), he decided to simplify the problem by building a servo driven light switch plate. It’s not the prettiest — but it does the trick. Continue reading “The Robot Light Switch”

Better, Smaller WiFi Throwies

Because the world doesn’t have enough electronic junk floating around, [Victor] has improved the WiFi Throwie.

A decade ago, when strong, cheap magnets, bright LEDs, and small coin cell batteries were materials fresh to hacking, someone had a great idea: tape all these items up and throw them on bridges and overpasses. The LED throwie was born, and while we’re sure the biggest installation of LED throwies looked cool, it’s really just a small-scale environmental disaster.

Since then, the ESP8266 was created, and the world now has a tiny WiFi-enabled computer that’s the size of a postage stamp. Yes, WiFi throwies already exist, but coin cells don’t work with the ESP. This means the compact and tiny ESPs are laden down with heavy lithium cells. [Victor] had a better solution: tiny lithium batteries for quadcopters exist, so why not use those?

[Victor] ended up using a small 100mAh 3.7V Lipo battery from a tiny quadcopter for this build. 100mAh isn’t a lot, but in sleep mode, the ESP only uses about 15mAh, or about 6 hours of run time. Sending a picture takes 30 seconds at 120ma, or about 120mAh, so even with a tiny battery no bigger than the ESP itself, this diminutive web server can handle 100 connections before the battery dies.

While not recommended unless you intend to retrieve your throwable web server, it is an interesting example of the latest and cheapest technology that made a throwable webserver possible; 10 years ago, both the ESP and a battery this small would have been unthinkable.

Use The Esp As A Serial Adapter

One of the most useful tools in the hardware hackers toolbox is a USB to serial adapter. With this, you can flash new firmware to routers, and ply the vast binary seas of embedded hardware. The common form of the USB to Serial adapter is an FTDI breakout board. This requires drivers, though, and there is actually a simpler – and wireless – solution: the ESP8266 WiFi module.

Despite being the best little IoT device on the block, the ESP8266 was originally designed to be a USB to WiFi adapter. In our haste to build WiFi throwies, WiFi blinkies, and freaking WiFi server farms, we seem to have forgotten that there’s still a use for a device that turns a 3.3V TTL into a WiFi connection. It’s the perfect device for reflashing a cheap WiFI router with new firmware, or just providing you with wireless serial connections to go along with your wireless Internet.

This project uses jeelabs’ ESP-link firmware for the ESP8266. It’s a simple bridge between WiFi and serial, and can function as an AVR programmer in a pinch. The web interface for this firmware is very nice, but you really don’t need it; the entire purpose of this firmware is to be even more transparent than an FTDI USB to serial adapter. For the next time you’re flashing a router with OpenWRT, don’t bother digging out the USB adapter; an ESP is all you need.