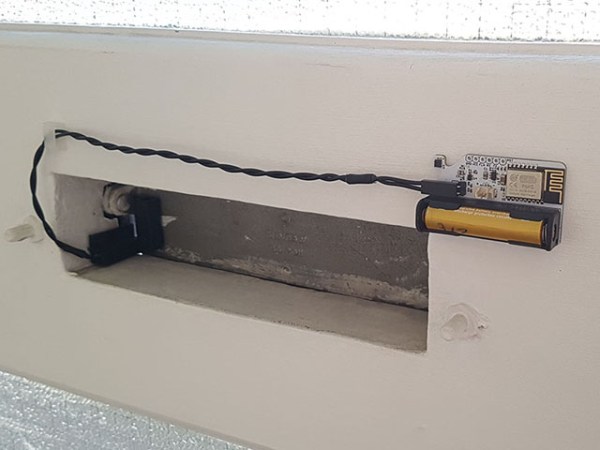
Moving The Snail Mail To WiFi

[Zak] loves getting a notification on his phone when he gets physical mail. Enough to wire his mailbox slot with an ESP8285 to send him alerts. Previously, [Zak] used a cellular-based solution as the mailbox slot was not within WiFi range. However, the network provider for the A9G GPRS module decided to move to different towers, and suddenly the module didn’t work. Unable to find a provider that had sensible pricing, he got to work redesigning the module.

The mailbox was now in a WiFi network range, meaning he no longer had to use cellular. This dramatically simplifies the design and uses an ESP-M2 module (think ESP8266 but with embedded flash). To maximize battery life, the ESP is entirely off most of the time. A reed switch triggers a 74LVC1G98 NAND gate with an inverted input. This enables the 3.3 voltage regulator. A 4uF capacitor holds the voltage regulator on for 716ms, giving the ESP8266 time to boot and drive the second pin of the logic gate so it can stay on. Once the web request completes (a call to a PHP server that takes 4-5 seconds, including WiFi association), it pulls the pin low, and the system powers off. With a custom server, [Zak] can include a few goodies, such as temperature and humidity from the SHT32-DIS sensor.

So far, the system has been chugging along for seven months and over 110 mail notifications and has only dropped 0.3v, suggesting that the battery should hold out for another year or two before recharging. The code and schematics are up on GitHub. We love the low-power focus and the handy circuit explanation that makes it easy to use in other projects.

Snail Mail Notifier’s Simple Power Management To Maximize Battery Life

There are no weird, specialized components nor esoteric sleep mode tricks behind the long battery life of [Zak]’s WiFi mail slot watcher. Just some sensible design and clever focus on the device’s purpose: to send an HTTP request whenever it detects that the front door’s mail slot has been opened. The HTTP request is what kicks off useful notifications, but it’s the hardware design that’s really worth a peek.

The watcher’s main components are a ESP-M2 WiFi module, a reed switch, and a single lithium cell. Here’s how it works at a high level: when the mail slot is opened (detected by the reed switch), the ESP module is powered up just long enough to connect to the local WiFi network and send a single HTTP request, after which it shuts back down. The whole process takes between four and ten seconds.

As mentioned, the power control isn’t managed by any unusual components; it comes down to a NAND gate with a single inverted input, and a MIC5504 3.3 V regulator responsible for feeding the ESP board. The logic gate controls whether the voltage regulator is enabled or disabled, and therefore whether the microcontroller receives any power at all. Most of the time the regulator is disabled, but when the reed switch triggers, its input to the NAND gate is pulled low and the regulator is turned on, booting up the ESP board.

In order to stay on, the first thing the ESP board does is use a GPIO pin to drive the inverted input of the NAND gate high in order to keep the regulator enabled, and it has a window of about half a second to do this. Once the HTTP request is sent (and the battery voltage sensed), the ESP board pulls that pin low, disabling the regulator and turning itself off until the reed switch once again begins the process.

After seven months of use, the battery has dropped from 4.2 V to 3.9 V, so there’s plenty of life left. The project’s GitHub repository has the necessary code if you’d like to apply some of its ideas to your own projects. Alternately, you may wish to consider supercapacitors and solar in lieu of batteries. Even if ultra-level power savings isn’t your bag, when WiFi and networking is involved, there are software-level opportunities to be more efficient. Even a judicious 1 ms delay can save a surprising amount of power in the right circumstances.

For The ESP’s Next ESP Trick…

It is a pretty stale dad joke to tell someone you have ESP when you mean you have an ESP8266 or ESP32 in your hand. However, [Naufil Metkar] uses an ESP device to pretend — via a magic trick — that he does have ESP. The trick requires a bit of 3D printing, an MPU6050 gyro sensor, and a lot of showmanship.

We hate to spoil an illusion, but you can probably figure it out from the list of things you need. The die has a gyro in it and uses a small ESP module to transmit its current orientation out to a display. There is a small reed switch that lets you turn off the device with a magnet. Without it, the battery dies quickly.

Continue reading “For The ESP’s Next ESP Trick…”

Templateize Your Timetable With EPaper Templates

To date, e-paper technology has been great for two things, displaying static black and white text and luring hackers with the promise of a display that is easy on the eyes and runs forever. But poor availability of bare panels has made the second (we would say more important) goal slow to materialize. One of the first projects that comes to mind is using such a display to show ambient information like a daily summary weather, train schedules, and calendar appointments. Usually this means rolling your own software stack, but [Christopher Mullins] has put together a shockingly complete toolset for designing and updating such parameterized displays called epaper_templates.

To get it out of the way first, there is no hardware component to epaper_templates. It presupposes you have an ESP32 and a display chosen from a certain list of supported models. A quick search on our favorite import site turned up a wide variety of options for bare panels and prebuilt devices (ESP32 and display, plus other goodies) starting at around $40 USD, so this should be a low threshold to cross.

Once you have the device, epaper_templates provides the magic. [Christopher]’s key insight is that an ambient display is typically composed of groups of semi-static data displayed in a layout that never changes. The only variation is updates to the data which is fully parameterized: temperature is always integer Fahrenheit, train schedules are lists of minutes and hours, etc. Layouts like this aren’t difficult to make, but require the developer to reimplement lots of boilerplate. To make them easy to generate, epaper_templates provides a fully featured web UI to let the user freely customize a layout, then exports it as JSON which the device consumes.

The sample layout configured in the video below

The web UI is shockingly capable, especially for by the standards of the embedded web. (Remember it’s hosted on the ESP32 itself!) The user can place text and configure fonts and styles. Once placed, the text can be set to static strings or tied to variables, and if the string is a timestamp it can be formatted with a standard strftime format string.

To round out the feature set, the user can place images and lines to divide the display. Once the display is described, everything becomes simple to programmatically update. The ESP can be configured to subscribe to certain MQTT topics from which it will receive updates, or if that is too much infrastructure there is a handy REST API which accepts JSON objects containing variables or bitmaps to update on device.

We’re totally blown away by the level of functionality in epaper_templates! Check out the repo for more detail about its capabilities. For a full demo which walks through configuration of a UI with train arrival times, weather, both instant temperature and forecast with icons, and date/time check out the video after the break. Source for the example is here, but be sure to check out examples/ in the repo for more examples.

Continue reading “Templateize Your Timetable With EPaper Templates”

Four Years Of Learning ESP8266 Development Went Into This Guide

The ESP8266 is a great processor for a lot of projects needing a small microcontroller and Wi-Fi, all for a reasonable price and in some pretty small form factors. [Simon] used one to build a garage door opener. This project isn’t really about his garage door opener based on a cheap WiFi-enabled chip, though. It’s about the four year process he went through to learn how to develop on these chips, and luckily he wrote a guide that anyone can use so that we don’t make the same mistakes he did.

The guide starts by suggesting which specific products are the easiest to use, and then moves on to some “best practices” for using these devices (with which we can’t argue much), before going through some example code. The most valuable parts of this guide especially for anyone starting out with these chips are the section which details how to get the web server up and running, and the best practices for developing HTML code for the tiny device (hint: develop somewhere else).

[Simon] also makes extensive use of the Chrome developers tools when building the HTML for the ESP. This is a handy trick even outside of ESP8266 development which might be useful for other tasks as well. Even though most of the guide won’t be new to anyone with experience with these boards, there are a few gems within it like this one that might help in other unrelated projects. It’s a good read and goes into a lot of detail about more than just the ESP chips. If you just want to open your garage door, though, you have lots of options.

Hacking This Smart Bulb Is Almost Too Easy

The regular Hackaday reader no longer needs to be reminded about how popular the ESP8266 is; they see the evidence of that several times a day. But what might not be quite so obvious is that it isn’t just us hacker types that are in love with the inexpensive IoT microcontroller, it’s also popping up more and more frequently in commercial products.

As [Majenko] demonstrates, one of those ESP-powered devices is the LOHAS Smart LED Bulb. Upon cracking one open, he found that these relatively low-cost bulbs are little more than a standard ESP8266 chip and a couple of LED drivers. He wanted to see how hard it would be to get his own code running on the bulb, and by the looks of it, it took longer to get the thing open then it did to load it up with a custom firmware.

The bulb’s PCB features the aforementioned ESP8266, a 1MB 25Q80 flash chip, and MY9231 LED drivers. Whoever put the board together was nice enough to label the RX, TX, and GPIO test points, though [Majenko] notes that what’s labeled as 3.3 V appears dead. With a ESP-01 programmer wired up to the board and the appropriate board settings (which he provides), you can use the Arduino IDE to upload whatever you like to it.

Running “Hello World” on a smart bulb is fun and all, but what about kicking on those LEDs? [Majenko] found a library that works with the MY9231 drivers, and it didn’t take long to figure out which of the ESP’s pins were used to communicate with them. All in all, he said it was far easier than he expected.

You’ll probably want to put this bulb back into service after reprogramming, so [Majenko] advises caution when cracking open the shell. There are clips holding on the diffuser which he assures us are going to break no matter what you do, plus some silicone adhesive. He suggests super glue to hold it together when you’re done programming it, and using an OTA firmware so you don’t need to get back in there.

In the past we’ve shown how some hackers are rolling their own smart bulb hardware, but with cheap commercial offerings that are so easily hackable, it frankly doesn’t seem worth the effort. On the other hand, an influx of cheap ESP-powered bulbs isn’t all good news.

Squeezebox Comes To The ESP

Streaming music may now come from somewhere in the cloud to an app on your phone and be sent to the client built in to almost every entertainment device you own, but there was a time when the bleeding edge lay in dedicated streaming device that connected to your existing set-up. One of the players in this market was Logitech with their Squeezebox line of products, and while the original hardware may have been discontinued it remains very much alive among its dedicated userbase due to the free nature of the Logitech Media Server software and implementations of the slimproto streaming protocol in players. Now you can create a network player on about as cheap hardware as it is possible to find, because [Bgiraut] has produced a client for the ESP32 and ESP8266.

The software can be found on GitHub, and comes with the warning that it’s an early proof-of-concept rather than a polished release. It has two options for playback that both require a little bit of extra hardware, an I2S DAC for uncompressed streams or a VS1053 codec module for compressed ones, but neither of those need be expensive.

You can find Logitech Media Server from its download page, and give this device a try. Meanwhile we’ve covered many Squeezebox implementations, including ones on the Raspberry Pi, and the PogoPlug.

Thanks [joyofdivisions] for the tip.