A Hi-Fi Speaker From Some Foil And Magnets

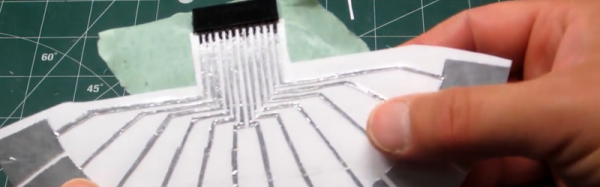
In the world of speakers, mass is the enemy of high frequency response. In order to get the crispest highs, some audiophiles swear by speakers in which the moving element is just a thin ribbon of metal foil. As the first step towards building a set of ribbon headphones, [JGJMatt] has designed a compact ribbon speaker made from aluminum foil.

A 3D-printed body holds six permanent magnets, which produce the static magnetic field necessary for the speaker to work. The sound itself is produced by a corrugated aluminum diaphragm made by taking a strip of foil and creasing it with a gear. Aluminum is difficult to solder, so electrical contact is made with a couple of short segments of copper tape. A little Blu Tack and glue hold it all together, and the result is stunning in its simplicity.

Check out the video after the break to hear how it sounds. If you want to try this yourself, it’s important to remember that ribbon speakers have very low input impedances (0.1 Ω for this design), so in order to prevent damage to your amplifier, a transformer or series resistor must be used to bring the impedance up to the 4-8 Ω your amplifier expects.

[JGJMatt] is no newcomer to exotic speaker technology—check out these thin distributed-mode loudspeakers they made! If you’re more interested in recording music than playing it, you might want to read about how a metal ribbon suspended in a magnetic field is used to make incredible microphones. Shout out to [Itay] for the tip. Continue reading “A Hi-Fi Speaker From Some Foil And Magnets”

Aluminum Foil Heatsink Keeps LEDs In Check

In your kitchen is very likely a roll of aluminum foil, like most people you probably use it to line pans or wrap food for baking. If you heard somebody used aluminum foil in the cooling of items, you could be forgiven for thinking they were referring to wrapping leftovers and tossing them in the refrigerator. But rather than preserving Mom’s famous meatloaf, [Michael Dunn] is using that classic kitchen staple to protect his LED strips.

Cheap LED strips are becoming extremely popular and have been popping up in more and more projects, but they have a pretty serious flaw: heat dissipation. Left on their own they can get hot enough to cook themselves, which is sort of a problem when you’re looking to replace as much of your home lighting with them like [Michael] is.

Heat was of particular concern as he was looking to retrofit a delicate shade with his beloved LED strips. Since he wanted a column of LEDs inside the unique shape of the shade, he reasoned that some kind of heat-conductive tubular structure could be used as both a mandrel to wrap the LEDs around and a way to dissipate heat. Like most of us, his first thought was copper pipe. But unfortunately the only copper pipe he had handy was of too small a diameter.

The tube of foil on the other hand was the perfect diameter, and while aluminum isn’t as good a conductor of heat as copper, it’s certainly no slouch either. Early tests weren’t that great when the tube was laying on the bench, but once it stood vertically convection got the air moving and cooled the LEDs down to where [Michael] was comfortable enough to put them inside the shade. Though he does have some lingering doubts about leaving the cardboard tube in such a toasty environment.

Going back through the archives, we’ve seen some absolutely fantastic projects utilizing LED strips in the past, some of which have come up with their own creative ways of beating the heat.

Conjuring Capacitive Touch Sensors From Paper And Aluminum Foil

Stumbling around YouTube, we found what has to be the lowest-tech method of producing a touchpad to make a capacitive touch keyboard, and we just had to share it with you. If you’re afraid of spoilers, skip down to the video below the break now.

[James Eckert] got his hands on a Freescale MPR121 capacitive touch sensor. The chip in question speaks I2C and senses up to twelve simultaneous capacitive sense electrodes; break-out boards are available in all of the usual places. It’s a sweet little part.

So [James] had to make a twelve-key capacitive keyboard on the quick. He printed out a key template on paper — something that he does often in his woodwork — and spray-glued aluminum foil on the back side. The video doesn’t say how many hours he spent with the razor blade tracing it all out, but the result is a paper, foil, and packing tape keyboard that seems to work just fine.

A pin-header was affixed to the foil with conductive paint and more tape. If you’ve ever tried soldering directly to aluminum foil, you’d know why. (And if you’ve got any other good tips for connecting electrically to aluminum foil, we’d love to hear them.)

Continue reading “Conjuring Capacitive Touch Sensors From Paper And Aluminum Foil”

HDTV Antenna That Can Hang In A Window

We can’t wait to give this one a try. We’ve got a DIY HDTV antenna hanging out in the attic which was made from some scrap wood and eight metal coat hangers. It works great but it’s pretty ugly and not everyone has an attic to hide it in (not to mention the signal drop caused by the roof shingles). This is a fractal antenna anchored to some clear plastic so you can just hang it in the window and start picking up the over-the-air channels without much effort.

The pattern was modeled in SketchUp then printed out on two pieces of paper. One piece had it printed on both sides, which makes it easy to glue on a sheet of aluminum foil, then follow the pattern on the opposite side to cut out the important parts. The other template was used as an aligment guide when gluing the foil to the clear plastic. A coaxial adapter was then attached using nuts and machine screws. If you build it, let us know how it comes out!

Roll Your Own Capacitors – High Voltage Edition

[Grenadier] tipped us off about his method for building your own high-voltage capacitors. He thought the paper and foil capacitor project was a nice introduction to the concepts, but at the same time he knew he could produce a much more powerful device.

For the dielectric he is using acetate film. This is the material from which overhead transparency sheets are made. He stuck with aluminum foil for the two plates. Just roll the foil flat with a rolling-pin, use thin wire to minimize the air that will be trapped between the dielectric layers, and make sure the foil plates are at least 4cm shorter than the acetate film on each end to prevent leakage. After rolling and securing the capacitor with zip ties you’ll be ready for the 3nF worth of fun seen in the video after the break. [Grenadier] mentions that this can be improved further if you were to vacuum impregnate the device with beeswax.

Continue reading “Roll Your Own Capacitors – High Voltage Edition”