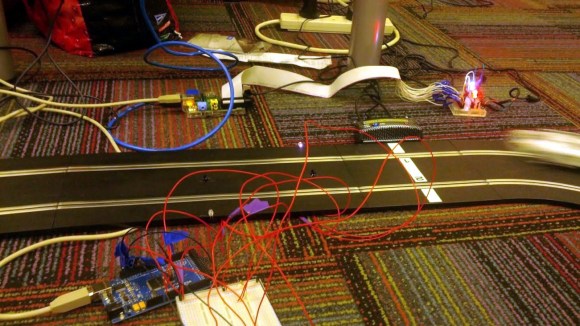
Brute Force Finds The Lost Password For An Electronic Safe

brute-force-an-electronic-safe

[Teatree] tells a sad, sad story about the lost password for his fire safe. The electronic keypad comes with a manufacturer’s code as well as a user selected combination. Somehow he managed to lose both of them, despite storing the user manual safely and sending the passwords to himself via email. He didn’t want to destroy the safe to get it open, and turning to the manufacturer for help seemed like a cop-out. But he did manage to recover the password by brute forcing the electronic keypad.

There is built-in brute force protection, but it has one major flaw. The system works by enforcing a two-minute lockout if a password is entered incorrectly three times in a row. But you can get around this by cutting the power. [Teatree] soldered a relay to each set of keypad contacts, and another to the power line and got to work writing some code so that his Arduino could start trying every possible combination. He even coded a system to send him email updates. Just six days of constant attacking netted him the proper password.

An Arduino Hydrogen Blimp… Oh The Humanity!

arduino-hydrogen-balloon

This sort of flying contraption seems more suited for indoor use. Well, except for the fire hazard presented by building an Android controlled hydrogen blimp. The problems we often see with quadcopters come into play when a motor wire comes loose and the thing goes flying off in a random direction. Loosing a motor on this airship will be no big deal by comparison.

Because the build relies on the buoyancy of the gas, light-weight components are the name of the game. The frame of the chassis is built from balsa wood. It supports two tiny DC motors which are almost indistinguishable in the image above. An Arduino nano and wireless receiver monitor commands from the transmitter and drive the propellers accordingly.

You may have noticed that we categorized this one as a chemistry hack. That’s because [Btimar] generated the hydrogen himself. He used an Erlenmeyer flask with a spout for the chemical reaction. After placing several heat sinks and other scraps of solid aluminum in the flask he poured on the lye solution. This generates the H2 but you need to keep things cool using ice to keep the reaction from getting out of control. We’re going to stick with helium filled blimps for the time being!

See this beast flying around [Btimar’s] living room in the clip after the break.

Continue reading “An Arduino Hydrogen Blimp… Oh The Humanity!”

LED Cloud Lamp In Any Color You Can Imagine

rgb-cloud-lamp

This lamp which [Dablondeemu] built will add a little whimsy to your home decor. The project started as coursework for a Digital Art and Installations class. But the remote controlled color changing cloud ended up being a pretty neat gift for her little brother.

The prototype uses an Arduino, breadboard, and a collection of LEDs to perform its tasks. [Dablondeemu] admits the next revision should have a standalone circuit board. The electronics are housed in a clear plastic container which was then adorned with Polyfill stuffing which would commonly be found inside a decorative pillow. The polyester fibers do a great job or filtering and diffusing the light. But they don’t seem to interfere with the incoming IR signals from the remote control.

If you like the idea of creatively shaped diffusers you should take a look at this giant LED lamp. It’s molded to look like a through-hole package with the leads hiding the power cord.

Continue reading “LED Cloud Lamp In Any Color You Can Imagine”

Hacking Grandfather Clock Accuracy While It’s Still Ticking

grandfather-clock-tweaking

[Keith] got his hands on a few grandfather clocks. Apparently the price tag is greatly reduced if you are able to get them second-hand. The mechanical timepieces require weekly winding, which is a good thing since you’ll also need to correct the time at least that often. But this drift got [Keith] thinking about improving the accuracy of these clocks. He figured out a high-tech way to adjust the timepiece while it’s ticking.

The first thing he needed was a source of super-accurate time. He could have used a temperature compensated RTC chip, but instead went the more traditional route of using the frequency of mains power as a reference. The next part of the puzzle is to figure out how to both monitor the grandfather clock and make small tweaks to its pendulum.

The answer is magnets. By adding a magnet to the bottom of the pendulum, and adjusting the proximity of a metal plate positioned below it, he can speed up or slow down the ticking. The addition of a hall effect sensor lets the Arduino measure the rate of each swing and calculate the accuracy compared to the high voltage frequency reference.

Printing Images With A Wood Burning CNC Machine

printing-images-with-a-wood-burning-cnc-machine

Just to clear up any confusion from the title, this wood burning CNC machine runs on electricity. The wood burner acts as the print head. It’s the thing in the upper right of the field that looks a bit like a soldering iron. In this case it’s being used like a dot matrix printer.

We suppose this is a form of halftone printing, although it doesn’t produce the uniformity we’ve seen with mill-based halftone techniques. [Random Sample] built the machine from wood, drawer sliders, and stepper motors with toothed belts. His Python script takes an image and transforms it into a file which can be used to guide each of the three axes of the machine. An Arduino receives these commands via the USB connection. Each image prints in a grid, with darker pixels created by leaving the hot tip in contact with the wood for a longer period of time.

Don’t miss the sample video embedded after the jump.

Continue reading “Printing Images With A Wood Burning CNC Machine”

Weather Station Graphs History On Webpage

weather-station

Kudos go out to [Jose] for his work getting so many different components to talk to each other in this Arduino weather station that using a Raspberry Pi to display the data online.

The components shown above make up the sensor package. There’s an Arduino with a custom shield that interfaces the barometric pressure sensor, real-time clock chip, a digital temperature sensor, and a humidity sensor. On top of that shield is an XBee shield that lets this push data back to the base station. [Jose] also rolled in an LCD character display and a few buttons so that the user may view weather data without heading to the web.

A Raspberry Pi board makes up the other half of the XBee pair. It harvests the incoming data from the radio module using a USB to Serial converter cable. You can see the data log on the webpage linked above. Just choose the “LIVE” menu option and click on “Daily” to get a better overview of humidity and pressure changes.

The PICnDuino Review

picnduino

For those of you that can’t make a decision between buying an Arduino and a PIC processor, [Brad] has come up with a novel solution, the PICnDuino. We’ve featured him before with his [Retroball] project, but this time Brad has been full funded on Kickstarter, and is pre-selling boards for delivery in March.

[HAD], specifically I, was fortunate enough to be sent one of the boards to try out early. I’ve worked with an Arduino before, but never a PIC processor, so read on to see if it was actually as easy as the tutorial video (at the end of the article) would have you believe it is to get started. Continue reading “The PICnDuino Review”