Nanode: A Low-cost Network-enabled Arduino Ethernet Alternative

nanode_ethernet_enabled_arduino_board

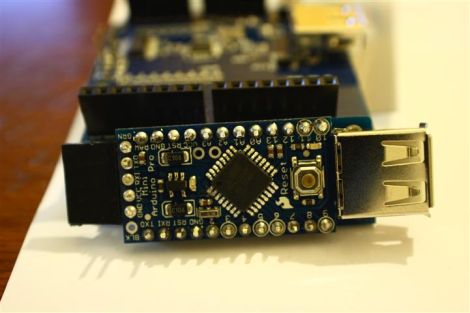
The folks over at Hackspace London have been working hard to create a “very low cost, open source, Internet connected platform on which others can develop their ideas”, which they have dubbed “Nanode”.

Essentially an Arduino with Ethernet networking on-board, the Nanode is armed with an ATMega 328 microcontroller along with all the other standard goodies you would expect from an Arduino-compatible device. The Nanode can be controlled with a web browser right out of the box, thanks to some custom Ethernet libraries. Additionally network of Nanodes can be easily configured to communicate with a “master” unit via a multidrop serial bus, allowing the device to be used for a wide array of distributed control tasks.

Obviously most of these features can be had in the form of an Arduino Ethernet board, or achieved by using an Ethernet shield. The Nanode is a touch cheaper than either option at $40 for a kit, and the native networking capabilities sound like they would be quite handy. That said, we are a bit bummed that it only has 10BaseT networking capabilities, though it is always nice to have options when it comes to choosing a microcontroller board.

[Thanks, TheHypnotist]

An Introduction To DC Boost Converters

simple_boost_converter

If you are planning on creating some sort of Nixie tube display, you will undoubtedly need to find yourself a high voltage DC power supply. If you don’t want to add a transformer to your project, you can always opt to build a boost converter instead. [Andrew Moser] shows us just how easy it is to build one, discussing the theory behind simple boost converters along the way.

Boost converters are often driven by dedicated ICs, but in this case the PWM signal from an Arduino does the job just fine. [Andrew] covers the process of choosing the proper components for the circuit, discussing duty cycles and components to avoid lest your boost converter die an untimely death.

He shows us how to implement a feedback system to get a more precise output voltage, but as Lady Ada has shown us, an open loop works pretty well too.

For the beginners that want to just get things up and running, his instructions and code should be sufficient, but [Andrew] provides plenty of reference links for those looking to delve deeper into the subject.

Impressive Lighting Console Offers Professional Features For A Fraction Of The Price

diy_dmx_lighting_control_panel

Hackaday reader [Michael] wrote in to share the build details of an impressive lighting console he has been working on for some time. He says that the 36+ channel console is on par with lighting rigs costing upwards of $5,000, but his was constructed for just around $1,000 – quite the substantial savings.

The console was constructed around an old IBM desktop computer, which handles all of the DMX output as well as preset management. An array of 20 ATMega 328Ps running the Arduino bootloader are scattered throughout the device, 18 of which are used to manage the six fader panels, while the remaining two handle management tasks. Aside from the fader banks, the console features a main control board featuring several LCD screens along with 17 capacitive touch buttons used for menu navigation and console control.

While [Michael] is finished building the board, he has just begun the documentation of the construction process. His blog should be updated regularly with more details, so be sure to check back often. Code, as well as hopefully tons of pictures and videos are all forthcoming.

[Edit: Cost comparison update]

Noise Generator Ported To Run On Small AVR, Also Arduino Compatible

Feeling a bit left out because he didn’t have a PICAXE on hand, [Rob Miles] decided to port the Luna Mod code so that it would work on an AVR chip. He chose to build his around an ATtiny45, but also mentions that this is Arduino compatible.

This case layout is a bit different from the original Make version, but we like this look just a bit better. It might not satisfy your need for that hipster looking enclosure, but the repurposed macadamia nut box looks seems it was built for this purpose. Take a look as the video after the break to see the final product and hear it spewing newly composed cacophony. [Rob] is sharing the sketch as a dropbox file but we’ve also included our own hosted link after the break in case is stops working.

Continue reading “Noise Generator Ported To Run On Small AVR, Also Arduino Compatible”

Old Pachinko Game Tweaked To Add A Reward System

restored_gumball_vending_pachinko_machine

[Tim Higgins] picked up an old pachinko game at a garage sale for his wife, but it ended up sitting unused in the garage for a few years. When he finally dusted it off, he decided that he wanted to restore and build a nice cabinet for it, though he thought the idea was a bit lame.

He says he likes to use some sort of CPU in his projects, and even though it was overkill, he made it his goal to add some sort of microprocessor to the game. He didn’t want to ruin the original aesthetics of the machine, so he decided that he could use an Arduino to drive a rewards system for skilled pachinko players.

Using some PVC pipe, he built a treat hopper which is controlled by the Arduino. When the player wins, the microcontroller triggers a small hobby servo, which dispenses gumballs/candy/etc.

[Tim] says that his wife loved the gift, and he was quite pleased with how it came out as well. Hit up his blog for additional build details and be sure to check out the photo slideshow of the restoration that we have embedded below.

Continue reading “Old Pachinko Game Tweaked To Add A Reward System”

Blow Your Mind With The Brainwave Disruptor

rich_decibles_brainwave_disruptor

Whether you believe in it or not, the science behind brainwave entrainment is incredibly intriguing. [Rich Decibels] became interested in the subject, and after doing some research, decided to build an entrainment device of his own.

If you are not familiar with the concept, brainwave entrainment theory suggests that low-frequency light and sound can be used to alter brain states, based on the assumption that the human brain will change its frequency to correspond to dominant external stimulus. [Rich’s] device is very similar to [Mitch Altman’s] “Brain Machine”, and uses both of these methods in an attempt to place the user in an altered state of mind.

[Rich] installed a trio of LEDs into a set of goggles, wiring them along with a set of headphones to his laser-cut enclosure. Inside, the Brainwave Disruptor contains an Arduino, which is tasked with both generating light patterns as well as bit-banged audio streams.

Well, how does it work? [Rich] reports that it performs quite nicely, causing both visual and auditory hallucinations along with the complete loss of a sense of time. Sounds interesting enough to give it a try!

LAN-connected Washing Machine Lets You Know When Your Clothes Are Done

lan_connected_washing_machine_laundruino

[Micha’s] washing machine is equipped with a rather inaccurate timer, so it is always difficult to estimate when the load will be finished. Since it is located in his basement, he hated having to check on the machine continually to know when his clothes were done. Instead of hauling up and down the stairs over and over, he decided to hack in an “end of cycle” notifier of his own.

The washer has an LED that lights when it is finally done doing its thing, so [Micha] removed the LED and soldered in two wires, which he then connected to his Arduino. When the washer is finished and the LED should be lit, the Arduino senses that the input has been pulled low, signaling the end of the cycle. The Arduino was hooked into his home network via an Ethernet shield, enabling him to monitor the process from the comfort of the nearest web browser.

It’s a clever implementation, and it sure saves him a lot of time trudging up and down the stairs. Nice job!