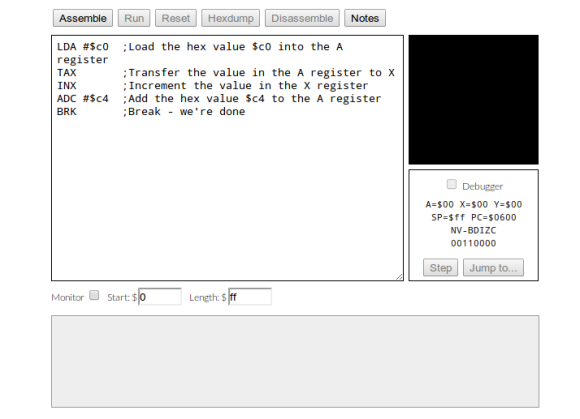
Raspberry Pi - rpi

Operating Systems Development With The Raspberry Pi

Even though the Raspberry Pi has, from the very beginning, been touted as an educational computer, we’ve seen neither hide nor hare of coursework, lesson plans, or even computer sciencey tutorials using the Raspi. We’re guessing academia works at a much slower pace than the average hardware hacker, but [Alex Chadwick] at Cambridge University has managed to put together an online tutorial on developing an operating system from scratch for the Raspi.

The goal of this tutorial is to throw a budding Raspi tinkerer into the strange and confusing world of registers, hexadecimal, and ARMv6 assembly. After going through the necessary toolchain, [Alex]’s tutorials cover blinking the ‘OK’ LED on the Raspberry Pi using only assembly.

The OS development guide goes on from there to include drawing graphics on the screen and even accepting input from a USB keyboard.

It’s important to point out what [Alex]’s tutorial isn’t; even though this series of tutorials goes through manipulating the bare metal of the Raspberry Pi, don’t expect to be porting UNIX to the Raspi after going through these guides. That being said, after completing these tutorials, you’ll be in a fabulous position for building your own homebrew OS on the Raspberry Pi.

A Detailed Tutorial On Speeding Up AVR Division

[Alan Burlison] is working on an Arduino project with an accelerometer and a few LEDs. Having the LEDs light up as his board is tilted to one side or another is an easy enough project a computer cowboy could whip out in an hour, but [Alan] – ever the perfectionist – decided to optimize his code so his accelerometer-controlled LEDs don’t jitter. The result is a spectacular blog post chronicling the pitfalls of floating point math and division on an AVR.

To remove the jitter from his LEDs, [Alan] used a smoothing algorithm known as an exponential moving average. This algorithm uses multiplication and is usually implemented using floating point arithmetic. Unfortunately, AVRs don’t have floating point arithmetic so [Alan] used fixed point arithmetic – a system similar to balancing your checkbook in cents rather than dollars.

With a clever use of bit shifting to calculate the average with scaling, [Alan] was able to make the fixed point version nearly six times faster than  the floating point algorithm implementation. After digging into the assembly of his fixed point algorithm, he was able to speed it up to 10 times faster than floating point arithmetic.

The takeaway from [Alan]’s adventures in arithmetic is that division on an AVR is slow. Not very surprising after you realize the AVR doesn’t have a division instruction. Of course, sometimes you can’t get around having to divide so multiplying by the reciprocal and using fixed point arithmetic is the way to go if speed is an issue.

Sure, squeezing every last cycle out of an 8 bit microcontroller is a bit excessive if you’re just using an Arduino as a switch. If you’re doing something with graphics or need very fast response times, [Alan] gives a lot of really useful tips.

Receiving Asynchronous Data Bursts

[Johan’s] been working on a chunk of code for about seven years and he thinks it’s ready to help you with your next project. He calls it D1 (The One) and it lets you receive asynchronous data without the need for a hardware USART. It’s capable of working with signals from an IR or RF remote, as well as tangentially related transmissions like RFID and magstripe readers.

It uses timer and port interrupts to sample the incoming data. Once it’s captured a transmission, the code sets a flag so that you can pull what it got into your own application. If you’re expecting to receive a protocol that sends packets several times in a row a verification module is also included which runs as a precondition of setting the received flag. The package is written in PIC assembly, but with all the information that [Johan] included in his post this shouldn’t be hard to port over to other chip architecture.

DCPU-16 Running Pac-Man

If you’ve been trying to think of stuff you can do with the DCPU-16 this may inspire you to write a clone of  a classic game.

This version of Pac-Man was written using a sprite system with a 16 color pallette. It runs in an HTML-based emulator, so you can even monkey around with the assembly code to help you figure out how it works. But if you’re not into writing code that is this machine-close, you can just click the ‘run’ button and use your keyboard arrows to play through a level or two. You’ll notice there’s only one game board available so far and some things are still missing like that familiar waka-waka as he gobbles up the dots. Let us know if you mange to extend the features of this version.

In case you missed it, this emulator is running the DCPU-16 spec from Notch’s new game, 0x10c (. We have no idea how that’s going to shape up, but getting in on the game early will pay off it turns out to be as popular as Minecraft.

Interesting Substrate Used To Position LEDs Of This Word Clock

[Ivan] decided to build a Word Clock as holiday gift for his parents. He pulled it off, but as you can see above, it meant a lot of point-to-point soldering. One small piece of proto-board is used to host the power supply and a few integrated circuits, with the rest of the device mounted on an interesting choice of material.

The substrate that holds the LED array for the display is a plastic mesh. You’ll find the stuff in any craft store, it’s meant for use in yarn work. It comes rated in several different sizes designated by holes-per-linear-inch. This is fantastic because it makes precision spacing a snap. The face plate itself looks great, especially when you consider that all of the letters were cut out from a piece of black foam board by hand. This bezel was then put in a picture frame, with a bit of tissue paper as a diffuser.

They tell us that the code was written in assembly for an ATtiny2313 microcontroller. It uses a DS1305 RTC chip to keep time and you might be interested to see how the communication protocol was implemented in assembly. The project is based on [Doug’s] Word Clock which we covered in this links post.

8-pin Micro Plays Pong On Your Widescreen

[Fernando] sent in a tangential project update that uses an ATtiny45 to play Pong on his television. Last time we looked in on his work he had just finished getting the eight-pin chip to display a big number on the TV via the VGA port. This expands on the idea while he continues to wait for parts.

Right now the chip plays against itself, but he’s got one input pin left and we’d love to see a button added for a simple one-player game. We’re thinking the paddle would always be moving in one direction or the other, with a click of the button to reverse that direction. The part that he’s waiting for is a Bluetooth module, which we’d love to see used for 2-player games via a pair of Wiimotes (we’re just wishing at this point and don’t know if that would even be possible). The end goal for the hardware is a Bluetooth connected scoreboard for Android devices.

The code is written in Assembly, and we found it relatively easy to follow what [Fernando] is doing with the game logic. On the graphics side of things he gets away with a 120×96 resolution because Pong is supposed to look pixelated. We love the result, which you can see for yourself after the break.

Continue reading “8-pin Micro Plays Pong On Your Widescreen”

ATtiny Hacks: ATtiny10 Game – Doing More With Less

ATtiny Hacks Theme Banner

Okay, you’ve got a six-pin microcontroller with 1k of program memory, 32 bytes of SRAM, and it can’t be programmed using an In-System-Programmer. Do you think you can use it to develop a game? [Wrtlprnft] managed to build a Simon Says game based on the diminutive device that has four buttons and four LEDs. Judging from the video after the break, we’d say he nailed it!

There are so many design challenges here. First off, with only six pins total getting eight devices connected and working means doubling up on each I/O pin and using the reset pin as a doubled-up I/O. We’ve seen momentary push buttons on the same pins as LEDs before, so that’s not too hard to get working.

But if you’re using the reset pin how do you flash the thing? It doesn’t use the same ISP programming protocol that it’s bigger cousins do, so [Wrtlprnft] used an ATmega1284P to program it, hooking up to the three I/O pins and using a transistor to push 12V on the reset pin. But there’s still the matter of writing the code. It has half of the 32 registers you’d expect to find. He ended up ditching C and went straight to writing Assembly because of the diminished instruction set. It’s the first thing he’s written in Assembly, and a great way to learn the ropes.

It may not be as polished, but we do like it just as much as the Karate Chop Simon Says game which has a lot of other bells and whistles.

Continue reading “ATtiny Hacks: ATtiny10 Game – Doing More With Less”