We’ve all prematurely stopped watching some Youtube video because of shaky camera work that makes the video unwatchable. There is a solution available for this problem, it’s a device called a camera stabilizer and it is designed to compensate for jerky camera movement. There are several types available for purchase but they can get fairly expensive. Even the cheaper ones at a few hundred dollars are not economical for hobbyists. [John] set out to make his own camera stabilizer using some unorthodox parts.
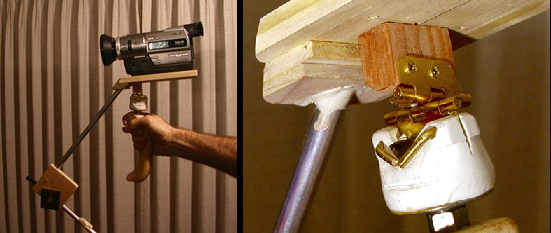
[John’s] chose a gimble style design that effectively lowers the camera’s center of gravity down close to the camera persons hand. The handle of the device must also be mounted in a manor to prevent angular and rotation movement of the supporting hand from transferring to the camera.
The handle is from a cement trowel, on top of which is a ball bearing mounted to a threaded rod. A PVC fitting was heated to soften it and the bushing pressed in. This bearing is responsible for allowing the rotational freedom between the handle and the camera. To decouple any angular movements, two hinges were attached to the PVC fitting. The hinges are perpendicular to each other, one allows forward-back tilting while the other allows left-right tilting. The upper hinge is attached to a piece of poplar wood that also serves as a base for the camera.
At this point, if you were to try to hold this contraption with the camera installed, it would immediately tip over due to gravity. To prevent this, the center of gravity of the moving parts (including the camera) must be lowered. [John] did this by using some aluminum tubing to support wood weights that reside lower than the pivot points created by the hinges.
If you like the DIYer-style stabilizers, check this other wooded one out. Want something more polished looking? How about this pistol grip stabilizer?


