BenAkrin-PlottyBot-TypeWriterMode

PlottyBot: A DrawBot That Plots A Lot

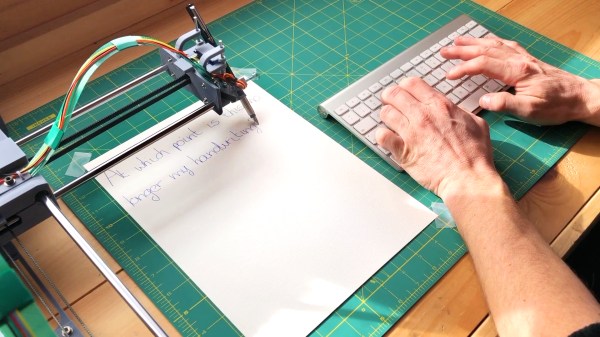
Fire up those 3D printers because if you’re like us, you’ll want your own PlottyBot. Still, have a pile of “thank you notes” to write from recent winter holiday gift exchanges? Hoping to hand letter invitations to a wedding or other significant event? Need some new art to adorn your lock-down shelter or shop? It sounds like [Ben] could help you with that.

Besides being a handsomely designed desktop DrawBot, this project from [Ben] looks to have some solid software to run it, a community of makers who have tested the waters, and very detailed build instructions. Those include everything from a BOM with links for ordering parts to animated GIF assembly for the trickier steps.

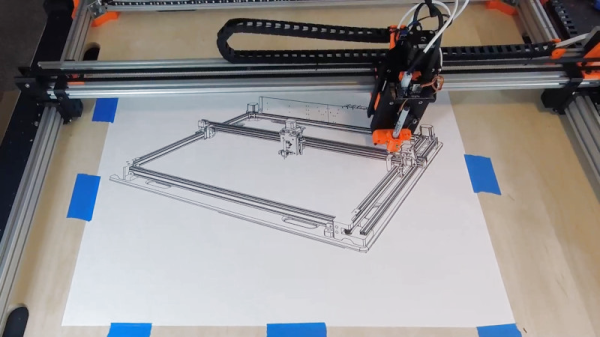
If you’d like to graduate from “handwritten” cards and letters to something poster-sized are customization tips for expanded X and Y dimensions. As we’ve included in other recent articles, one caveat to mention is the current scarcity of the Raspberry Pi Zeros that PlottyBots require. But if you have one on hand or think you’ll be able to source one by the time you’ve 3D printed all the parts, it might just be the perfect time to add another bot to your family. As a heads up, this project is self-hosted on a solar-powered server, so maybe take turns reading the complete build log.

A nice bonus if you need help drawing something suitably complex to require a robot’s help, [Ben] also created MandalGaba which looks like an awesome online tool for drawings like the ones shown above.

Cyberplotter Uses Multiple Tools To Great Success

The CNC bug is a familiar ailment in these parts. Often, patients present with persistent obsession with computer controlled machinery, most commonly after initial contact with gateway hardware such as 3D printers or basic plotters. Once diagnosed, there is no cure – simply the desire to build, and build again. [Adam Haile] knows this all too well, and built the Cyberplotter in service to the affliction. 

The Cyberplotter is the culmination of [Adam]’s CNC wishlist – a two-axis build with a seriously large build area, and the capability to mount a whole bunch of different tools for different jobs. With a work area of up to 800mm x 750mm depending on what’s mounted, it can produce some seriously big output. With a Smoothieboard 5X running the show, [Adam] does all kinds of neat hacks to make the system play with different gadgets on the business end. There’s a laser for engraving, and a top-notch pen plotter featuring a high-quality linear rail for precise movement. But the fun doesn’t stop there – [Adam] goes so far as mounting a Z-axis, camera, and even a Sharpie-based airbrush which we’d never even contemplated before.

It’s not [Adam]’s first build, and past experience shines through here – armed with prior knowledge, the build does many things well without compromising on outright capability. You may find [Adam]’s name familiar – we’ve featured his Engravinator on these pages before. Video after the break.

Continue reading “Cyberplotter Uses Multiple Tools To Great Success”

Simple Pen Plotter

Simple DIY Pen Plotter, Great First CNC Project

[Morten] has been busy recently making a pen plotter. It is a simple and elegant build that he completely designed from the ground up. There are no extra frivolous parts here. The frame is made from laser-cut plexiglass which makes fabrication easy if you have access to a laser cutter. Two NEMA17 motors are responsible for the machine’s movement. One moves the pen carriage back and forth by way of a belt. The other is connected by laser-cut gears to a roller bar, scavenged from an ink jet printer, that moves the paper media forward and aft underneath the pen.

The software chain used here is sort of uncommon compared to other inexpensive DIY CNC machines we see here on Hackaday. [Morten] creates his geometry with Rhino, then uses a plugin called Grasshopper to generate the g-code that controls the machine. That g-code is sent using gRemote to an Arduino flashed with the contraptor.org g-code interpreter. A RAMPS board takes the step and direction signals generated by the Arduino and moves the two stepper motors appropriately.

In typical open-supporting fashion, [Morten] has made his design files freely available for anyone to download. His plotter moves the pen side to side and the paper front to back in order to draw shapes but that’s not the only way a plotter can work. Check out this polar plotter and this one that hangs.

Check out the video after the break…

Continue reading “Simple DIY Pen Plotter, Great First CNC Project”

Cheap Unique CNC Plotter

DIY Plotter Strives For Cheapest CNC Machine Title

Arguably, taking the plunge into the CNC hobby does indeed have potential to end up costing more than expected. But that should be no reason to deter anyone from doing it! [msassa11] shows us how to do it in full effect with his definitely unique and extremely inexpensive homemade plotter.

The design goal was to keep this machine as low-cost as possible while at the same time using materials that can be found around any tinkerer’s shop or at least purchased locally. First of all, you’ll notice that there is only one linear rail, yes, one rail for two axes of movement. The single rail was removed from an inkjet printer along with the mating bushing that originally allowed the print head to move freely back and forth. A threaded rod lead screw does double duty here, keeping the X axis carriage from rotating around the linear rail and also transmitting the force to move the carriage back and forth. Both the lead nut and bushings are held in place with cast-epoxy mounts.

uniquecnc-closeup
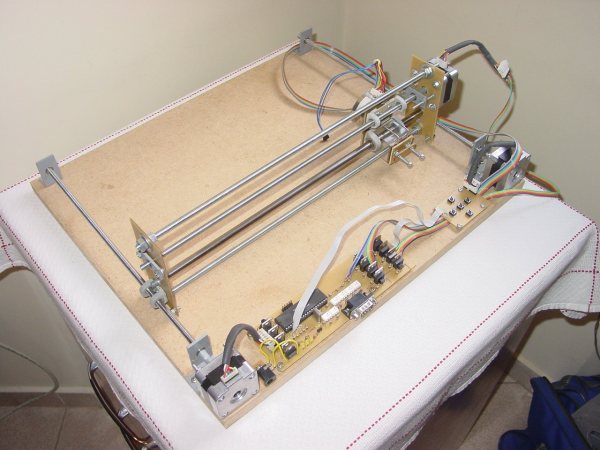
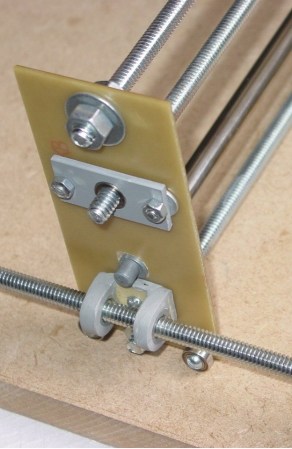
As unique as the X axis is, the Y sure gives it a run for its money. No linear rails are used, two lead screws are the only things that maintain the gantry’s position. To prevent gravity from pulling the gantry down and bending the Y axis lead screws, there are a couple of bearings on either side that ride along the bed of the machine. The frame material also hits the cheap target, it’s made from blank PCB board. A PIC16F877 microcontroller and a handful of mosfets control the motors. [msassa11] built this control circuit but admits it’s performance is not that great, it’s noisy and loses torque at high speed.

[msassa11] certainly proves that he is extremely resourceful with the outcome of this project. He met his goal of building an extremely inexpensive CNC machine. Check out his project page to see a ton of photos and find out what other unconventional ideas he used to build his machine.