Zerowriter Promises Zero Distractions While Writing

As great as full-blown desktop computers may be for web surfing, gaming, and what have you, they are theaters of distraction when it comes time to write. And while there are machines out there purpose-built for writing, the price tags run awfully high for what they are, which is essentially a microprocessor handling a keyboard and an E-ink display.

So, why not build one yourself, then? That’s the idea behind the Zerowriter, which, as you may have guessed, is based on the Raspberry Pi Zero. The Zero 2 W to be exact: [zerowriter]  says that the extra power over the original Zero is quite useful.

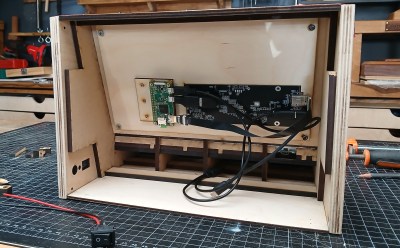
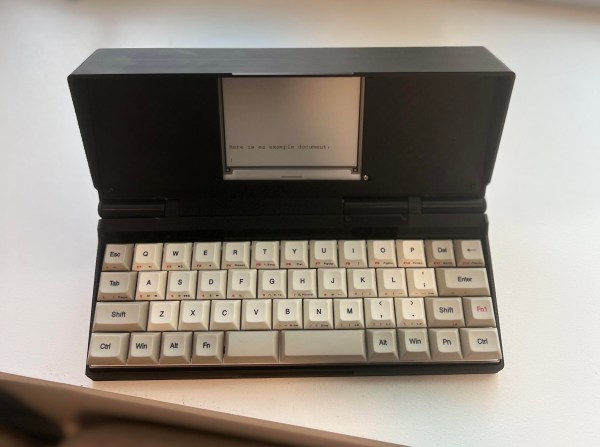
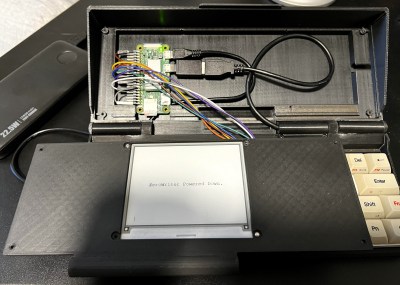
In addition, there’s a 4.2″ Waveshare E-ink display and the Vortex Core 40% keyboard inside the 3D-printed enclosure. The design is based on the Penkesu computer, although in the Zerowriter, the Pi sits behind the screen instead of underneath the keyboard. [zerowriter] built an application on top of the Waveshare demo program that’s easy to use and modify.

The price tag for this build comes in around $200, which is a fraction of similar commercial products. Most of the cost is in this particular keyboard, although 40%s are, broadly speaking, not cheap. We would love to see someone make a keyboard for this.

Looking to make something a bit bigger? Be sure to check out the MUSE.

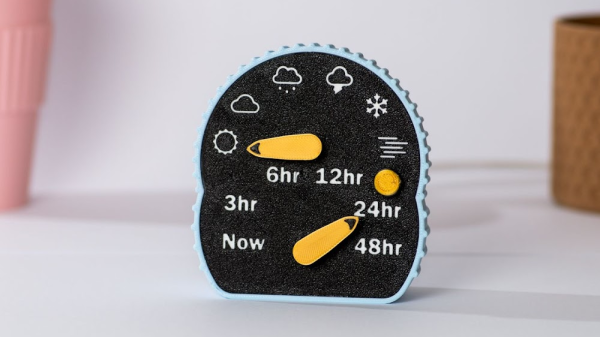
A desktop weather display, with two yellow pointers, one for the time frame (Now, 3hr, 6hr, 12hr, 24hr, 48hr) and the other pointing to an iconographic description of the weather (sunny, cloudy, cloud with rain, cloud with lightning, snowflake and fog)

Let This Minimal Desktop Weather Display Point The Way

Much of the Northern Hemisphere is currently in the middle of winter, so what better way to brighten a potentially gloomy day than to put this charming, minimalist weather display on your desk.

[Joe] has created a weather gauge that uses two servo motors to position mechanical pointers to indicate weather symbols and time ranges. The electronics consists of a push button and two SG90 servos driven by a Raspberry Pi Zero W 2. The case is 3D printed including the pointers attached to the servos and the button brim of the switch. The Raspberry Pi Zero W 2 is programmed to automatically connect to the OpenWeather API to retrieve the latest weather conditions, with the latitude and longitude being configured into the update script during the configuration and assembly stages.

[Joe] has provided extensive documentation about the build and software setup, in addition to releasing the source code and STL files for anyone wanting to make their own. [Joe] even offers kits for those who don’t want to go through the trouble of putting one together themselves — not that we imagine many in this particular audience would fall into that category.

We love to see these delightful weather builds and we’ve featured others in the past, like a converted weather house for weather prediction or a weather reporting diorama.

Continue reading “Let This Minimal Desktop Weather Display Point The Way”

A 3D-printed device labelled "BlixTerm" plugged into the back of a Commodore PET

BlixTerm Brings Full-Speed YouTube Video To The Commodore PET

If you’ve ever used a home computer from the late 1970s or early 1980s, you’ll no doubt be familiar with the slow speed of their user interfaces. Even listing the contents of a BASIC program from RAM could take several seconds, with the screen updating one line at a time. Video games were completely optimized for speed, but could still handle just a few slowly-moving objects at the same time. Clearly, playing anything resembling full-motion video on hardware from that era would be absolutely impossible – or so you might think.

In fact, [Thorbjörn Jemander] has managed to persuade a Commodore PET to play YouTube videos at a completely reasonable 30 frames per second. He describes the process of designing the “BlixTerm” hardware and software in his video (embedded below), along with lots of useful information on how to push digital systems to their absolute limits.

A video of a drifting car, as rendered by a Commodore PET displayNaturally, the PET needs a bit of assistance from modern hardware, in this case a Raspberry Pi Zero 2 W hooked up to the “User” expansion port. The Pi connects to YouTube through WiFi and loads the requested video, then downconverts it to a 640×200 grayscale stream and transforms each frame to an 80×25 grid of characters, using those from the PET’s ROM that most closely resemble the pattern needed.

While it took quite some effort to squeeze enough performance out of the Pi to do all of this in real time, the trickiest bit was getting the resulting character stream into the PET’s video memory fast enough. To do this, [Thorbjörn] designed a special interface card with 2 KB of dual-port SRAM, which enabled the Pi to store its video frames as soon as they were ready on one side, and the PET to load them at its own pace from the other side. With just sixteen microseconds available to process each byte, the PET’s CPU can execute only four or five machine code instructions; barely enough to load and store a single character and jump to the next memory address.

The end result, as you can see in the video, is really impressive. Even within the constraints of the Commodore character set, the resulting image is clearly recognizable, while the frame rate seems to defy the hardware’s limitations.

If you’re a Commodore aficionado and wondering what the hell that weird PET 600 model is all about, [Thorbjörn] made a video about that too; it’s a rebadged 8296 aimed at the Swedish market. We’ve actually seen a project to generate live video on the PET before, although at a much lower frame rate. Thanks for the tip, [Keith Olson]!

Continue reading “BlixTerm Brings Full-Speed YouTube Video To The Commodore PET”

BenAkrin-PlottyBot-TypeWriterMode

PlottyBot: A DrawBot That Plots A Lot

Fire up those 3D printers because if you’re like us, you’ll want your own PlottyBot. Still, have a pile of “thank you notes” to write from recent winter holiday gift exchanges? Hoping to hand letter invitations to a wedding or other significant event? Need some new art to adorn your lock-down shelter or shop? It sounds like [Ben] could help you with that.

Besides being a handsomely designed desktop DrawBot, this project from [Ben] looks to have some solid software to run it, a community of makers who have tested the waters, and very detailed build instructions. Those include everything from a BOM with links for ordering parts to animated GIF assembly for the trickier steps.

If you’d like to graduate from “handwritten” cards and letters to something poster-sized are customization tips for expanded X and Y dimensions. As we’ve included in other recent articles, one caveat to mention is the current scarcity of the Raspberry Pi Zeros that PlottyBots require. But if you have one on hand or think you’ll be able to source one by the time you’ve 3D printed all the parts, it might just be the perfect time to add another bot to your family. As a heads up, this project is self-hosted on a solar-powered server, so maybe take turns reading the complete build log.

A nice bonus if you need help drawing something suitably complex to require a robot’s help, [Ben] also created MandalGaba which looks like an awesome online tool for drawings like the ones shown above.

New Pi Zero Gains Unapproved Antennas Yet Again

We’ve only started to tap into the potential of the brand new Pi Zero 2. Having finally received his board, [Brian Dorey] shows us how to boost your Pi’s WiFi, the hacker way. Inline with the onboard WiFi antenna can be found a u.FL footprint, and you just know that someone had to add an external antenna. This is where [Brian] comes in, with a photo-rich writeup and video tutorial, embedded below, that will have you modify your own Zero in no time. His measurements show seeing fourteen networks available in a spot where he’d only see four before, and the RSSI levels reported have improved by 5 dB -10 dB, big when it comes to getting a further or more stable connection.

With old laptops being a decent source of WiFi antennas, you only need to procure a u.FL connector and practice soldering a bit before you take this on! The hardest part of such a project tends to be not accidentally putting any solder on the u.FL connector’s metal can – and [Brian] mostly succeeds in that! He shows how to disconnect the external antenna to avoid signal reflections and the like, and, of course, you will be expected to never power your Pi Zero on without an attached antenna afterwards, lest you have your transmitter become fatally confused by the mismatch of hardware-defined impedance expectations. A Pi Zero isn’t the only place where you’ll encounter footprints for connectors you can add, and arguably, that’s your duty as a hacker – modifying the things you work with in a way that adds functionality. Don’t forget to share how you did it!

This trick should be pretty helpful if you’re ever to put your new Pi Zero in a full-metal enclosure. Curious about the Raspberry Pi antenna’s inner workings? We’ve covered them before! If you’d like to see some previous Raspberry Pi mods, here’s one for the Pi 3, and here’s one for the original Zero W – from [Brian], too!
Continue reading “New Pi Zero Gains Unapproved Antennas Yet Again”

PiGlass V2 Embraces The New Raspberry Pi Zero 2

Well, that certainly didn’t take long. It’s been just about a month since the Raspberry Pi Zero 2 hit the market, and we’re already seeing folks revisit old projects to reap the benefits of the drop-in upgrade that provides five times the computational power in the same form factor.

Take for example the PiGlass v2 that [Matt] has been working on. He originally put the Pi Zero wearable together back in 2018, and while it featured plenty of bells and whistles like a VuFine+ display, 5 MP camera, and bone conduction audio, the rather anemic hardware of the original Zero kept it from reaching its true potential.

But thanks to the newly released Pi Zero 2, slapping quad-core power onto the existing rig was as easy as unplugging a couple cables and swapping out the board. With the increased performance of the new Pi, he’s able to play multimedia content through Kodi, emulate classic games with RetroPie, and even stream live video to YouTube. Using the custom menu seen in the video below, a small off-the-shelf Bluetooth controller from 8BitDo is all he needs to control the wearable’s various functions without getting bogged down with a full keyboard and mouse.

Although it might not have the punch of its larger siblings, the new Pi Zero 2 is definitely a very exciting platform. The highly efficient board delivers performance on par with the old Pi 3, while still being well positioned for battery powered projects like this one. We’re eager to see what develops as the new SBC finds its way into the hands of more hackers and makers in the coming months.

Continue reading “PiGlass V2 Embraces The New Raspberry Pi Zero 2”

The Pi Zero 2 W Is The Most Efficient Pi

Last week we saw the announcement of the new Raspberry Pi Zero 2 W, which is basically an improved quad-core version of the Pi Zero — more comparable in speed to the Pi 3B+, but in the smaller Zero form factor. One remarkable aspect of the board is the Raspberry-designed RP3A0 system-in-package, which includes the four CPUs and 512 MB of RAM all on the same chip. While 512 MB of memory is not extravagant by today’s standards, it’s workable. But this custom chip has a secret: it lets the board run on reasonably low power.

When you’re using a Pi Zero, odds are that you’re making a small project, and maybe even one that’s going to run on batteries. The old Pi Zero was great for these self-contained, probably headless, embedded projects: sipping the milliamps slowly. But the cost was significantly slower computation than its bigger brothers. That’s the gap that the Pi Zero 2 W is trying to fill. Can it pull this trick off? Can it run faster, without burning up the batteries? Raspberry Pi sent Hackaday a review unit that I’ve been running through the paces all weekend. We’ll see some benchmarks, measure the power consumption, and find out how the new board does.

The answer turns out to be a qualified “yes”. If you look at mixed CPU-and-memory tasks, the extra efficiency of the RP3A0 lets the Pi Zero 2 W run faster per watt than any of the other Raspberry boards we tested. Most of the time, it runs almost like a Raspberry Pi 3B+, but uses significantly less power.

Along the way, we found some interesting patterns in Raspberry Pi power usage. Indeed, the clickbait title for this article could be “We Soldered a Resistor Inline with Raspberry Pis, and You Won’t Believe What Happened Next”, only that wouldn’t really be clickbait. How many milliamps do you think a Raspberry Pi 4B draws, when it’s shut down? You’re not going to believe it.

Continue reading “The Pi Zero 2 W Is The Most Efficient Pi”