Building A Ten-Hundred Key Computer Word-Giving Thing

From the styling of this article’s title, some might assume that the Hackaday editors are asleep at the switch this fine day. While that might be true — it’s not our turn to watch them — others will recognize this tortured phrasing as one way to use the 1,000 most commonly used words in the English language to describe a difficult technical project, such as [Attoparsec]’s enormous and enormously impractical ten-hundred word keyboard.

While the scale of this build is overwhelming enough, the fact that each key delivers a full word rather than a single character kind of throws the whole keyboard concept out the window. The 60×17 matrix supports the 1,000 most common English words along with 20 modifier keys, which allow a little bit of cheating on the 1-kiloword dictionary by letting you pluralize a word or turn it into an adjective or adverb. Added complexity comes from the practical limits of PCB fabrication, which forces the use of smaller (but still quite large) PCBs that are connected together. Luckily, [Attoparsec] was able to fit the whole thing on five identical PCBs, which were linked together with card-edge connectors.

The list of pain points on this six-month project is long, and the video below covers them all in detail. What really stood out to us, though, was the effort [Attoparsec] put into the keycaps. Rather than 3D printing his own, he used dye sublimation to label blank keycaps with the 1,000 words. That might sound simple, but he had to go through a lot of trial and error before getting a process that worked, and the results are quite nice. Another problem was keeping the key switches aligned while soldering, which was solved with a 3D printed jig. We also appreciate the custom case to keep this keyboard intact while traveling; we’re going to keep that build-your-own road case service in mind for future projects.

This mega-keyboard is a significant escalation from [Attoparsec]’s previous large keyboard project. The results are pretty ridiculous and impractical, but that’s just making us love it more. The abundance of tips and tricks for managing a physically expansive project are just icing on the cake.

Continue reading “Building A Ten-Hundred Key Computer Word-Giving Thing”

3D Printing With Sublime Sublimation

[Teaching Tech] got an interesting e-mail from [Johan] showing pictures of 3D prints with a dye-sublimated color image on the surface. Normally, we think of dye sublimation, we think of pressing color pictures onto fabric, especially T-shirts. But [Johan] uses a modified Epson inkjet printer and has amazing results, as you can see in the video below.

The printers use separate tanks for ink, which seems to be the key. If you already have an Espon “tank” printer, you are halfway there, but if you don’t have one, a cheap one will set you back less than $200 and maybe even less if you pick one up used.

Continue reading “3D Printing With Sublime Sublimation”

A Real-World Experience In PCB Dye-Sub Printing

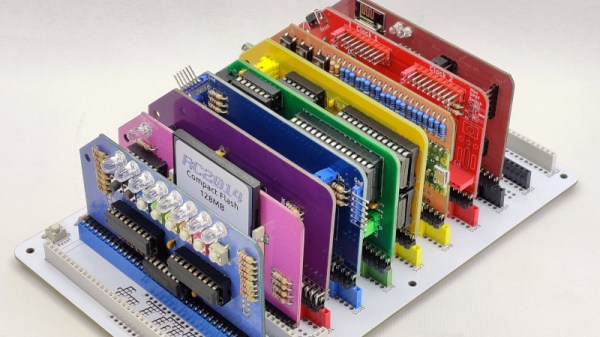
We all love PCB artwork, but those who create it work under the restriction of having a limited color palette to work with. If it’s not some combination of board, plating, solder mask, and silk screen, then it can’t easily be rendered on a conventional PCB. That’s not the end of the story though, because it’s technically possible to print onto a PCB and have it any color you like. Is it difficult? Read [Spencer]’s experience creating a rainbow Pride version of his RC2014 modular retrocomputer.

Dye-sublimation printing uses an ink that vaporizes at atmospheric pressure without a liquid phase, so a solid ink is heated and the vapor condenses back to solid on the surface to be printed. Commercial dye-sub printers are expensive, but there’s a cheaper route in the form of an Epson printer that can be converted. This in turn prints onto a transfer paper, from which the ink is applied to the PCB in a T-shirt printing press.

[Spencer] took the advice of creating boards with all-white silkscreen applied, and has come up with a good process for creating the colored boards. There is still an issue with discoloration from extra heat during soldering, so he advises in the instructions for the kit to take extra care. It remains however a fascinating look at the process, and raises the important point that it’s now within the reach of perhaps a hackerspace.

Regular readers will know we’ve long held an interest in the manufacture of artistic PCBs.