Dimming LED Bulbs Designed To Replace Halogen Lamps

dimming-led-halogen-replacements
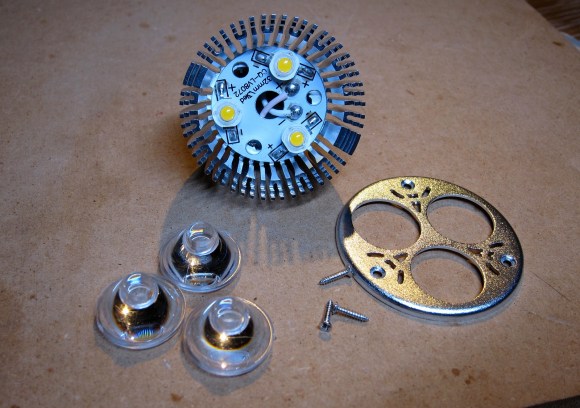
Halogen bulbs put out a lot of focused light but they do it at the expense of burning up a lot of Watts and generating a lot of heat. The cost for an LED replacement like the one seen disassembled above has come down quite a bit. This drove [Jonathan Foote] to purchase several units and he just couldn’t resist tearing them apart to try out a couple of hacks.

The one we find most interesting is a PWM based dimming hack he pulled off with an Arduino board and a FET. The bulbs are designed to be dimmable through the 12V supply that feeds the light fixture. But the relationship of dimmer position to light level is not linear and [Jonathan] figured he could do better. His solution is to add a FET in parallel with the LEDs. When activated it basically shunts the current around the diodes, resulting in a dimming. The video below shows this in action. We wonder if the flashing is a camera artifact or if you pick that up with your eye as well?

You may also be interested to read his post on Gelling the LED bulbs. Gels are colored filters for lights (or camera lenses). He cuts his preferred color down to size and inserts it between the LEDs and the lenses.

Continue reading “Dimming LED Bulbs Designed To Replace Halogen Lamps”

DIY Ballistic Gel


Earlier today, we looked at DIY ballistic glass, so we decided to look into DIY ballistic gel as well. Anyone who watches Mythbusters is probably already well familiar with their extensive use of this wonderful gel. Turns out the stuff is beyond easy to create at home. With some gelatin molds (and firepower) you could have a lot of fun with it.

To get started, pick up a box of gelatin powder from your local supermarket. Using 8 oz. of the powder and 2 quarts of cold water, stir together until the consistency is thick and all powder moist. Then, place the mixture in the fridge to chill for two hours. You will then need to heat the mixture until melted; be sure the liquid does not exceed 130 degrees. Finally, apply a layer of nonstick spray to your favorite mold or tupperware, and pour the mixture in. Allow to set in the fridge for 36 hours before use.

If you want even more DIY ballistics, check out this nice guide to creating your own chronograph, for measuring bullet velocity. After the break are videos on making and, of course, shooting the final product.

Continue reading “DIY Ballistic Gel”

Make Your Own Aerogel

Our own [Eliot] dug this one up from the grave. While the recipe has been online for a while, do you know many 10 year olds who made their own Aerogel, that wonderful insulator that’s essentially gelled air? [William] made some(cache) for his science project in 2002. He started with Silbond H5, a combination of ethyl alcohol and ethyl polysilicate. You can get the MSDS after a painless email registration on the Silbond website. After the gel is formed you have to soak it in an alcohol bath to make sure all water has been removed from the structure. Then the gel is placed in a drying chamber. Liquid CO2 is forced into the chamber to displace all the alcohol in the chamber and the structure. Once the the alcohol is gone the supercritical drying phase begins. The temperature is raised to 90degF and the pressure is regulated to 1050psi. At this point the liquid CO2 in the gel structure takes on gas properties (looses surface tension) and leaves the silica structure. All that remains in the chamber is your new Aerogel which is 99% empty space and 1000 times less dense than glass.

Of course, if you’re lazy, you can buy some here.