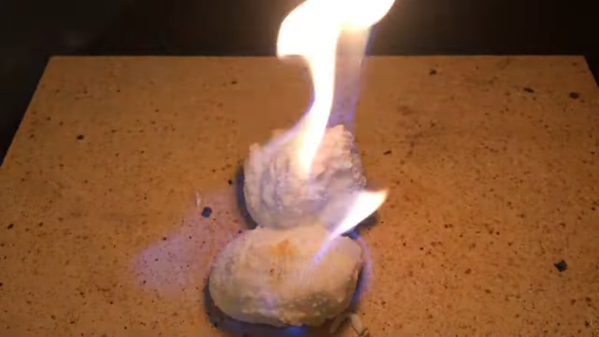
Behold A Microscope That Sees By Squashing Things Into It

“Look with your eyes, not your hands” is something many of us have heard while growing up, but that doesn’t apply to the touch-sensitive microscope [Steve Mould] got to play with.

Gel pad removed, exposing lens and multi-directional lighting.

The wand-like device is made by Gelsight, and instead of an optical lens like a normal microscope, it sports a gel pad on the sensing end. By squashing an object into the gel, the device is able to carefully illuminate and image the impression created. By taking multiple images lit from different angles, a lot of information can be extracted.

The result is a high-resolution magnification — albeit a monochromatic one — that conveys depth extremely well. It’s pretty neat clearly seeing tiny specks of dust or lint present on surfaces when [Steve] demonstrates imaging things like coin cells.

Many a hacker knows that the devil is in the details when it comes to executing an idea. Even so, the basic principles of the Gelsight seem simple enough and possibly within the realm of inspired DIY in the same way that we saw a CNC gantry and USB microscope repurposed as an optical comparator.

Watch the Gelsight in action in the video below, embedded below the page break.

Continue reading “Behold A Microscope That Sees By Squashing Things Into It”

Behold The Giant Eye’s Orrery-Like Iris And Pupil Mechanism

This is an older project, but the electromechanical solution used to create this giant, staring eyeball is worth a peek. [Richard] and [Anton] needed a big, unblinking eyeball that could look in any direction and their solution even provides an adjustable pupil and iris size. Making the pupil dilate or contract on demand is a really nice feature, as well.

The huge fabric sphere is lit from the inside with a light bulb at the center, and the iris and pupil mechanism orbit the bulb like parts of an orrery. By keeping the bulb in the center and orbiting the blue gel (for the iris) and the opaque disk (for the pupil) around the bulb, the eye can appear to gaze in different directions. By adjusting the distance of the disks from the bulb, the size of the iris and pupil can be changed.

A camera system picks out objects (like people) and directs the eye to gaze at them. The system is clever, but the implementation is not perfect. As you can see in the short video embedded below, detection of a person walking by lags badly. Also, there are oscillations present in the motion of the iris and pupil. Still, as a mechanism it’s a beauty.

Continue reading “Behold The Giant Eye’s Orrery-Like Iris And Pupil Mechanism”

Printing Without Supports!

If print supports have ever caused you grief, know that there’s an alternate printing method in the works. First: get yourself a vat of industrial gel in which to print.

Rapid Liquid Printing(RLP) is being developed in collaboration by Michigan-based company [Steelcase] and [Skylar Tibbits’] Self Assembly Lab at MIT. RLP is touting advantages over traditional 3D printing technology such as reduced print times, a higher quality print, and enabling larger scale prints — all without supports!

Working with rubber, plastic, or foam, the printing material is injected by nozzle into a basin of industrial gel. That gel suspends the print throughout the process without bonding to it and the finished product is simply lifted out of the gel and rinsed off. Shown off at the Design Miami event earlier this month, onlookers could pick up finished lampshades and tote bags after mere minutes.

Continue reading “Printing Without Supports!”

Get Into Biohacking On The Cheap With This Electrophoresis Rig

If you want to get into electronics, it’s pretty straightforward: read up a little, buy a breadboard and some parts, and go to town. Getting into molecular biology as a hobby, however, presents some challenges. The knowledge is all out there, true, but finding the equipment can be a problem, and what’s out there tends to be fiendishly expensive.

So many would-be biohackers end up making their own equipment, like this DIY gel electrophoresis rig. Electrophoresis sorts macromolecules like DNA or proteins by size using an electric field. For DNA, a slab of agarose gel is immersed in a buffer solution and a current through the tank moves the DNA through the gel. The shorter the DNA fragment, the easier it can wiggle through the pores in the gel, and the faster it migrates down the gel. [abizar]’s first attempt at a DIY gel rig involved a lot of plastic cutting and solvent welding, so he simplified the process by using the little plastic drawers from an old parts cabinet. With nichrome and platinum wires for electrodes for the modified ATX power supply, it’s just the right size and shape for the gel, which is cast in a separate mold. The video below shows the whole build, and while [abizar] doesn’t offer much detail on recipes or techniques, there are plenty of videos online to guide you.

Need more apparatus to deck out your lab? We’ve got you covered there too.

Continue reading “Get Into Biohacking On The Cheap With This Electrophoresis Rig”

Drone-Drone

Yes, the pun was ripped off the article that got our attention . It was just too good not to share. A team of researchers in Japan created an artificial honeybee, a small drone that is meant to cross-pollinate flowers. The (still) manually controlled drone is 4 centimetres wide and weighs only 15 grams. At the bottom side of the drone, a mix of a special sticky gel and horse hair resides. The purpose of this gel is to collect the pollen particles as it bumps into the flowers and exchange it as it goes hopping around from plant to plant. In experiments, the drone was able to cross-pollinate Japanese lilies (Lilium japonicum) without damaging the plant, stamens or pistils when the drone flew into the flowers.

The gel used for the artificial pollinators was the result of a failed experiment back in 2007. While researching electrical conduction liquids, Eijiro Miyako, a chemist at the National Institute of Advanced Industrial Science and Technology (AIST) Nanomaterial Research Institute, produced a sticky gel with no useful electrical characteristics and stored it away in a cabinet. After 8 years, when cleaning the cabinet, he found the gel still sitting there, unspoiled.

“This project is the result of serendipity. We were surprised that after 8 years, the ionic gel didn’t degrade and was still so viscous. Conventional gels are mainly made of water and can’t be used for a long time, so we decided to use this material for research.”

Continue reading “Drone-Drone”

Dimming LED Bulbs Designed To Replace Halogen Lamps

dimming-led-halogen-replacementsHalogen bulbs put out a lot of focused light but they do it at the expense of burning up a lot of Watts and generating a lot of heat. The cost for an LED replacement like the one seen disassembled above has come down quite a bit. This drove [Jonathan Foote] to purchase several units and he just couldn’t resist tearing them apart to try out a couple of hacks.

The one we find most interesting is a PWM based dimming hack he pulled off with an Arduino board and a FET. The bulbs are designed to be dimmable through the 12V supply that feeds the light fixture. But the relationship of dimmer position to light level is not linear and [Jonathan] figured he could do better. His solution is to add a FET in parallel with the LEDs. When activated it basically shunts the current around the diodes, resulting in a dimming. The video below shows this in action. We wonder if the flashing is a camera artifact or if you pick that up with your eye as well?

You may also be interested to read his post on Gelling the LED bulbs. Gels are colored filters for lights (or camera lenses). He cuts his preferred color down to size and inserts it between the LEDs and the lenses.

Continue reading “Dimming LED Bulbs Designed To Replace Halogen Lamps”

DIY Ballistic Gel


Earlier today, we looked at DIY ballistic glass, so we decided to look into DIY ballistic gel as well. Anyone who watches Mythbusters is probably already well familiar with their extensive use of this wonderful gel. Turns out the stuff is beyond easy to create at home. With some gelatin molds (and firepower) you could have a lot of fun with it.

To get started, pick up a box of gelatin powder from your local supermarket. Using 8 oz. of the powder and 2 quarts of cold water, stir together until the consistency is thick and all powder moist. Then, place the mixture in the fridge to chill for two hours. You will then need to heat the mixture until melted; be sure the liquid does not exceed 130 degrees. Finally, apply a layer of nonstick spray to your favorite mold or tupperware, and pour the mixture in. Allow to set in the fridge for 36 hours before use.

If you want even more DIY ballistics, check out this nice guide to creating your own chronograph, for measuring bullet velocity. After the break are videos on making and, of course, shooting the final product.

Continue reading “DIY Ballistic Gel”