Car Stereo AUX Input Taps Into CD Ribbon Cable

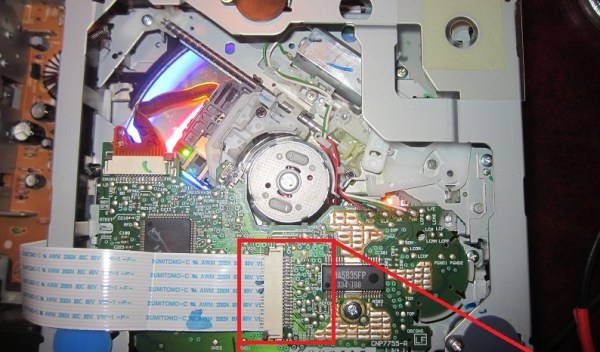
[Gezepi] wanted to add an auxiliary input to the stereo in his 1994 Camry. At first look there wasn’t an easy way to patch into the system. But a bit of probing with an oscilloscope and figured out that he could inject audio through the CD ribbon cable shown above. The CD reader is a self-contained unit that receives commands through the cable, and passes analog stereo audio back to the receiver portion of the head unit. We’re not sure how he figured out which pins to tap into, but it may have been as easy as probing with some headphones while a CD is playing.

The extent of his hack is documented in the image below. He cut the two audio leads on the CD side of the ribbon cable, then soldered his auxiliary jack on the receiver side of the cable connector. This ensures that two audio signals aren’t being piped into the receiver at the same time. Unfortunately it also means that he won’t be able to use the CD player. We have seen other methods that use a special audio jack as a pass-through which cuts the connection when a jack is inserted. That’s the method used in this Subaru hack.

Continue reading “Car Stereo AUX Input Taps Into CD Ribbon Cable”

An XBMC Controller Built For Grandma

10-finished-controller

Is your grandmother cool enough to use XBMC? Maybe it’s a testament to the functionality of the wildly popular home entertainment suite rather than the hipness of your elders. But indeed, [Brian’s] grandmother is an XBMC user who needed a controller with larger buttons to accommodate her. This is what he built. He sent us a set of photos and a description of the build, both of which you can see below. He was inspired to get in touch after reading about the custom controller which [Caleb] has been working on for [Thomas].

[Brian] didn’t get bogged down with electronics. He went with the simple, cheap, and popular solution of gutting a wireless keyboard. After tracing out the keys he needed he got rid of everything except the PCB. A wiring harness was crafted by soldering jumper wires to the PCB traces and terminating them with crimping slide connectors. The arcade buttons he used have terminals for the connectors which will make it simple to mate the electronics with the mechanics.

The enclosure is a little wooden hobby box. It originally had a lid with a mirror. [Brian] broke open the lid’s frame to replace it with a thin piece of plywood which hosts the buttons. Inside you’ll find a battery power source. These keyboards last a long time on one set of batteries so he just needs to remember to preemptively replace them from time to time. The finishing touch was to add decals so that granny can figure out what each button does.

Continue reading “An XBMC Controller Built For Grandma”

Bringing ELua To The Mbed

[Karl] loved his mbed – a tiny little ARM-powered microcontroller platform – but he wanted an interactive programming environment. BASIC just wasn’t cutting it, so he decided to bring eLua to his mbed.

When choosing an interactive development environment for microcontrollers, you generally have two choices: old or huge. Sure, there is a middle ground with Python on an ARM, but why not use something explicitly designed for microcontrollers?

To get eLua running on his mbed, [Karl] downloaded the latest version and plopped it on his mbed. The current version, 0.9, doesn’t have support for an SD card, severely limiting its usefulness. [Karl] got around this by wiring up an SD card to the mbed, giving him gigabytes of space for all his development work.

While the AVRs and PICs of the world are stuck with languages like C or worse, the new ARM boards available are more than capable of running a complete eLua development environment, with everything accessible through a terminal. [Karl] even wrote his own editor for the mbed and he’ll shortly be working on a few dozen embedded projects he has in mind.

Send An Arduino To The Moon For $300

sat

We’ve seen Kickstarter campaigns to put a single satellite into space and one to launch your own personalized postage-stamp sized satellite into low Earth orbit. This time, though, you can break the bonds of Earth and send your own Arduino compatible satellite on a collision course with the moon. The project is called Pocket Spacecraft, and exactly as its name implies, it allows you to send a small, flat, 8 cm diameter spacecraft to the surface of the moon.

The pocket spacecraft are made of metallized kapton, a very thin membrane stretched inside a loop of wire. On board this paper-thin spacecraft are a pair of solar cells and a bare die MSP430 microcontroller connected to a suite of sensors. Before launch, you can program your tiny space probe with commands to relay data back to Earth, either useful scientific data or a simple tweet.

These pocket spacecraft will be launched from a cubesat – a highly successful line of amateur spacecraft that are usually launched by hitching a ride with larger commercial satellites. To get from low Earth orbit to the moon is much harder than just hitchhiking, so the cubesat mothership comes equipped with either a solar sail or its own engine that electrolysed water into hydrogen and oxygen, the perfect rocket fuel.

Pocket Spacecraft is an amazingly impressive feat; there are literally dozens of amateur-built spacecraft orbiting above our heads right now, but so far none have ventured more than a few hundred miles away from their home planet. Getting to the moon with an amateur spacecraft is an amazing accomplishment, and definitely worthy of the $300 price tag.

Dimming LED Bulbs Designed To Replace Halogen Lamps

dimming-led-halogen-replacements
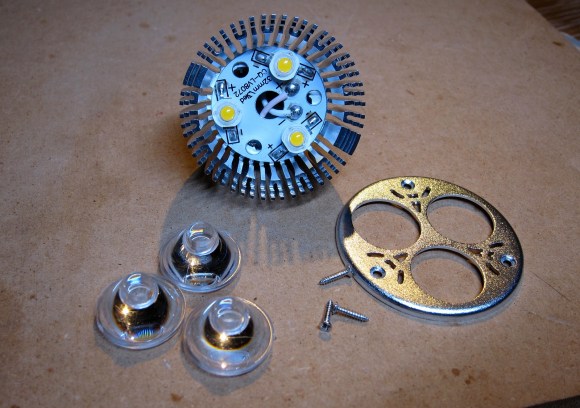
Halogen bulbs put out a lot of focused light but they do it at the expense of burning up a lot of Watts and generating a lot of heat. The cost for an LED replacement like the one seen disassembled above has come down quite a bit. This drove [Jonathan Foote] to purchase several units and he just couldn’t resist tearing them apart to try out a couple of hacks.

The one we find most interesting is a PWM based dimming hack he pulled off with an Arduino board and a FET. The bulbs are designed to be dimmable through the 12V supply that feeds the light fixture. But the relationship of dimmer position to light level is not linear and [Jonathan] figured he could do better. His solution is to add a FET in parallel with the LEDs. When activated it basically shunts the current around the diodes, resulting in a dimming. The video below shows this in action. We wonder if the flashing is a camera artifact or if you pick that up with your eye as well?

You may also be interested to read his post on Gelling the LED bulbs. Gels are colored filters for lights (or camera lenses). He cuts his preferred color down to size and inserts it between the LEDs and the lenses.

Continue reading “Dimming LED Bulbs Designed To Replace Halogen Lamps”