Power Supply Design For Clean Jazz Amps

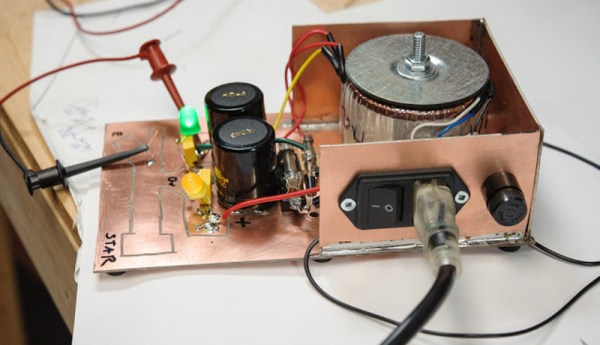
Power supply design is a broad field, requiring entirely different tools and techniques depending on what you’re working with. Creating a low-cost and compact mobile phone charger is a completely different ball game to designing the power supply for a medium-sized laser cutter, for example. [Vasily Ivanenko] has been designing a power supply for a clean jazz guitar amplifier, and has helpfully documented the process.

For a guitar amplifier which prides itself on clean tones, it’s highly important to avoid all sources of noise, to let the natural sound of the guitar come through as clearly as possible. [Vasily] notes that this requires careful component selection, as well as consideration of the placement of key parts and the construction of the power supply. Strategies to minimise inductive and capacitive coupling are discussed, as well as grounding schemes to minimise undesirable hum or buzz during amplifier operation.

The article is the first of a three part series, in which [Vasily] will then cover the full design of the guitar amp, including a focus on the design of the power amplifier stage. We’ve seen some of [Vasily]’s work before, like this discussion of how to build high quality audio amplifiers for ham radio use. 

Portable Guitar Amp – Is That A Linux In Your Pocket?

When it comes to music production and audio engineering, Linux isn’t the most common choice. This isn’t for lack of decent tools or other typical open source usability issues: Ardour as a highly capable, feature-rich digital audio workstation, the JACK Audio Connection Kit for powerful audio routing, and distributions like Ubuntu Studio packing all the essentials nicely together, offer a great starting point as home recording setup. To add variation to your guitar or bass arrangement on top of that, guitarix is a virtual amp that has a wide selection of standard guitar effects. So when [Arnout] felt that his actual guitar amp’s features were too limiting, he decided to build himself a portable, Linux-based amp.

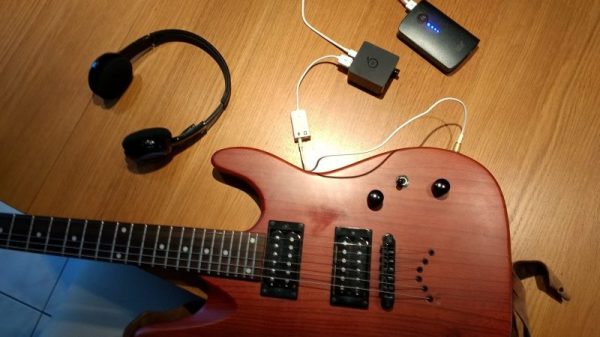
[Arnout] built the amp around an Orange Pi Zero with an expansion board providing USB ports and an audio-out connector, and powers it with a regular USB power bank to ensure easy portability. A cheap USB audio interface compensates the lacking audio-in option, and his wireless headphones avoid too much cable chaos while playing. The amp could theoretically be controlled via a MIDI pedalboard, but [Arnout] chose to use guitarix’s JSON API via its built-in Python web interface instead. With the Orange Pi set up as WiFi hotspot, he can then use his mobile phone to change the effect settings.

One major shortcoming of software-based audio processing is signal latency, and depending on your ear, even a few milliseconds can be disturbingly noticeable. To keep the latency at a minimum, [Arnout] chose to set up his Orange Pi to use the Linux real-time kernel. Others have chosen a more low-level approach in the past, and it is safe to assume that this won’t be the last time someone connects a single-board computer to an instrument. We surely hope so at least.

Controlling Guitar Amps With Servos

[fichl] plays electric guitar, and with that hobby comes an incredible amount of knob twisting and dial turning. This comes at a cost; he can’t change the settings on his small amp without taking his hands off the guitar. While larger, more expensive amps have multiple channels and footswitches, this tiny amp does not. Instead of upgrading, [fichl] came up with a device that turns his single channel amp into a completely programmable one, with just an Arduino and a handful of servos.

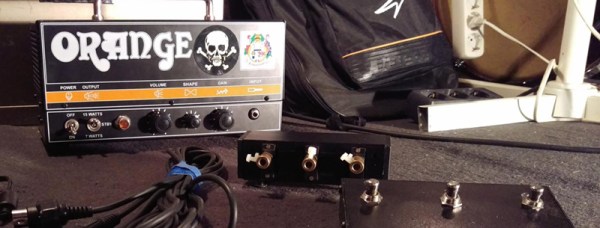
The amp in question – an Orange Dark Terror head – has just three knobs on the front of the chassis, volume, shape, and gain. [fichl] had the idea of controlling these knobs electronically, and the simplest solution he came up with is cheap hobby servos. These servos are mounted in an aluminum box, and mount to the knobs with a few shaft couplings.

The footswitch is the brains of the setup, with three buttons, four LEDs, and a DIN-5 output jack that delivers power, ground, and three PWM signals to the servo box. With the help of an Arduino Nano, [fichl] can change any of the knobs independently, or switch between twelve programmed settings. It’s an interesting setup, and something that could serve as a prototype for a much larger system on a much larger amp.

Trash Can Guitar Cab

Guitar Speaker Cabinet Actually Belongs In Garbage Can

[Dano] builds a lot of guitar pedals and amps. He needed a speaker cabinet dedicated to this task in order to be a consistent reference when checking out his electronic creations. He ordered a couple of 10″ guitar speakers…. and they sat around for a while.

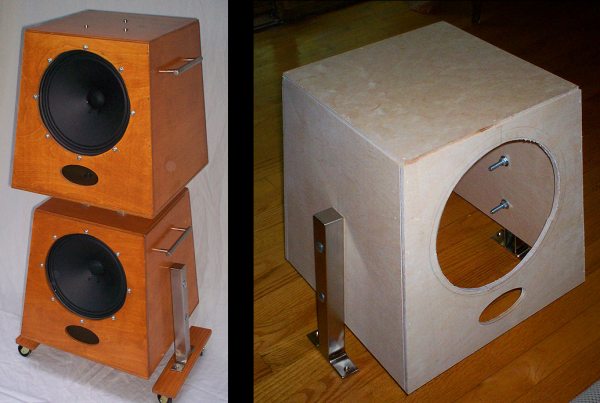
Then one day at the craft store, he stumbled on an inexpensive wooden trash can. It had a tapered design and came with a lid. As would any normal person, [Dano] immediately thought these would make a perfect speaker cabinet so he bought two of them.

The trash cans would be used in an upside-down orientation. The intended lid makes for a well fitting bottom of the cabinet. Holes were cut for the speaker and two terminal blocks. Since these cabinets would be used for testing a bunch of different amps, two different terminal blocks were used to permanently have multiple connector types available.

A pair of modern kitchen cabinet handles were used as carrying handles for each of the two cabinets. If a speaker cabinet one speaker tall is cool, a cabinet two speakers tall must be twice as cool. To get there, the two cabinets were bolted together using electrical conduit as an industrial looking spacer. Those brackets bolted to the sides of the bottom cabinet are actually Ikea shelf brackets that [Dano] had bought and never used. The Ikea brackets support casters making for easy moving around the studio.

Overall, [Dano] is happy with how his cabinets sound. They are very unique and interesting at the least. We’d be happy to play some riffs through them!

Artistic Guitar Practice Amp

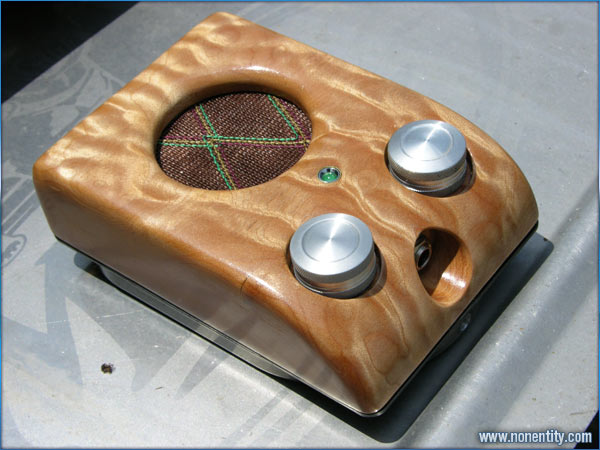
Sweet Guitar Practice Amp Is A Literal Work Of Art

Check out this odd different looking guitar practice amp. It looks like a professionally manufactured product but it certainly is not. [Bradley] made it himself, not just a little bit of it either, all of it.

One of the first things you notice is the quilted maple wood grain of the case. There is no veneer here, this started out as a solid maple block. The front radius was shaped and the recesses for the control knobs and input jack were bored out using a forstner bit. The case was sanded smooth and several coats of high gloss tung oil was rubbed on to give the wood a perfect finish. A small piece of grill cloth protects the speaker while adding a little more class to the amp. The bottom of the case is actually a cover for a computer hard drive. A rectangular hole cut in the hard drive cover makes way for a 9 volt battery compartment.

Artistic Guitar Practice Amp

There are two control potentiometers, one for volume and one for gain. Any old knobs wouldn’t do for this project. [Bradley] knurled and turned his own aluminum knobs and they look awesome! The units power is turned on when the guitar cord is plugged in. An LED not only indicates that the power is on but it also gets brighter with the volume input from the guitar. The LED also pulses if two strings are out of tune with each other giving the guitarist an opportunity to tune one of the strings until the LED stops pulsing. When it is time for some private jamming headphones can be plugged into the amp and doing so cuts power to the speaker.

The electronic circuitry is [Bradley’s] design also, but unfortunately he doesn’t share the schematic. I suppose he wants to keep his amp one-of-a-kind.

Junkyard Tube-amp Gold!

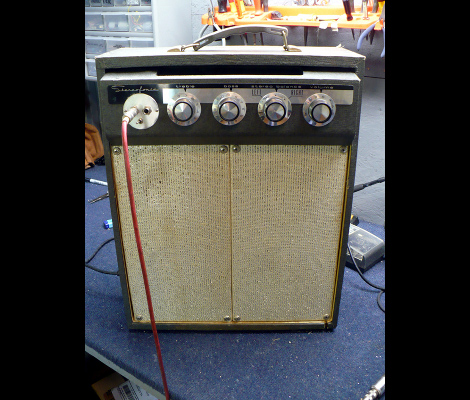
Why, oh why, oh why do people toss out awesome retro hardware?? Luckily, [Dino] visited the junk depot himself at just the right time. Even though you’re not supposed to take things others have dropped off he poached the retro portable turntable that was just sitting there. He cracked it open and figured out how to turn it into this great tube guitar amp without going to all that much trouble.

The original turntable used to be where the front grates are in the image above. The guitar amp version sits the case on end, which works perfectly since the carrying handle is now on the top. This orientation would have put the amplifier hardware upside down, so [Dino] pulled it out and flipped it around. The speakers for the turntable were made to sit separately and be connected with wires. But they also doubled as a lid for the unit. This makes them the perfect size to fit side-by-side in the void left by the turn table.

[Dino] records his own music for the build video after the break using his new hardware. Sounds great, looks great, and it was saved from being needlessly buried in the ground. Fantastic!

Continue reading “Junkyard Tube-amp Gold!”