Human Flight At 190 MPH With No Steering

It’s been a while since we looked in on a TED talk but this one is fantastic. [Yves Rossy] is interviewed about his jet-powered flight wing at the TED conference. He designed the unit as a form of personal flight. He straps it on, jumps out of a plane, then flies across the sky until he runs out of fuel. There’s no steering mechanism; it’s more of a fixed-wing hang glider plus jet turbine engines. But the pilot can affect the direction of the wing by moving his body.

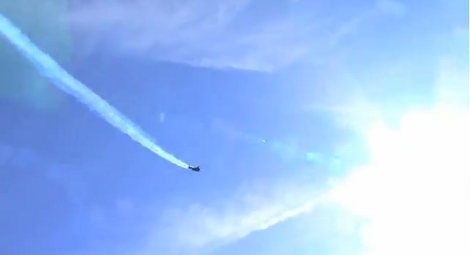
We’ve embedded the video after the break. The first five minutes are all flight footage (which you’re going to want to watch… we specifically kept the banner image vague so as not to spoil it for you). After that, you’ll enjoy the interview where details about the hardware and its operation are shared.

The wing itself is about 2 meters across, hosting four kerosene-powered turbine engines. There’s about eight minutes worth of fuel on board, which [Yves] monitors with a clock while also keeping an eye on the altimeter. Landings are courtesy of a parachute, with a second on board as a backup. If things go badly–and they have as you’ll hear in the interview–an emergency release frees the pilot from the machine.

Want to build your own? Maybe this will get you started.

Continue reading “Human Flight At 190 MPH With No Steering”

I’ll See Your Launchpad Controlled Arm And Raise You Arduino Controlled Autonomy

This OWI robot arm has been hacked to add position sensors and Arduino control. [Chris Anderson] took one look at the Launchpad controlled OWI from earlier today and said “wait a minute, I’ve already posted my own version of that project”. Well, that will teach him not to tip us off about his hacks!

The position control is a really nice addition. Potentiometers added to each of the joints (shoulder, elbow, and wrist) can be read by the ADC pins on the Arduino. Just a bit of calibration will let the microcontroller board know the position of the arm at any given time. The control technique is the same as the Launchpad hack, with one glaring drawback. [Chris] is using the Adafruit motor driver shield. It uses L293D H-bridge chips, but it only has four channels. There are five motors on this arm, so the video after the break shows it moving around without any outside instruction, but you won’t see it grab onto anything since the Arduino can’t move the gripper!

Still, the position feedback makes the case for this version. Just remember to order an extra chip if you want full control.

Continue reading “I’ll See Your Launchpad Controlled Arm And Raise You Arduino Controlled Autonomy”

Tracking Satellites With An Arduino

The guys over at brainwagon just finished up ANGST, the Arduino n’ Gameduinio Satellite Tracker, a build that displays 160 different satellites in Earth orbit on any SVGA monitor.

The build is of course based off an Arduino and Gameduino shield. A real-time clock is always needed for a satellite tracker, so a DS1307 RTC is thrown into the mix. The satellite data is stored on a 128KB EEPROM that is big enough to hold 750 different satellites and orbits.

The software side of things is a bit trickier. The guys at brainwagon used [James Miller]’s very popular and very old-school PLAN-13 sat tracking software. This orbit calculation program was published in 1983 and has since been ported from BBC Basic to just about every system imaginable.

Once the ANGST is hooked up and powered on, it reads the real-time clock and calculates the position of a satellite. This is done in real-time and updated every three minutes. On the screen, the last orbit (and a little more) is displayed along with the sun and the location of the ANGST. You might not find something like ANGST at the Space Command at NORAD, but we can’t think of a better way to keep track of the cubesats and spy sats above our heads.

Continue reading “Tracking Satellites With An Arduino”

Junkyard Tube-amp Gold!

Why, oh why, oh why do people toss out awesome retro hardware?? Luckily, [Dino] visited the junk depot himself at just the right time. Even though you’re not supposed to take things others have dropped off he poached the retro portable turntable that was just sitting there. He cracked it open and figured out how to turn it into this great tube guitar amp without going to all that much trouble.

The original turntable used to be where the front grates are in the image above. The guitar amp version sits the case on end, which works perfectly since the carrying handle is now on the top. This orientation would have put the amplifier hardware upside down, so [Dino] pulled it out and flipped it around. The speakers for the turntable were made to sit separately and be connected with wires. But they also doubled as a lid for the unit. This makes them the perfect size to fit side-by-side in the void left by the turn table.

[Dino] records his own music for the build video after the break using his new hardware. Sounds great, looks great, and it was saved from being needlessly buried in the ground. Fantastic!

Continue reading “Junkyard Tube-amp Gold!”

Think You Can Take Kinect To The Next Level? Check Out Kinect Accelerator

kinect-accelerator

If you’ve got a crazy ingenious idea for Microsoft’s Kinect peripheral, but don’t have the means to make your dream a reality, the Kinect Accelerator just might be the opportunity you’ve been waiting for.

Microsoft, having performed a complete 180-degree turnaround from their initial stance on Kinect hacking, is embracing developers more than ever with this new program. They are offering a $20,000 along with development space to ten startup companies, in hopes of turning out some incredible Kinect applications. At the end of the three month program, each group will have the opportunity to present their creations to a group of angel investors, which is a fantastic opportunity.

Obviously competition to gain entry into the program will be pretty fierce, but if you think you have what it takes, get your application in now. Judging by the Kinect Accelerator FAQ section, this looks to be something geared towards small tech startups rather than individuals, but it never hurts to give it a shot.

Power Strip Hack Reduces Standby Electricity Consumption

computer-standby-circuit

For years, [Rasmus] has left his computer connected directly to the mains power so that he can turn it on via Wake on Lan. While powered down, it would still continuously consume about 6W of electricity, but now that he didn’t need it to be on standby so often, he wanted to make it more energy efficient.

In Denmark, where he lives, many people use power strips that have an onboard USB cable. These strips are meant to reduce the standby power consumption of PC peripherals such as monitors by powering on the mains sockets only when the computer is active. He decided the easiest way to cut his standby energy consumption to 0W would be to power his computer via this strip as well.

While it sounds great in theory, it presented a sort of chicken/egg problem. If the computer needs to be turned on for the power strip to recognize it, then how could he also supply power to the computer from the same strip? His solution was a small circuit that would charge up while the computer was running, and still hold enough juice to kickstart the PC’s boot process, thus turning on the power strip.

It really is an ingenious way to go about things, nice job!

Simple Touch Sensors With The Arduino CapSense Library

Ever thought of using touch sensors on your projects but didn’t because it would be too much work? [Paul Stoffregen] proves that it can be pretty easy if you use the CapSense library for Arduino. Here he’s created three touch sensors, connecting them to the Teensy microcontroller with two resistors each. The larger resistor (looks like 4.7 megaohms here) sends a signal through the copper pad which is read by the secondary pin. Here that pin is protected from electrostatic discharge with the 1k resistors. The microcontroller takes a reading by measuring how long it takes the voltage to change on the input pin.

Since the CapSense library takes care of the timing involved in these readings, all you have to do is decide how your program will react to the numbers that are coming in. In the video after the break [Paul] is echoing the timing figures back through the serial monitor to get an idea of what the data looks like. He experiments with touching the copper directly, and touching it through a piece of clear tape.

We’ve seen the CapSense library at work before in this interactive exhibit piece.

Continue reading “Simple Touch Sensors With The Arduino CapSense Library”