Stuff The Ballot Boxes For The Best Hackaday Prize Entry

Last week we started the first round of community voting for The Hackaday Prize, where everyone on Hackaday.io has a voice in choosing the best project for the current theme of the week. To encourage people to vote, we’re giving away a $1000 gift card to The Hackaday Store to one person on hackaday.io if they have voted in the latest round of community voting. How are we doing that? A very, very large die and SQL queries:

https://www.youtube.com/watch?v=j6kbwU76wwA

No, no one won this week. That’s okay, because we’re giving t-shirts away to three random people who did vote. This week, [cgapeart], [Jeff], and [devonelliott] are getting t-shirts from the Hackaday Store, just because they were cool enough to vote.

We’re going to keep this round of community voting going for another week. Everyone registered on Hackaday.io gets 50 votes for each round of voting, and every Friday (around 20:00 UTC), we’ll randomly select one person registered on Hackaday.io. If that person has voted, they get a $1000 gift card for The Hackaday Store. If they haven’t voted — a t-shirt. They’re nice t-shirts, but I’d rather have the gift card.

All you have to do for a chance to win a $1000 gift card is head over to the Community Voting Page and pick which project is most likely to be widely used. There’s no wrong answer; all you have to do is decide between two projects. If you only use up one vote, you’re in the running for a $1000 gift card.

I’ll be doing another round of random, fair die rolls and SQL queries next Friday. Until then, VOTE!

Hackaday Prize Entry: Flex Modules

One of [Chris Hamilton]’s entries for The Hackaday Prize deals directly with his job. He works at Fyber Labs designing wearable and flexible electronics. While anyone can go out and buy some flex sensors and every large board house can make flex PCBs, there aren’t many people building flexible products, and even fewer are creating the tools to build these wearable electronics. To solve this problem, [Chris] is building Flex Modules, circuit boards that combine the ease of use of breadboard-compatible modules with something that can be placed on a flexible PCB.

This is a toolkit for [Chris] and he already has a ton of modules that are either completed or in the works. The Flex Sensor ADC Buffer and Filter is meant to read flexible sensors, the STM32F401 module puts an incredibly powerful microcontroller in these projects, and the 12axis module gives these projects pressure, humidity, gyro, and temperature sensors. There are over two dozen modules [Chris] is working on, and each of them work with his system for flexible electronics.

If you’d like to see an example of what these modules can do, check out the Dance Kit [Chris] built. It’s a wearable LED strip with motion feedback and bioelectric monitoring. Without being flexible, this project would be a huge unwieldly mass of circuit boards. With these modules, it was easy to create a wearable solution to the problem.


The 2015 Hackaday Prize is sponsored by:

Portabilizing The Kinect

Way back when the Kinect was first released, there was a realization that this device would be the future of everything 3D. It was augmented reality, it was a new computer interface, it was a cool sensor for robotics applications, and it was a 3D scanner. When the first open source driver for the Kinect was released, we were assured that this is how we would get 3D data from real objects into a computer.

Since then, not much happened. We’re not using the Kinect for a UI, potato gamers were horrified they would be forced to buy the Kinect 2 with the new Xbox, and you’d be hard pressed to find a Kinect in a robot. 3D scanning is the only field where the Kinect hasn’t been over hyped, and even there it’s still a relatively complex setup.

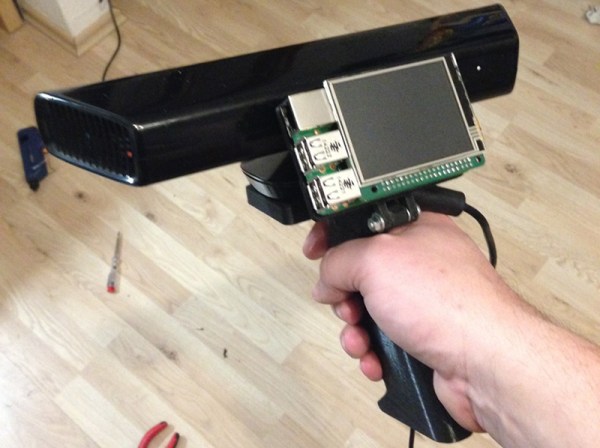
This doesn’t mean a Kinect 3D scanner isn’t an object of desire for some people, or that it’s impossible to build a portabilzed version. [Mario]’s girlfriend works as an archaeologist, and having a tool to scan objects and places in 3D would be great for her. Because of this, [Mario] is building a handheld 3D scanner with a Raspberry Pi 2 and a Kinect.

This isn’t the first time we’ve seen a portablized Kinect. Way back in 2012, the Kinect was made handheld with the help of a Gumstix board. Since then, a million tiny ARM single board computers have popped up, and battery packs are readily available. It was only a matter of time until someone stepped up to the plate, and [Mario] was the guy.

The problem facing [Mario] isn’t hardware. Anyone can pick up a Kinect at Gamestop, the Raspberry Pi 2 should be more than capable of reading the depth sensor on the Kinect, and these parts can be tied together with 3D printed parts. The real problem is the software, and so far [Mario] has Libfreenect compiling without a problem on the Pi2. The project still requires a lot of additional libraries including some OpenCV stuff, but so far [Mario] has everything working.

You can check out his video of the proof of concept below.

Continue reading “Portabilizing The Kinect”

Automatic Print Ejector For All 3D Printers

Way back in 2010, Makerbot released the Automated Build Platform, a neat heated conveyor belt for the Cupcake or Thing-O-Matic that would spit parts out when a print was done. It’s a great invention if you need to produce 20 of something, and the perfect invention if you want to sit on a patent and not innovate anything ever.

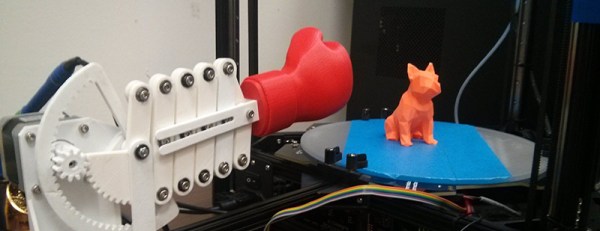
You won’t need to wait until the year 2030 to get a device that automatically removes a print from a print bed. The folks at MatterHackers came up with an Automatic Print Ejector that removes a print in the most [Rube Goldberg]-ish way possible: with a boxing glove.

The Automatic Print Ejector is pretty much taken straight out of a [Buster Keaton] movie. It’s a series of scissor mechanisms with a 3D printed boxing glove on the end, driven by a stepper motor. When the print finishes, the boxing glove simply punches a print off the bed of a printer.

Does it work? It does, brilliantly. Check out the video below.

Continue reading “Automatic Print Ejector For All 3D Printers”

Hackaday Prize Entry: Python Powered Scientific Instrumentation

A common theme in The Hackaday Prize and Hackaday.io in general is tools to make more tools. There are a lot of people out there trying to make the next Bus Pirate, and simply measuring things is the first step towards automating a house or creating the next great blinkey invention.

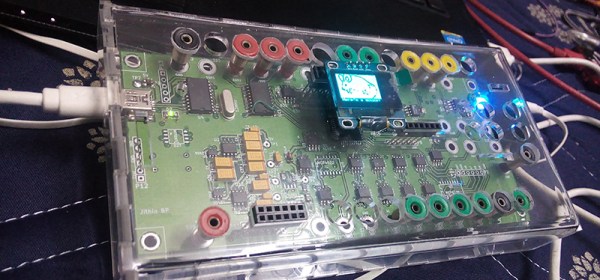
In what is probably the most capable measurement system in the running for this year’s Hackaday Prize, [jithin] is working on a Python Powered Scientific Instrumentation Tool. It’s a microcontroller-powered box containing just about every imaginable benchtop electronics tool, from constant current supplies, LCR meters, waveform generators, frequency counters, and a logic analyzer.

This project is stuffed to the gills with just about every electronic tool imaginable; there are programmable gain amplifiers, voltage references, DACs and constant current sources, opamps and comparators, all connected to a bunch of banana jacks. All of these components are tied up in a nifty Python framework, allowing a bunch of measurements to be taken by a single box.

If that’s not enough, [jithin] is also working on wireless extension nodes for this box to get data from multiple acquisition points where wires would be unfeasible. This feature uses a NRF24L01+ radio module; it’s more than enough bandwidth for a lot of sensors, and there’s enough space all the wireless sensors you would ever need.


The 2015 Hackaday Prize is sponsored by:

Astronaut Or Astronot: Random Stuff For Random People

In case you’re not aware, we’re running a contest to send one lucky hacker into space. We’re already giving out $50k in prizes to entice the most worthy hackers to submit their project to the The Hackaday Prize. Now it’s time for community voting, and that means trotting out Astronaut Or Astronot, where you decide the best project for this week’s theme. Projects voted into the top ten for each theme will receive Hackaday Prize t-shirts.

But there’s something in it for you too. Everyone who votes in the community voting rounds will be eligible to win a $1000 gift card to The Hackaday Store.

Most Likely To Be Widely Used

This week’s round of community voting will decide which project entered into the Hackaday Prize will be the most likely to be widely used. Everyone on Hackaday.io gets 50 votes to pick the project that will be the most popular, most game changing, and most useful. Head on over to the voting page and spend those votes wisely.

Submit Your Entry For Community Feedback

We’ll be doing a new round of community voting as often as every seven days. Everyone registered on Hackaday.io gets 50 votes for each round of voting, and every Friday (around 20:00 UTC), we’ll randomly select one person registered on Hackaday.io. If that person has voted, they get a $1000 gift card for The Hackaday Store. If they haven’t vote — nothing.

So what do you need to get in on this action? Vote, obviously. We’ll be tracking which projects make it to the top of the list, and next week we’ll do it all over again. Enter your project now because we’re giving away a trip to space and hundreds of other prizes.

Hot Swappable Raspberry Pi Rack

The Raspberry Pi has inspired many a hacker to take the inexpensive (~$35) microcomputer to the enterprise level. From bitcoin miners to clusters, the Raspberry Pi has found itself at the heart of many large-scale projects.

On hackaday.io [Dave] served up his own contribution with his Raspberry Pi Rack. Inspired by enterprise blade servers, he wanted to house multiple Raspberry Pi boards in a single enclosure providing power and Ethernet. The spacing between the blades and the open sides allow for each Pi to cool without the additional power and cost of fans.

Starting with an ATX power supply and Ethernet switch, Dave created a base that housed the components that would be shared by all the Pis. Using a 3D model of a Pi he found online, he began working on the hotswap enclosures. After “dozens of iterations” he created a sled that would hold a Pi in place with clips rather than screws and slide into his rack to connect to power and Ethernet.

Like most projects, some mistakes were made along the way. In his write up [Dave] describes how after printing the bottom plate he realized he hadn’t accounted for the holes for the Ethernet cable runs. Instead the cables run along the back wall in a way he now prefers.

You can find all the details and download the 3D models on his project page.