Hackaday Prize Entry: Python Powered Scientific Instrumentation

A common theme in The Hackaday Prize and Hackaday.io in general is tools to make more tools. There are a lot of people out there trying to make the next Bus Pirate, and simply measuring things is the first step towards automating a house or creating the next great blinkey invention.

In what is probably the most capable measurement system in the running for this year’s Hackaday Prize, [jithin] is working on a Python Powered Scientific Instrumentation Tool. It’s a microcontroller-powered box containing just about every imaginable benchtop electronics tool, from constant current supplies, LCR meters, waveform generators, frequency counters, and a logic analyzer.

This project is stuffed to the gills with just about every electronic tool imaginable; there are programmable gain amplifiers, voltage references, DACs and constant current sources, opamps and comparators, all connected to a bunch of banana jacks. All of these components are tied up in a nifty Python framework, allowing a bunch of measurements to be taken by a single box.

If that’s not enough, [jithin] is also working on wireless extension nodes for this box to get data from multiple acquisition points where wires would be unfeasible. This feature uses a NRF24L01+ radio module; it’s more than enough bandwidth for a lot of sensors, and there’s enough space all the wireless sensors you would ever need.


The 2015 Hackaday Prize is sponsored by:

Galactic Dimension – A Supersized DIY Pinball Machine

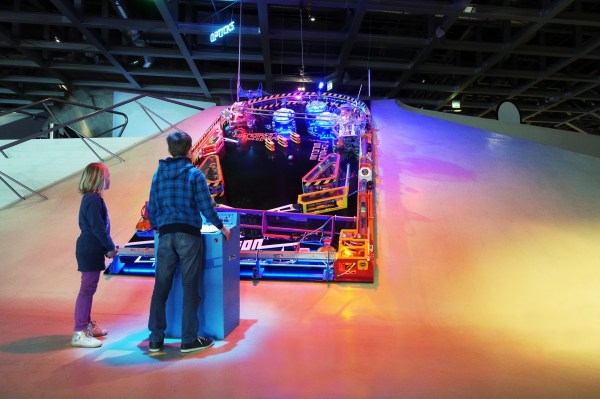
If you are from the 1960’s or 1970’s we know you would have enjoyed furiously punching the buttons of a pin ball machine back in the day. Installation artist [Niklas Roy] recently revisited this old classic game and built Galactic Dimension – a supersized pinball machine for Phæno – an amazing science center in the German city of Wolfsburg. The science centre was planning a big exhibition featuring thirty beautiful, classic pinball machines loaned from the Pacific Pinball Museum in Alameda, California.

The game machine was built on a steep ramp and has a gigantic play field measuring 3m x 6m (10’x20′). It features Sci-Fi game elements in the play field which blend perfectly with the futuristic building where it is housed. The game elements are built from repurposed everyday items like hair dryers and fans, giving visitors the motivation to build some of their own such contraptions.

The players operate the machine via a control desk, and a giant calculator is used to display the game score. The steep ramp had an incline of almost 30° which meant that he had to use a light ball to be able to propel it around the play field. The main user controls are the two flippers, and building giant ones was a big challenge. Solenoids or coils would not cut the ice, and he settled for pneumatic cylinders – easy to control, powerful, not too loud, and the museum already had a compressed air supply readily available. But it still took him three iterations before he could get it right. The plunger, which initially propels the ball, was built from PVC pipes and a hair dryer. Each play field element was built as a separate module to make assembly and maintenance easier. All featured a 220V AC supply, a sensor (either an IR distance sensor or a light barrier) to detect the ball, and an Arduino. Actuators were built from hair dryers and portable fans. Each of them have their own sound effects too – either a hacked toy or a speaker controlled by the Arduino. After everything was built, taken apart, transported, and reassembled at the site, the Galactic Dimension worked without a glitch, and without releasing any magic smoke. To top it off, Andreas Harre, who’s been the German pinball champion for several years in a row, also played the machine when he visited Phæno – and was totally excited about it!

So if you are in that part of Germany anytime until September, do drop in and try to ring up a big score. For photos of his build log, check out the photo album. There’s also a fairly big block diagram (German) and the Arduino sketches (.zip file), if you’d like to take a stab at building an even bigger pinball machine. Check the video to see the machine in action. And if the name [Niklas] sounds familiar, it is because he loves building installations such as the Forbidden Fruit Machine, the Ball Sucking Machine, and another Ball Sucking Machine.

Continue reading “Galactic Dimension – A Supersized DIY Pinball Machine”

Smile For The Raspberry Pi Powered Photo Booth

[Roo] was tasked with finding a better way to take corporate employee photos. The standard method was for a human resources employee to use a point and shoot camera to take a photo of the new recruits. The problem with this method is many people feel awkward trying to force a smile in front of other people. Plus, if the photo turns out poorly many people won’t ask to have it retaken so as not to feel vain or inconvenience the photographer. [Roo’s] Raspberry Pi powered photo booth solves this problem in a novel way.

The new system has the employee use their own mobile phone to connect to a website running on the Pi. When the employee tells the Pi to snap a photo, the system uses the Raspberry Pi camera module to capture an image. [Roo] actually 3D printed a custom adapter allowing him to replace the standard camera lens if desired. The photo can be displayed on an LCD screen so the user can re-take the photo if they wish.

The system is built into a custom case made from both 3D printed and laser cut parts. The front plate is a frosted white color. [Roo] placed bright white lights behind the front panel in order to act as a flash. The frosted plastic diffuses the light just enough to provide a soft white light for each photo taken. Once the photo is selected, it can then be uploaded to the company database for use with emails, badges, or whatever else.

[Roo] also mentions that the system can easily be changed to send photos via Twitter or other web applications. With that in mind, this system could be a great addition to any hackerspace or event. The code for an older version of the project can be found on the project’s github page.

Continue reading “Smile For The Raspberry Pi Powered Photo Booth”

Embed With Elliot: Multiplexing SPI Uses Few Pins

[Ralph Doncaster], aka Nerdralph, seems to be absolutely driven to see how few resources he can use on a microcontroller to get the job done. In this post on his blog, [Ralph] writes some custom bit-banged SPI code to cut the number of SPI lines necessary to drive an nRF24L01+ radio module from four down to two. That really helps if you’re using a micro with only six free pins, like an ATtiny85.

If you’re going to say, “why don’t you just buy a bigger microcontroller?”, you’re missing the point. This exercise strikes us as optimization for optimization’s sake and a dirty hack, both of which are points in its favor.  There are also a couple of techniques here for your mental toolbox. We thought it was interesting enough to look at in depth.

Continue reading “Embed With Elliot: Multiplexing SPI Uses Few Pins”

Building Your Own SDR-based Passive Radar On A Shoestring

Let’s start off with proof. Below is an animation of a measurement of airplanes and meteors I made using a radar system that I built with a few simple easily available pieces of hardware: two $8 RTL software defined radio dongles that I bought on eBay, and two log-periodic antennas. And get this, the radar system you’re going to build works by listening for existing transmissions that bounce off the targets being measured!

I wrote about this in a very brief blog posting a few years ago. It was mainly intended as a zany little side story for our radio telescope blog, but it ended up raising a lot of interest. Because this has been a topic that keeps attracting inquiries, I’m going to explain how I did the experiment in more detail.

It will take a few posts to show how to build a radar capable of performing these types of measurements. This first part is the overview. In later postings I will go through more detailed block diagrams of the different parts of a passive radar system, provide example data, and give some Python scripts that can be used to perform passive radar signal processing. I’ll also go through strategies to determine that everything is working as expected. All of this may sound like a lot of effort, but don’t worry, making a passive radar isn’t too complicated.

Let’s get started!

Continue reading “Building Your Own SDR-based Passive Radar On A Shoestring”

Astronaut Or Astronot: Random Stuff For Random People

In case you’re not aware, we’re running a contest to send one lucky hacker into space. We’re already giving out $50k in prizes to entice the most worthy hackers to submit their project to the The Hackaday Prize. Now it’s time for community voting, and that means trotting out Astronaut Or Astronot, where you decide the best project for this week’s theme. Projects voted into the top ten for each theme will receive Hackaday Prize t-shirts.

But there’s something in it for you too. Everyone who votes in the community voting rounds will be eligible to win a $1000 gift card to The Hackaday Store.

Most Likely To Be Widely Used

This week’s round of community voting will decide which project entered into the Hackaday Prize will be the most likely to be widely used. Everyone on Hackaday.io gets 50 votes to pick the project that will be the most popular, most game changing, and most useful. Head on over to the voting page and spend those votes wisely.

Submit Your Entry For Community Feedback

We’ll be doing a new round of community voting as often as every seven days. Everyone registered on Hackaday.io gets 50 votes for each round of voting, and every Friday (around 20:00 UTC), we’ll randomly select one person registered on Hackaday.io. If that person has voted, they get a $1000 gift card for The Hackaday Store. If they haven’t vote — nothing.

So what do you need to get in on this action? Vote, obviously. We’ll be tracking which projects make it to the top of the list, and next week we’ll do it all over again. Enter your project now because we’re giving away a trip to space and hundreds of other prizes.

Nice Looking Countdown Timer For The Home Game Show Enthusiast

Every couple of weeks, [Roo’s] place of employment, TMW Unlimited, has a contest. This contest takes place in the form of a game show and the contestants have 30 seconds to pitch their current project to the group. A panel of judges vote on the best pitches. Winners receive cupcakes and drinks. Originally, stopwatches were used to keep track of the elapsed time, however, a stopwatch is not very game showy. [Roo] set out to make a countdown timer to add some authenticity to the bi-weekly event.

The main enclosure is a plastic fence post. Fifteen holes and 15 large LEDs are covered up by large plastic translucent spheres. End caps were designed and 3D printed to not only make the rig look good but also to serve as a speaker mount. Inside resides an Arduino that does the counting and turns off the row of lights, one every 2 seconds, as the countdown continues. A speaker not only ticks and tocks its way down with the lights, it also buzzes when time is up. Starting and resetting the timer is as easy as pushing a single button mounted on the case.

If you’ve already built a game show timer, you may want to check out this DIY game buzzer system!

Continue reading “Nice Looking Countdown Timer For The Home Game Show Enthusiast”