Hacklet 21 – Halloween Hacks Part 2

We asked, you listened! Last weeks Hacklet ended with a call for more Halloween themed projects on Hackaday.io. Some great hackers uploaded awesome projects, and this week’s Hacklet is all about featuring them. Every one of our featured projects was uploaded to Hackaday.io within the last 7 days.

masseffect2
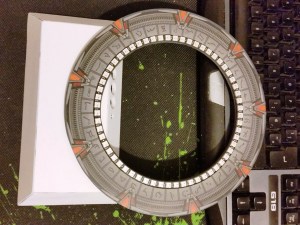
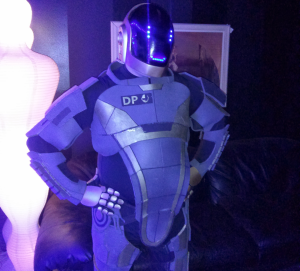
Mass Effect meets Daft Punk in [TwystNeko’s] 5-Day SpeedBuild Mass Effect Armor.  As the name implies, [TwystNeko] built the armor in just 5 days. Ethylene-vinyl acetate (EVA) foam was used to make most of the costume. Usually EVA foam needs to be sealed. To save time, [TwystNeko] skipped that step, and just brushed on some gold acrylic paint.  The actual cuts were based on an online template [TwystNeko] found. To top the armor off, [TwystNeko] used a custom built Daft Punk Guy Manuel helmet. Nice!


rat
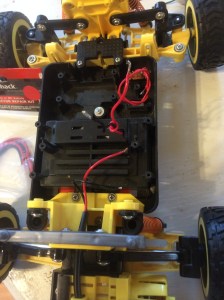
[Griff] wins for the creepiest project this week with Rat Bristlebot. Taking a page from the Evil Mad Scientist Labs book, [Griff] built a standard bristlebot based on a toothbrush and a vibrating pager motor. He topped off the bristlebot with a small rubber rat body from the party store. The rat did make the ‘bot move a bit slower, but it still was plenty entertaining for his son. [Griff] plans to use a CdS cell to make the rat appear to scamper when room lights are turned on. Scurrying rats will have us running for the hills for sure!

pumpkin
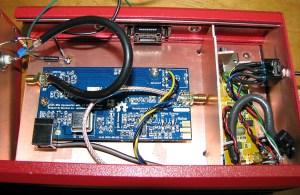
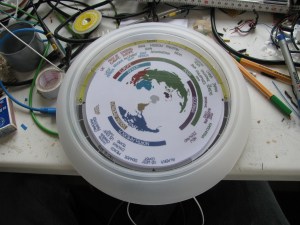
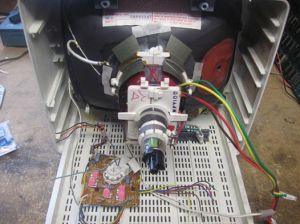
[MagicWolfi] was created Pumpkin-O-Chain to light up Halloween around the house. This build was inspired by [Jeri Ellsworth’s] motion sensing barbot dress from 2011. Pumpkin-O-Chain uses the a similar RC delay line with 74HC14 inverters to make the LEDs switch on in sequence. He wanted the delay to be a bit longer than [Jeri’s] though, so he switched to 100K ohm resistors in this build. The result is a nice effect which is triggered when someone passes the PIR motion sensor.

pumpkinlite
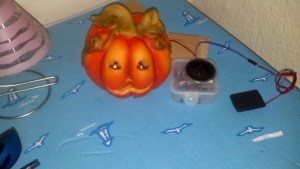
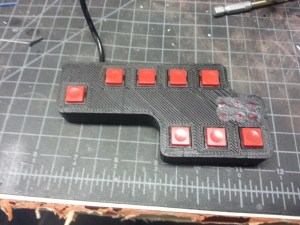
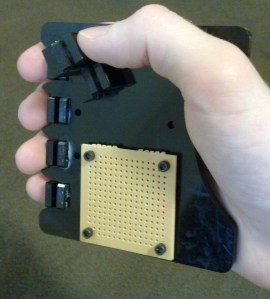
[Petri] got tired of his Jack-o’-lantern candles burning out, so he built his own Pumpkin Light. The light made its debut last year with a Teensy 2.0++ running the show. This year, [Petri] decided to go low power and switched to an MSP430 processor on one of TI’s launchpad boards. With plenty of outputs available on the Teensy and the MSP430, [Petri] figured he might as well use and RGB LED. The new improved Jack-o’-lantern can run for hours with no risk of fire.
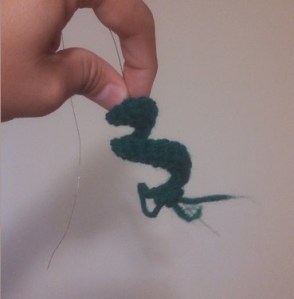
We ccuth2an’t end this week without mentioning [Griff’s] updated Crochet Cthulhu Mask. We featured the mask in last week’s Hacklet, and called  [Griff] out for an update. Well, the final project is up, and it looks great! We’re sure [Griff’s] son will be raking in the candy this year!

It’s time for trick-or-treating, which means we have to end this episode of The Hacklet. As always, see you next week. Same hack time, same hack channel, bringing you the best of Hackaday.io!

Thumbnail that say The Hacklet

Hacklet 20 – Halloween Hacks

20

Hey, did you know that Hackaday.io is continuously being updated and improved? One of the coolest features this week is the new LaTeX based equation editor. That’s right, you can now put symbols, equations, and all sorts of other LaTeX goodies into your posts. Check out [Brian Benchoff’s] LaTeX demo project for more information.

Every holiday is a season for hacks, but Halloween has to be one of the best. From costumes to decorations, there are just tons of opportunities for great projects. We know that with an entire week left before the big day, most of you are still working on your projects. However a few early bird hackers already have Halloween themed projects up on Hackaday.io. We’re featuring them here – on the Hacklet!

pumpkin1[philmajestic] is in the Halloween spirit with his AVR Halloween Pumpkin. [Phil] created a motion activated Jack-o’-lantern with an ATmega328 as its brain. The AVR monitors a PIR motion sensor. When motion is detected, it flashes Jack’s LED eyes and plays spooky sound files from a WTV-020-16sd audio player. This is a great example of how a bit of work can create something cooler and infinitely more flexible than a store-bought decoration. Nice work [Phil]!

littlebitsPortraitThe littleBits crew have been working overtime on Halloween hacks this year. We definitely like their Halloween Creepy Portrait. A motion trigger, a servo, and a few glue bits are all it take to turn a regular portrait into a creepy one. When the motion detector is triggered, the servo moves a paper behind the portrait’s eyes. The replacement eyes look like some sort of demon or cat. Definitely enough to give us nightmares!

ironman[jeromekelty] helped his friend [Greg] build an incredible Animatronic Iron Man MKIII suit. The suit features RFID tags which trigger suit features. Since we’re talking about an Iron Man suit, “features” are things like shoulder rockets, boot thrusters, and a helmet that lifts up to reveal “Tony Stark”. No less than four Arduinos handle the various I/O’s. The suit even features an Adafruit WaveShield for authentic sounds! The electronics are just one piece of the puzzle here. [Greg] is a card-carrying member of the Replica Prop Forum. His MKIII suit is incredibly detailed. We especially like the weathering and battle damage!

tenticlesFinally, [Griff’s] son is going to be wearing a Crochet Cthulhu Mask, with Arduino controlled tentacles for Halloween this year. [Griff] is an experienced crochet hobbiest. He’s mixing his love of needlework with his love of electronics to build the animated Cthulhu mask for his 4-year-old son. The mask is based on a free crochet pattern from ravelry, though [Griff] is making quite a few changes to support his application. The mask will be smaller to fit a 4-year-old, and will contain servos to move the tentacles. We haven’t heard from [Griff] in a while, so if you see him, tell him to post an update on the mask!

If you haven’t started working on your Halloween hacks, get busy! But don’t forget to upload them to Hackaday.io! If we get enough, we’ll run a second Hacklet with even more great projects. Until then, you can check out our Halloween Projects List!

That’s about it for this frightful episode The Hacklet. As always, see you next week. Same hack time, same hack channel, bringing you the best of Hackaday.io!

Thumbnail that say The Hacklet

Hacklet 19 – Ham Radio

19

Amateur, or ham radio operators have always been hackers. For much of the early 1900’s, buying a radio was expensive or impossible. Hams would build their own rigs, learning electronics and radio theory along the way. Time moves on, but hams keep hacking. Today we’re highlighting some of the best ham radio projects on Hackaday.io!

rtl

We start with [DainBramage1991] and his very practical RTL-SDR With Upconverter and Case. [DainBramage1991] fell in love with his low-cost RTL software defined radio dongle. He even added a Ham-It-Up upconverter to cover HF bands. The only problem was RF noise. the Realtek USB sticks tend to have little or no filtering, which means they are very susceptible to noise. [DainBramage1991] used the time-honored technique of insulating with copper clad board. Bits of PCB hold the RTL-SDR and upconverter in place. More PCB separates the two boards. Everything goes into a steel enclosure which keeps that unwanted RF at bay.

foxhunt-attenNext up is [Ryan Miller’s aka KG7HZQ]’s  ham radio fox hunt attenuator. Ham radio fox hunt’s don’t involve baying dogs or horses. In this case a fox hunt is a contest to find hidden low power transmitters. If you’ve never tried one, it’s a heck of a lot of fun. One of the challenges with a fox hunt is to find the direction to the transmitter when you’re very close. Even with directional antennas, reflections and swamped receivers make it hard to figure out just where the transmitter is. The solution is an attenuator, which simply reduces the signal to a more reasonable value. [Ryan] also used copper clad PCB for his circuit. Since the attenuator parts are soldered directly to the PCB, this is more of a Manhattan style design. Two ceramic 1k pots help him achieve his goal of near perfect linear attenuation. We’re betting this attenuator will help [Ryan] win some contests!

psdrWho says amateur radio won’t take you places? It may well be taking [Michael R Colton] to space! [Michael’s] project PortableSDR is one of the five finalists in The Hackaday Prize. We covered Michael earlier in the contest. PortableSDR started as a ham radio project: a radio system which would be easy for hams to take with them on backpacking trips. It’s grown into so much more now, with software defined radio reception and transmission, vector network analysis, antenna analysis, GPS, and a host of other features. We seriously love how [Michael] optimized a small LCD for waterfall display, tuning, and bandpass filter adjustment.

e2ra[W5VO] is working on an Ethernet to Radio Adapter. Every foot of coax in a radio system loses signal. Connections are even worse. It can all add up to several dB loss. [W5VO] wants to put an SDR at the antenna feed-point. With the signal path minimized, more watts make it out when transmitting, and more signal gets back to the receiver when listening. The interface between the SDR and host computer will be all digital; Ethernet to be precise. [W5VO] isn’t the first person to do something like this, microwave systems have had the transmitter and LNB at the antenna for years. That doesn’t take away from [W5VO’s] design at all  He’s been quiet for a while, but we’re hoping he continues on his design!

Where is everyone else? We’re a bit light on projects this week, but we have a good reason. There just aren’t enough ham radio projects on Hackaday.io! We’re hoping to change that though. Are you an amateur radio enthusiast? Document your project on the site. Get input from other hams and push the envelope! You might even find yourself on the Ham Radio List!

That’s all for this episode of The Hacklet. As always, QRX is next week. Same hack time, same hack channel, bringing you the best of Hackaday.io! 73’s!

Thumbnail that say The Hacklet

Hacklet 18 – Tick Tock, It’s Time For Clocks

18

In three words, Hackers love clocks. Not only do we think that digital watches are still a pretty neat idea, we love all manner of timepieces. This episode of The Hacklet focuses on the clock projects we’ve found over on Hackaday.io.

xkcdHardwareWe start with [rawe] and [tabascoeye], who both put the famous XKCD “now” clock into hardware. [tabascoeye] used a stepper motor in his xkcd world clock. [rawe] didn’t have any steppers handy, so he grabbed a cheap wall clock from Ikea for his xkcd.com/now clock in hardware. The now clock needs a 24 hour movement. Ikea only sells 12 hour movements, so [rawe] hacked in a 555 and some logic to divide the clock’s crystal by two. He’s currently using an EEVblog uCurrent to verify his modified clockwork consumes about half a milliwatt.

touchscreenclockNext up is [Craig Bonsignore] and his Touchscreen Alarm Clock. [Craig] got sick of store-bought alarm clocks, so he built his own. Then he modified it, added a few features, and kept building! The current incarnation of the clock has a pretty novel interface: a touchscreen over a bicolor LED matrix. The rest of the clock consists of an Arduino, an Adafruit Wave shield, and a Macetech Chronodot. [Craig] is currently mashing up these open source designs and building a single Arduino shield for his clock.

irisledclock[Warren Janssens] took the minimalist route with The Iris Clock. Iris is a ring of WS2812 RGB LEDs. The LEDs are mounted behind a wall colored piece of wood in such a way that you can only see their glow on the clock frame and the wall beyond it. This helps a with the eye searing effect WS2812s can have when viewed directly – even when dimmed with PWM. The code is mainly C with some AVR assembly thrown in to control the LEDs. [Warren] has given Iris 8 different time modes, from hour/minute/second to percentage of day with sunrise and sunset markers. With so many modes, the only hard part is knowing how to read the time Iris is displaying!

stargate[David Hopkins] also built a ring clock. His Stargate LED Clock not only tells time, but is a great replica of the Stargate from the TV series. [David] used four Adafruit WS2812 Neopixel segments to build a full 60 RGB LED ring. The Stargate runs on an Arduino nano with a real-time clock chip to keep accurate time. A photoresistor allows the Stargate to automatically dim at night. With some slick programming [David] added everything from a visual hourly “chime” to a smooth fade from LED to LED.

bendulum[dehne1] gives us something completely different with The Bendulum Clock. A bendulum is [dehne1’s] own creation consisting of an inverted pendulum built without a pivot. The inverted pendulum swings by bending along its length. In [dehne1’s] design, the bendulum is made out of a spring steel strip rescued from a car windshield wiper. The Bendulum doesn’t have a mechanical escapement, but an electromagnet sensed and driven by an Arduino. The amazing part of this project is that  [dehne1] isn’t using a real-time clock chip. The standard 8MHz Arduino resonator is calibrated over various temperatures, then used to calibrate the bendulum itself. The result is a clock that can be accurate within 1 minute each day. [dehne1] mounted his clock inside a custom wood case. We think it looks great, and want one for Hackaday HQ!

We’ve used enough clock ticks for this episode of The Hacklet. As always, see you next week. Same hack time, same hack channel, bringing you the best of Hackaday.io!

Still want more? Check out our Timepiece List!

Hacklet 17 – Keyboards

This week on The Hacklet we’re featuring some of the best keyboard hacks from Hackaday.io!

Hackers are really into their keyboards. Everyone has a favorite, and those favorites vary wildly. Mechanical, soft touch, ergonomic, QWERTY, DVORAK, chorded, you name it, there is a hacker, maker, or engineer who loves it, or absolutely hates it. For some, no commercial product is perfect. All is not lost though, as a custom keyboard is just a hack away!

ergo60

[Warren Janssens] gets things rolling with Ergo60, his 60 key ergonomic keyboard. [Warren’s] layout is a pair of 25 key hand clusters, each with a matching 5 key thumb cluster. This layout minimizes lateral wrist movement. With the reduced key count and stacked keys, the user’s hands never move from the home row. [Warren] rolled his own PCBs for Ergo60. A Teensy 2.0 running a fork of TMK serves as Ergo60’s controller. [Warren’s] is running Cherry Black switches and his keycaps are from Signature Plastics. [Warren] is using Ergo60 as his daily driver these days, so it’s no surprise that he’s set the “Completed Project” tag.

keycaps

Some say he needs no keyboard at all, and that his heartbeat sounds just like an IBM Model M. All we know is he’s called [Brian Benchoff]. [Brian’s] created a pair of minimalist keyboard projects. The Unhappy Hacking Keyboard takes us back to basics. After all, computers run on 1’s and 0’s, right? What more could a person need? Apparently just a space and return. Unhappy Hacking Keyboard uses an ATtiny85 with V-USB as the controller and the interface. Keys are cherry MX blues. The keycaps are [Brian’s] own Hackaday Cherry MX Keycaps printed by Shapeways.

zxkeyboardAn entire generation of hackers don’t know the joy of typing on a tiny rubber keyboard. [Alistair MacDonald] aimed to fix that, so he turned an old computer into a keyboard with his ZX Keyboard. [Alistair] started with a broken ZX Spectrum. He gutted the original electronics and added an Ardunio Pro Mini running the V-USB library. [Alistair] directly wired the row and column I/O lines from the keyboard to his Arduino. The result is a keyboard which is the perfect size for cell phones, Raspberry Pi’s and the like.

chordkey[Servo] teaches us new ways to type with Chordy KEY, his chording keyboard project. Chordy Key is meant to be used in the left hand. Five finger buttons and three thumb buttons are all that is needed to chord out 64 different letters and symbols. [Servo] utilized an ATmega32U4 powered Sparkfun pro micro to control his keyboard. Chordy Key is a proof of concept, but with [Servos’s] use of 3D printed parts, Chordy Key looks like it’s ready for your next wearable computing project!

chord2[jmptable] is also working on a chorded keyboard design. Chord Keyboard uses only 7 keys to send the entire ASCII character set and a few control combinations. [jmptable] used an ATmega328P as his processor. Chord keyboard isn’t wired though. An RN-42-HID module provides bluetooth connectivity to the world.

[jmptable] has provided an amazing amount of detail on his research, including one of his goals of adding a chorded keyboard to the Gameboy Advance. They keyboard itself would be mounted on the spine of a game cartridge. We would love to see that idea come to fruition, [Servo]!


mightyFinally we have [Gertlex], who just wanted a scroll wheel embedded in his keyboard. He got there with the help of an Apple Mighty Mouse. Keyboard with Apple Mouse Scroll Ball is one of those hacks that looks like it original equipment. [Gertlex] took a drill to a Targus slim USB keyboard, putting a small hole right between the ESC and F1 keys. He fit the scroll ball from his Apple Mighty Mouse in the hole. Electronics are as simple as plugging the mouse and keyboard into the same USB hub. The only downside to the design is that [Gertlex’s] keyboard doesn’t recognize fast enough to send key presses during the boot process.

That’s just about enough keystrokes for this episode of The Hacklet. As always, see you next week. Same hack time, same hack channel, bringing you the best of Hackaday.io!

Update – check our our keyboard list right here!

Thumbnail that say The Hacklet

Hacklet 16 – Terrific Telepresence Technology

16

This weeks Hacklet is all about being there when you can’t through the magic of telepresence. More than just teleconferencing, telepresence takes things a step further to put the user in a remote space. That might be a robot platform, VR goggles, or a actuators to interact with the remote environment. It’s also a field filled with opportunities for creative hackers!

sidWe start with [PJK’s] Subterranean investigation device. [PJK] is exploring a castle for a hidden basement. To get there he has to traverse a tiny passageway with a rubble floor. Nicknamed “Sid The Weedy”, [PJK’s] bot is radio controlled and uses a webcam to send images back to [PJK]. Much like the robots used to explore pyramids, [PJK] has gone with a track drive system. Unlike the pyramid bots, [PJK] is on a budget, so his track system is a modified chain with block treads. [PJK] doesn’t want to get too attached to his robot – he may well lose Sid on his maiden voyage.

skypeRobotNext up is [JackRC] with his Skype robot. [Jack] is building a relatively low-cost (approx $200 USD) robot using the Skype API. Both his Mark I and Mark II models are based on R/C tanks. Tanks can carry a surprising amount of weight when you remove the turret and cannon. [Jack] added a mounting arm for a tablet and a robot arm for disarming bombs and/or angry children. His craftsmanship skills really show through in the completed ‘bot. Without a size reference, it could pass for a police issue bomb disposal robot!

rift[Gary Firestone] takes us to the skies with his Minimal Latency Oculus Rift FPV. [Gary] is using an Oculus Rift Head Mounted Display (HMD) for First Person View (FPV) piloting. His aircraft is a quadcopter.  [Gary’s] video source is a GoPro camera. His quadcopter transmits the video on 5.8GHz using a standard analog video system. On the receiving end, a laptop captures the video, removes the fish eye warp from the GoPro lens, the re-warps the image for the Oculus. His latency is down around 50 – 100ms, which is pretty good for a system capturing analog video.

rover-americaNext [Brad] rolls cross-country with Chipbot: 4G Telepresence Rover Across America. [Brad] and his 5-year-old stepson are converting an R/C truck into a telepresence rover. Chipbot’s electronics have been given a major upgrade. [Brad] added a Raspberry Pi and an Arduino with an SN75441 chip for motor control. Connectivity is via WiFi using a TP-LINK router, or cellular using a 4G modem. Rather than a Raspberry Pi camera, [Brad] chose to go with a Ubiquiti IP camera. The Ubiquiti uses power over ethernet, so he’s added a POE injector. Chipbot is still in development, but as [Brad’s] last update shows, Chipbot is already responding to commands from the interwebs. It’s been about a month since the last Chipbot update, so if you see [Brad] tell him to stop by Hackaday.io and let us how things are progressing!

android-teleFinally, we have [Joe Ferner] with his generically named Telepresence Robot. [Joe] is controlling his android telepresence avatar with Google’s Android Operating System. His on-board computer is a Nexus 7 tablet. A custom board with an STM32 ARM microcontroller allows the Nexus to interface to the robot’s motors and sensors. [Joe] is using a web interface to control his robot. The early demos are promising, as the telepresence bot has already been taken for a drive in Reston, VA by a user in Milwaukee, WI.

That’s a wrap for this episode of The Hacklet.  As always, see you next week. Same hack time, same hack channel, bringing you the best of Hackaday.io!

Update – Check out our telepresence list right here!

Hacklet 15 – Arcade Fire

This week’s Hacklet is dedicated to arcade games. The arcade parlors of the 80’s and early 90’s may have given way to today’s consoles and PC games, but the classic stand-up arcade cabinet lives on! Plenty of hackers have restored old arcade cabinets, or even built their own. We’re going to take a look at some of the best arcade game-related hacks on Hackaday.io!

blackvortex[Brayden] starts things off with his Raspberry Pi Vintage Arcade. The Black Vortex is a tabletop arcade cabinet using a Raspberry Pi, an old monitor, and some nice carpentry skills. Black Vortex uses a Raspberry Pi B+. The extra GPIO pins make interfacing buttons and joystick switches easy. On the software side, [Brayden] is using the popular PiMame (now PiPlay) flavor of Linux built for gaming and emulation. Black Vortex’s shell is plywood. [Brayden] used a pocket hole jig to build a sturdy, cabinet without extra support blocks. A stain finish really works on this one!

custom-crtNext up, [fredkono] blows our minds with the Arcade XY Monitor From Scratch. [fredkono] repairs classic Atari vector game PCBs. He needed a test monitor for his lab. The original Amplifone and WG6100 color XY monitors used in games like Tempest and Star Wars are becoming rather rare. Not a problem, as [fredkono] is building his own. Much like the WG6100, [fredkono] started with a standard color TV CRT. He removed and rewound the yoke for vector operation. The TV’s electronics were replaced with [fredkono’s] own deflection amplifier PCBs.  [fredkono] was sure to include the all- important spot killer circuit, which shuts down the electron guns before a spot can burn-in the CRT.

controlpanel[Rhys] keeps things rolling with a pair of projects dedicated to arcade controls. His TI Launchpad Arcade Control to USB Interface contains instructions and code to use a Texas Instruments Tiva C launchpad as a USB interface for arcade controls. [Rhys] puts all that to good use in his Arcade Control Panel. The control panel features MAME buttons, as well as the standard 2 player fighting game button layout. He finished off his panel with some slick graphics featuring red and blue dragons.

trongame[Sarah and Raymond] hosted a Tron:Legacy release party back in 2010. An epic arcade movie calls for an epic arcade game, or in this case, games. 16 table top arcades to be exact. All 16 machines were built in just 6 days. 8 of the machines ran Armegatron Advanced, a networked version of the classic Tron lightcycle game. The others ran a mix of classic games like PacMan or modern bullet hell shooters like Tou-Hou. The cabinets were built from expanded PVC with wood blocks as a support structure. [Sarah and Raymond] custom painted each cabinet with UV black light paint. We love the custom artwork on their personal signature machines!

mikesArcade[Mike] takes us back to the 80’s with Just Another Arcade Machine. Under the hood, this machine uses the standard Raspberry Pi and PiMame (now PiPlay) suite. [Mike] even added a trackball so he could play Centipede. What makes this arcade special is the cabinet. [Mike] found an old wardrobe with that perfect 80’s style metallic strip cladding. [Mike] removed the cladding, and cut up the chipboard frame. He re-assembled things into a stand-up arcade cabinet that looks like it came right out of Sears’ Electronics department in 1985.

Ok folks, that’s it for another episode of The Hacklet. As always, see you next week. Same hack time, same hack channel, bringing you the best of Hackaday.io!