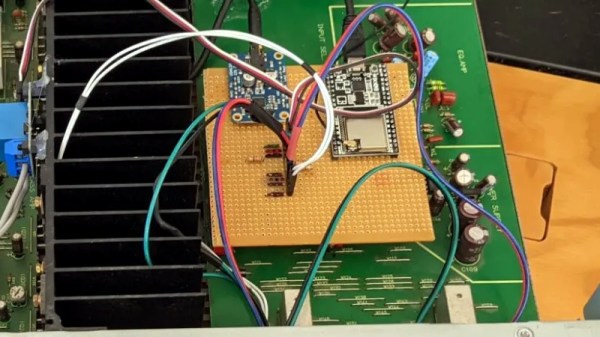
Know Audio: A Loudspeaker Primer

As we’ve started out on our journey through the world of Hi-Fi audio from a strictly practical and engineering viewpoint without being misled by any audiophile woo, we’ve already taken a look at the most important component in any audio system: the listener’s ear. It’s time to move down the chain to the next link; the loudspeaker.

Sound is pressure waves in the air, and the purpose of a loudspeaker is to move the air to create those waves. There are a variety of “exotic” loudspeaker technologies including piezoelectric and electrostatic designs, here we’ll be considering the garden variety moving-coil speaker. It’s most usually used for the large bass or smaller mid-range drivers in a typical speaker system. Continue reading “Know Audio: A Loudspeaker Primer”

Know Audio: Start At The Very Beginning

A lot of our projects make noise. It can be something as simple as a microcontroller driving a small speaker or a truly ambitious Hi-Fi project, but common to all of them is the desire to get that sound out in as audible and high-quality a manner as possible. We’ve been known to make fun of the more preposterous side of the Hi-Fi world at times, but behind it all there’s a basis of solid and provable audio engineering that can be brought to bear on almost any project involving sound and electronics. Perhaps it’s time to devote some time to a series exploring the topic, and what better place to start than the ultimate destination for all that sound. Any Hi-Fi is only as good as the ears of the person listening to it, so in out journey through the world of audio that’s where we’ll start. Continue reading “Know Audio: Start At The Very Beginning”

3D Printed Speaker Uses DSP For Ultimate Performance

Speaker design used to be as much about woodwork as it was about advanced acoustic mathematics. In recent decades, technologies such as digital signal processing and 3D printing have changed the game significantly. Leaning heavily on these techniques, [ssashton] developed a design called Mr. Speaker.

The speaker contains a 3″ woofer for good bass response, and twin tweeters to deliver stereo audio. Using WinISD to help do the requisite calculations on porting and volume, [ssashton] designed a swooping 3D printed enclosure with a striking design. Sound comes into the unit through an off-the-shelf Bluetooth module, before being passed to an ADAU1401 digital signal processing unit. From there, it’s passed to a mono amp to drive the woofer and a stereo one for the tweeters.

To get the flattest frequency response possible and maintain linear phase, it’s all about DSP in this case. RePhase software was used to design a DSP filter to achieve these goals, helping the speaker to produce the desired output. The ADAU1401 DSP was then programmed using Sigma Studio, which also allows the designer to do things such as split outputs for seperate woofer and tweeter drives.

[ssashton] does a great job of explaining both DSP principles and old-school speaker design tricks, from phase plugs to reflections. The use of 3D printed parts to rapidly iterate the design is impressive, too. We’d love to see the final enclsoure get an acetone smoothing treatment to really take it over the edge.

If you’re into serious speaker design and want more, be sure to check out this advanced transmission line design. For those of you with your own builds with some nifty tricks, drop us a note on the tipline.


Gold Cables Really Do Work The Best

As a writer, I have long harboured a dream that one day an editor will buy me a top-of-the-range audio analyser, and I can set up an audio test lab and write pieces debunking the spurious claims made by audiophiles, HiFi journalists, and the high-end audio industry about the quality of their products. Does that amp really lend an incisive sibilance to the broader soundstage, and can we back that up with some measurable figures rather than purple prose?

An Audio Playground You Didn’t Know You Had

An Audio Precision APx525 audio analyser.
An Audio Precision APx525 audio analyser. Bradp723 (CC-BY-SA 3.0)

Sadly Hackaday is not an audio magazine, and if Mike bought me an Audio Precision he’d have to satisfy all the other writers’ test equipment desires too, and who knows where that would end! So there will be no Hackaday audio lab — for now. But that doesn’t mean I can’t play around with audio analysis.

Last month we carried a write-up of a Supercon talk from Kate Temkin and Michael Ossmann, in which they reminded us that we have a cracking general purpose DSP playground right under our noses; GNU Radio isn’t just for radio. Once I’d seen the talk my audio analysis horizons were opened up considerably. Maybe that audio analyser wouldn’t be mine, but I could do some of the same job with GNU Radio.

It’s important to stress at this point that anything I can do on my bench will not remotely approach the quality of a professional audio analyser. But even if I can’t measure infinitesimal differences between very high-end audio circuitry, I can still measure enough to tell a good audio product from a bad one.

Continue reading “Gold Cables Really Do Work The Best”

HiFi Audio On The Commodore 64 – 48KHz, Yo!

Prior to the development of CD-quality audio hardware in the mid-1990s, home computers and consoles typically made do with synthesized music. Due to the storage and RAM limitations of the time, there weren’t a whole lot of other practical options. If you’re willing to ignore practicality, however, you can do some wonderful things – such as playing high-quality audio on a Commodore 64!

The project is the work of [Antonio Savona], who set out to play hi-fi audio on a Commodore 64 using only period-correct hardware. That means no 16MB RAM expansions, and no crazy high-capacity carts. The largest carts of the era were just 1MB, as produced by Ocean, and [Antonio] intended to cram in a full 90 seconds of music.

Targeting a sample rate of 48 KHz with 8-bit samples would mean the cartridge could only fit 20 seconds of raw audio into its 1MB of storage. This wasn’t good enough, so the audio would have to be compressed, with the target being a 4:1 ratio to reach the 90 second goal. With the C64’s CPU running at just 1MHz, there are just 21 clock cycles to deal with each sample when playing at 48 KHz.

Obviously, [Antonio] had set quite the challenge, and some masterful assembly coding was used to get the job done. The final result has the audio sounding impressively good, given that it’s being pumped out by a 6502 that is surely sweating to get the job done.

We love a good C64 hack around these parts, and it’s now even possible to build a new one from scratch if that’s your particular itch. Video after the break.

Continue reading “HiFi Audio On The Commodore 64 – 48KHz, Yo!”

Does This Timber Have The Right Timbre?

A hi-fi amplifier used to be a rite of passage for the home electronic constructor, back in the days when consumer electronics was still dominated by analogue entertainment. It’s unusual then to see [carbono.silício]’s stereo amplifier project, constructed in an open-wire circuit sculpture form on a log. You didn’t read that incorrectly, it’s built not on a breadboard but on a piece of Olea Maderensis, or Madiera Olive wood, complete with bark. This endangered tree was not felled, instead it was a piece blown down after a storm.

The circuit is slightly unusual for a project such as this, in that it uses a pair of LM386 audio amplifier chips. This isn’t an unusual component, but it’s one more commonly seen providing the amplification for a small speaker project than in a stereo hi-fi amplifier. But the construction is beautifully done, with very neatly routed wires, a single central volume knob, and a blue LED power light. A particularly nice touch are the aluminium electrolytic capacitors, we suspect having had their plastic sleeving removed.

We’ve had our share of stereo amp projects here, and some of them are surprisingly simple. We have even been known to partake of them ourselves.

Yet Another Concrete Speaker Build

Concrete is great if you feel like making something heavy on the cheap. [Marek Unger] decided to have a go, using the material to cast speaker cabinets for a home hi-fi rig (Youtube link, embedded below).

Initial attempts involved creating a laser-cut MDF outer mold, with a styrofoam core inside to be removed later. This was unsuccessful, and [Marek] developed the design further. The second revision used an inner core also made from lasercut MDF, designed to be left inside after casting. This inner mold already includes the mounting holes for the speaker drivers, making assembly easier too.

Once cast, the enclosures were fitted with Tang-Band W4-1320SIF drivers. These are a full-range driver, meaning they can be used without needing crossovers or other speakers to fill in the frequency range. Each cabinet weighs just over 10kg, and they’re ported for extra response in the lower frequency bands. Sound tests are impressive, and the rough-finished aesthetic of the final product looks great in [Marek]’s living room.

We’ve seen concrete used for all manner of projects, from furnaces to USB hubs. Video after the break.

Continue reading “Yet Another Concrete Speaker Build”