HiFi Audio On The Commodore 64 – 48KHz, Yo!

Prior to the development of CD-quality audio hardware in the mid-1990s, home computers and consoles typically made do with synthesized music. Due to the storage and RAM limitations of the time, there weren’t a whole lot of other practical options. If you’re willing to ignore practicality, however, you can do some wonderful things – such as playing high-quality audio on a Commodore 64!

The project is the work of [Antonio Savona], who set out to play hi-fi audio on a Commodore 64 using only period-correct hardware. That means no 16MB RAM expansions, and no crazy high-capacity carts. The largest carts of the era were just 1MB, as produced by Ocean, and [Antonio] intended to cram in a full 90 seconds of music.

Targeting a sample rate of 48 KHz with 8-bit samples would mean the cartridge could only fit 20 seconds of raw audio into its 1MB of storage. This wasn’t good enough, so the audio would have to be compressed, with the target being a 4:1 ratio to reach the 90 second goal. With the C64’s CPU running at just 1MHz, there are just 21 clock cycles to deal with each sample when playing at 48 KHz.

Obviously, [Antonio] had set quite the challenge, and some masterful assembly coding was used to get the job done. The final result has the audio sounding impressively good, given that it’s being pumped out by a 6502 that is surely sweating to get the job done.

We love a good C64 hack around these parts, and it’s now even possible to build a new one from scratch if that’s your particular itch. Video after the break.

Continue reading “HiFi Audio On The Commodore 64 – 48KHz, Yo!”

Don’t DIY This Surgical Robot At Home

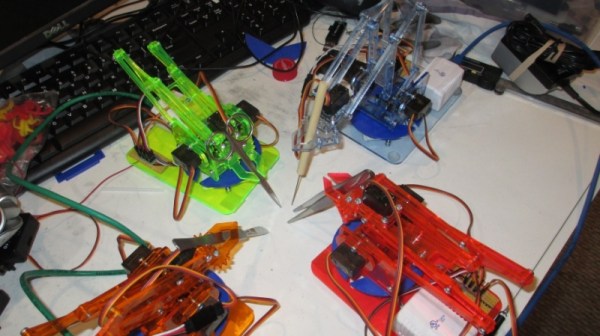
The LVL1 Hackerspace in Louisville hosted a hackathon for useless and impractical devices a couple of years ago and this makeshift Duh-Vinci Surgical Robot was one of the “successful” results. While it’s not necessarily a project that should ever be used for its intended purpose, its miniature setup is certainly an interesting one.

The project builds on top of the MeArm Open Source Robot and a camera controlled by a Blynk board. Servos are wired into the base of each of the robotic arms for freedom in rotating. A separate microcontroller is used for the motor controllers for the arms and for the camera, partially due to the current draw for the camera power supply. The remote control system runs on an Android tablet and is used to control each of the arms.

The ESP32-Cam supplied video input is configured as a RTSP stream. As for the operation, while the movements are jerky and the range of dexterity limited, the robot is technically able to handle the sharps. Its final setup looks a bit like a deranged game of Hungry Hungry Hippos meets Operation and definitely not something to be making its way to surgical tables anytime soon.

Continue reading “Don’t DIY This Surgical Robot At Home”

Add-On Makes ESP32 Camera Board Easier To Program

Don’t you just hate it when dev boards have some annoying little quirk that makes them harder to use than they should be? Take the ESP32-CAM, a board that started appearing on the market in early 2019. On paper, the thing is amazing: an ESP32 with support for a camera and an SD card, all for less than $10. The trouble is that programming it can be a bit of a pain, requiring extra equipment and a spare finger.

Not being one to take such challenges lying down, [Bitluni] has come up with a nice programming board for the ESP32-CAM that you might want to check out. The problem stems from the lack of a USB port on the ESP32-CAM. That design decision leaves users in need of a USB-to-serial adapter that has to be wired to the GPIO pins of the camera board so that programs can be uploaded from the Arduino IDE when the reset button is pressed. None of that is terribly complex, but it is inconvenient. His solution is called cam-prog, and it takes care of not only the USB conversion but also resetting the board. It does that by simply power cycling the camera, allowing sketches to be uploaded via USB. It looks to be a pretty handy board, which will be available on his Tindie store.

To demonstrate the add-on, he programmed his ESP32-CAM and connected it to his enormous ping pong ball video wall. The video quality is about what you’d expect from a 1,200 pixel display at 40 mm per pixel, but it’s still pretty smooth – smooth enough to make his interpretive dance moves in the last few minutes of the video pretty interesting.

Continue reading “Add-On Makes ESP32 Camera Board Easier To Program”

Hiking Pole Turned Lightweight Yagi Antenna

Among amateur radio enthusiasts, there’s a subset of users who climb mountainous areas to use their gear from elevated positions. Anyone looking to take part in what’s known as Summits on the Air (SOTA) will obviously want to keep their equipment as light and small as possible. For [Stuart Thomas], that meant a collapsible yagi antenna he could easily pack away.

But one day he wondered why he was carrying around a separate antenna boom when his aluminum hiking pole would make a perfectly good substitute. All he had to do was figure out a way to mount the elements to the pole in a way that could be easily assembled in the field. He initially tried to use the sort of insulated electrical clamps used to hold down conduit, but he found they weren’t quite what he was after.

[Stuart] eventually ended up designing and 3D printing his own element mounts that use an M3 bolt to tightly clamp onto the hiking pole, preventing them from twisting while still being very lightweight and easy to adjust. To further reduce the packed size of the antenna, he cut each element in half with a pipe cutter and flared the ends slightly so he could reassemble them on location with inserts.

Even if you aren’t the type of person who owns hiking poles, let alone climbs mountains for fun, there’s still plenty of interesting applications for a lightweight yagi antenna. We’ve seen custom yagis built out of carbon fiber before and of course cobbling one together out of PVC and tape measures is a classic hack, but we think the solution [Stuart] has come up with strikes a nice balance between the extremes.

Continue reading “Hiking Pole Turned Lightweight Yagi Antenna”

Mini Space Station Keeps Tabs On The Real One

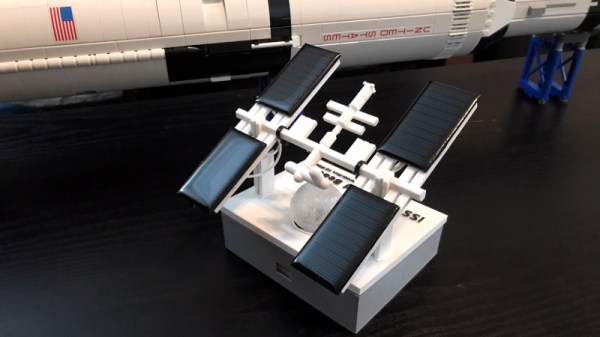
Over the years, we’ve seen a number of projects that can blink an LED or otherwise notify you when the International Space Station is overhead. It’s a neat trick that brings space a little closer to home, but not exactly a groundbreaking achievement in 2020. That said, we think this version built by [Lance] deserves some special recognition for the unbearably adorable miniature ISS he designed it around.

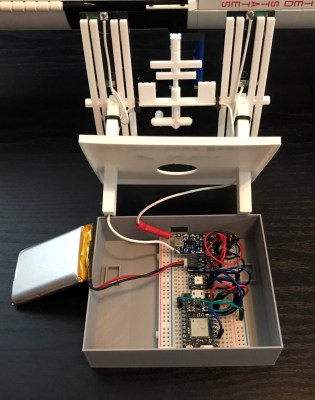
Especially once you realize that its tiny little solar panels are actually functional. Well, more or less. [Lance] says conditions have to be pretty ideal for the panels to actually charge up the internal battery, so there’s the option to top things off with a USB cable if need be. To try and reduce power consumption as much as possible, he uses some pretty aggressive power saving tricks which are interesting in their own right.

As the ISS silently passes over your head several times per day, the notifier can’t spend too much time sleeping on the job. The Particle Photon needs to wake up regularly to pull down the time of the next pass given the current geographical position, then go back to sleep until right before showtime. When the Station is nearby, it blinks an Adafruit Smart NeoPixel positioned under a small 3D printed model of the Earth, and finally goes back to sleep until the process starts over.

If you’re looking for something a little less complicated, this two dimensional representation of the Space Station might be more your speed. Then again, an even more complicated take on the idea using lasers sounds pretty good too.

Living At The Close Of The Multiway Era

After over a decade of laptop use, I made the move a couple of months ago back to a desktop computer. An ex-corporate compact PC and a large widescreen monitor on a stand, and alongside them a proper mouse and my trusty IBM Model M that has served me for decades. At a stroke, the ergonomics of my workspace changed for the better, as I no longer have to bend slightly to see the screen.

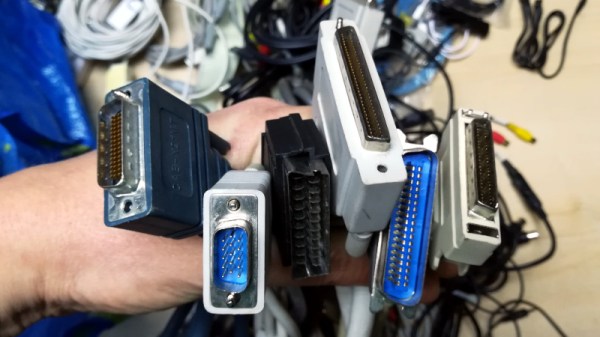
The previous desktop PC was from an earlier time. I think it had whatever the AMD competitor to a Pentium 4 was, and if I recall correctly, its 512 MB of memory was considered to be quite something. On the back it had an entirely different set of sockets to my new one, a brace of serial ports, a SCSI port, and a parallel printer port. Inside the case, its various drives were served by a set of ribbon cables. It even boasted a floppy drive. By contrast the cabling on its successor is a lot lighter, with much less bulky connectors. A few USB plugs and a network cable, and SATA for its disk drive. The days of bulky multiway interconnects are behind us, and probably most of us are heaving a sigh of relief. Continue reading “Living At The Close Of The Multiway Era”

Vintage Mini Inkjet Prints On-Demand ASCII Art

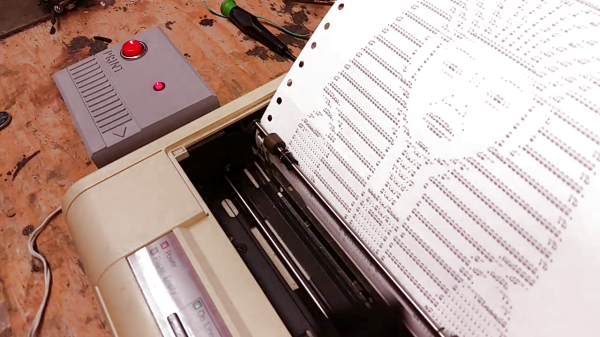
Readers of a certain age may fondly remember ASCII art emerging from line printers in a long-gone era of computing; for others, it’s just wonderfully retro. Well, when [Emily Velasco] found a vintage Kodak Diconix 150 inkjet at a local thrift store for $4, she knew what she had to do: turn it into a dedicated ASCII-art machine.

Dating to the mid-1980s, the diminutive printer she scored was an early example of consumer inkjet technology; with only 12 “jets,” it sported a resolution roughly equivalent to the dot-matrix impact printers of the day. [Emily] notes that this printer would have cost around $1000 in today’s money — this is from a time before printer companies started selling the printer itself as a loss leader to make revenue on the back end selling consumables. It seems you can’t escape the razor-and-blades model, though: [Emily] had to pay $16 for a new ink cartridge to revive the $4 printer.

With the new ink in place, and some tractor-feed paper acquired, [Emily] started work on the art generator. The concept is something that might have been sold on late-night TV ads: a “cartridge” you plug into your printer to make ASCII masterpieces. Starting with a stripped-down Centronics printer cable that matches the printer’s port, she added an Arduino nano to store and serve up the art. The user interface is foolproof: a single button press causes a random selection from one of ten ASCII images to be printed. The whole thing is ensconced within a slick 3D printed case.

One of the coolest aspects of this project is the lack of power supply. When she first hooked the Arduino to the printer’s parallel port, [Emily] noticed that it powered right up with no external supply, and in true hacker fashion, just ran with it. Upon reflection, it seems that power is being supplied by the printer status lines, Busy and/or Ack, through the input protection diodes of the Atmega328 on the nano.

We really like this project, and are more than a little bummed we tossed those old printers that were kicking around the Hackaday labs for years. If you still have yours, and would like turn out some rad ASCII art, the code for this project is up on GitHub.

We’re no strangers to [Emily]’s work, but if you aren’t familiar with it, check out her inspiring talk from the 2019 Hackaday Superconference. Meanwhile, don’t miss the excellent video about the ASCII art printer cartridge, after the break.

Continue reading “Vintage Mini Inkjet Prints On-Demand ASCII Art”