Design A Gingerbread House In CAD, Then Cut Pieces With A Laser

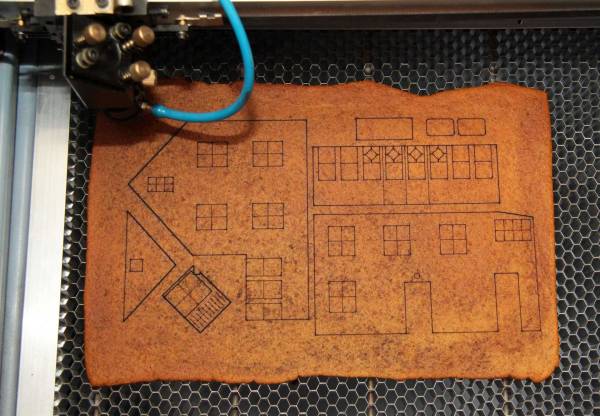
This is one of those ideas that’s so simple we can’t believe we haven’t heard of it before now. [Johan von Konow] is upping his holiday decorating game this year by designing his Gingerbread House in CAD and cutting it out on a laser cutter. If designed well this will easily allow you to increase the complexity of your design by orders of magnitude.

We remember making Gingerbread Houses with mom when we were little. She would bake a sheet of gingerbread, then pull out stencils she had made from file folders to carefully cut the walls and roof of the houses. But these were the homesteading equivalent of candy construction — one room consisting of four walls and two roof pieces. [Johan’s] design uses roofs with multiple pitches, dormers, and an entryway off the front of the main building. Quite impressive!

He mentions a few things to keep in mind. The gingerbread should be an even thickness for best results. You’re also going to want to plan for ventilation during cutting and give up the idea that you might eat the house when the holidays are over. The cutting process creates quite a stink and leaves a horribly burnt taste in the baked goods. Of course you could always cut out templates and use a knife when working with food.

DIY Laser Cutter From Non-DIY Parts

[Jerry] missed the laser cutters he had been using at the local TechShop. It closed down and after seeing some hardware in a surplus store he decided to build a laser cutter to call his own. You won’t be disappointed by his build log. It’s got a ton of hi-res images and plenty of explanation.

Often, cost is the key consideration in these types of builds. [Jerry] spent a little more than average, but look what he got back out of it. This started as a CNC machine aimed at loading silicon wafers for a company making electron microscopes. It’s barely been used, and the light-duty specs will work just fine with a laser cutter as the gantry won’t be moving much weight or fighting the rotational force of a mill motor. He tore out the stock controllers and built his own, adding a q-switched 355nm Frequency Tripled DPSS laser along the way. We’re not quite sure what that means… but in laymen’s terms it’s an ultraviolet laser source. See the finished unit cutting out some Kapton in the clip after the break.

Continue reading “DIY Laser Cutter From Non-DIY Parts”

Portable Radio Station Gets A Beautiful Case

[Martin] put together a simple portable radio unit to take some MP3s with him while he’s out and around. The build was simple; just a no-name Chinese MP3 player, a battery, and an FM radio transmitter. To give his project a little more pizzazz, he came up with a very handsome laser cut wooden case to turn what would be a bunch of wires and components into an attractive build.

[Martin]’s case makes wonderful use of the kerf bending technique. By cutting small staggered lines in a piece of plywood, [Martin] was able to bend his laser cut enclosure into a surprisingly tight radius. With the help of a pair of laser cut forms and a bit of hot water and glue, he was able to make the shape of his case permanent.

The top and bottom of his case are also laser cut plywood, but [Martin] included a translucent plexiglas logo on the top. When his radio unit is activated a LED inside his project box lights up, illuminating his personal logo.

Kerf bending is something we’ve seen before, and we’re looking forward to seeing more project boxes use it in the future, hopefully with the application of a veneer to cover the diamond-shaped holes.

Simple Solution Makes Rocket Fin Alignment A Breeze

If you’re building model rockets you want to make sure they fly straight, and most of that is dependent on the stabilizer fins. It has long been a problem come assembly time. How can you make sure that they’re being aligned without any variation? [Rrix] mentioned that one technique is to use a square to position them perfectly perpendicular to the bench on which the rocket is being assembled. But this is still prone to error. His method uses a couple of precision jigs made out of cardboard.

He designed this pair of jigs in Inkscape, then used the files to fabricate them out on a laser cutter. It worked like a charm, but led him to another issue that can be solved in a similar way. Model rockets have rail guides that travel along a rod attached to the launch pad as the craft accelerates to a point where the fins have enough effect to keep it going in a straight line. If those guides aren’t straight, your fin alignment will be all for naught. His second version of the jigs includes a cut out for these guides.

Hackaday Links: July 1, 2012

Opening really old lock boxes

[Barry Wels] is a locksmith. One day, he got a call from a museum that had a few 17th century strong boxes that needed to be opened. After a little probing with an endoscope, he decided they could be picked with a little bit of spring steel. So, what’s in the box? [Barry] is going to send in an update in a month or two.

An awesome Geordi La Forge VISOR. But don’t take my word for it.

[DrewSmith007] made a replica of Geordi’s VISOR from Star Trek: The Next Generation. Bonus: it’s autographed by Levar Burton.

Free mirrors for your laser cutter

If you have a laser cutter, your mirrors will get damaged, and they’re very expensive to replace. [Phil] sent in a neat tip: make your own mirrors from hard drive platters.

A proper M.U.L.E. remake

Combine Settlers of Catan with M.U.L.E.. That’s what this Kickstarter is trying to do, and it sounds freakin’ awesome.

This game is so cool

A few months ago, I mapped the surface of a video game moon. Since then, Kerbal Space Program had a huge update with a brand new moon. Over on Reddit, [InsanityCore] started mapping this new moon, so I rendered it. Go give [InsanityCore] some karma. He did all the hard work.

Raspberry Pi Enclosure Turns It Into A Desktop PC

While you’re still waiting for your Raspberry Pi to be delivered, why not build an enclosure for it? This build comes from the fruitful workshop of [builttospec], and gives the Raspi a very nice case well-suited for being placed on your desktop.

Like most of [builttospec]’s case builds, this enclosure was made on a laser cutter out of acrylic and features everything you would expect in a good Raspi enclosure. All the hardware ports are available, and there’s also a slot for a GPIO ribbon cable, perfect for connecting an enclosed Raspi to whatever hardware project you’re working on.

One thing we’re loving about [builttospec]’s enclosure is the tasteful use of light pipes that funnel the light from the LED indicators on the Raspi to the surface of the case. Sure, they’re just a few bits of laser-cut polycarbonate, but its little touches like this that transform a good case build into a great one.

Files available on Thingiverse.

Building Better Cases With A Laser Cutter

[Ryan] just got his Raspberry Pi, and what better way to add a new toy to your workbench than by building a case for it? Using a laser cutter and 3D printer, [Ryan] managed to make a case that is sure to be the envy of all the other tinkerers at his hackerspace.

The build started off with a piece of dark red acrylic in a laser cutter. After cutting the Raspberry Pi logo out of this acrylic, [Ryan] cut the same logo – a little bit larger – out of plywood. Because he was very careful to measure the kerf (or the width of the laser beam/saw blade/what have you), the wooded version of the Raspi logo fit snugly inside the acrylic cut out.

The sides of the enclosure are a single piece of plywood with a kerf bend, making for a very attractive rounded case. Finally, the Raspberry Pi is mounted on a Pi plate printed on a Ultimaker.

For as many builds we see using a laser cutter here on Hackaday, there’s surprisingly little information on exploiting the true potential of these machines with marquetry, intarsia, or fretwork. Enclosures are always cool, so if you have a very elegant laser cut box, send it in and we’ll put it up.