Beating Bitlocker In 43 Seconds

How long does it take to steal your Bitlocker keys? Try 43 seconds, using less than $10 in hardware. Encrypting your hard drive is good security. If you’re running Windows, the most popular system is BitLocker, which has come with Windows since Vista. We’ve known for some time that Bitlocker could be defeated with direct access to the hardware. Microsoft claims that the process requires an attacker with skill and lengthy access to the hardware. [Stacksmashing] wanted to define lengthy, so he gave it a try. The result is a shockingly fast attack.

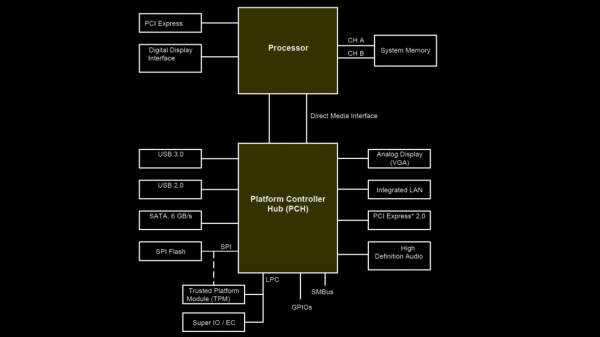
Anyone who uses Windows has probably run into Bitlocker. Your hard drive is encrypted, and Bitlocker runs silently in the background, decrypting data on demand.  The problem is key storage. In a simplified sense, encryption keys are stored in the Trusted Platform Module (TPM). When your computer boots, it reads the key from the TPM over the LPC (low pin count) bus, which is one of the last remnants of the original ISA bus.

Continue reading “Beating Bitlocker In 43 Seconds”

Can You Use A POST Card With A Modern BIOS?

[Alessandro Carminati] spends the day hacking Linux kernels, and to such an end needed a decent compilation machine to chew through the builds. One day, this machine refused to boot leaving some head-scratching to do, and remembering the motherboard diagnostics procedures of old, realized that wasn’t going to work for this modern board. You see, older ISA-based systems were much simpler, with diagnostic POST codes accessible by sniffing the bus with an appropriate card inserted, but the modern motherboard doesn’t even export the same bus anymore.

See “out 0x80, al” in there? That’s a POST code being written

Do modern machines even run a POST test at all, or are there other standards? After firing up a Linux machine and dumping the first meg of memory address space, it clearly contained some of the BIOS code. [Alessandro] looked at a disassembly of the BIOS update image and saw a similar structure, with POST code data sent to port 0x80 just like machines of old.

But instead of an ISA CPU bus, we have the Low Pin Count (LPC) bus which is used to hook up the ‘super IO’ functions, controlling things such as fans, temp sensors, and other system management functions. It also serves as the connection for the TPM feature, which usually appears as one of the motherboard connectors intended to be user-accessible. It turns out that POST codes can be accessed from this point with an appropriate POST card that can talk LPC.

Continue reading “Can You Use A POST Card With A Modern BIOS?”

EC Hacking: Your Laptop Has A Microcontroller

Recently, I stumbled upon a cool write-up by [DHowett], about reprogramming a Framework laptop’s Embedded Controller (EC). He shows us how to reuse the Caps Lock LED, instead making it indicate the F1-F12 key layer state – also known as “Fn lock”, AKA, “Does your F1 key currently work as F1, or does it regulate volume”. He walks us through adding custom code to your laptop’s EC firmware and integrate it properly into the various routines the EC runs.

The EC that the Framework uses is a MEC1521 chip from Microchip, and earlier this year, they open-sourced the firmware for it. Now, there’s a repository of microcontroller code that you can compile yourself, and flash your Framework laptop’s motherboard with. In a comment section of HackerNews, a Framework representative has speculated that you could add GPIOs to a Framework motherboard through EC firmware hacking.

Wait… Microcontroller code? GPIOs? This brings us to the question – what is the EC, really? To start with, it’s just a microcontroller. You can find an EC in every x86 computer, including laptops, managing your computer’s lower-level functions like power management, keyboard, touchpad, battery and a slew of other things. In Apple land, you might know them as SMC, but their function is the same.

Why have we not been reprogramming our ECs all this time? That’s a warranted question, too, and I will tell you all about it.

Continue reading “EC Hacking: Your Laptop Has A Microcontroller”

A Modern, Upgraded BASIC Stamp

Back in the Before Times, when microcontroller development required ultraviolet light, building anything was a pain. You probably had to burn a ROM onto a chip with a parallel programmer, there was no in-circuit programming, and who knows what would happen if you needed a serial port.

This changed in the early 90s with the introduction of the BASIC Stamp from Parallax. This was a simple microcontroller development board using Microchip PIC. With a little bit of clever firmware developed by Parallax, you could write code in BASIC, upload your code over a serial or parallel port (which every computer had), and blink a LED with just a few lines of code. All microcontroller development boards — including the Arduino — owe a debt to the BASIC Stamp. It is the grandfather to the Arduino, and it is very, very old.

Microchip didn’t update the BASIC Stamp, but that doesn’t mean someone else can’t handle that. [Bruce Eisenhard] is crowdfunding an improved, updated version of the famous 24-pin BASIC Stamp. It’s got modern parts, runs seven hundred times faster than the original, and is still chock full of BASIC interpretation.

This upgraded Stamp is built around NXP’s LPC11U3 micrcontroller, an ARM Cortex-M0 part with about a hundred times more Flash than the chip in the original Stamp. Programming is done through modern IDEs, and yes, there’s a USB port. This project is pin-compatible with the original BASIC Stamp, so if your microcontroller project from twenty years ago is dying, this is the replacement for you.

The BASIC Stamp was an awesome device for its time, even though it cost more than two hundred dollars in today’s money. [Bruce]’s campaign is offering one of these for $25, which is pretty reasonable for what it is.


A 16-voice Homebrew Polyphonic Synth

Homebrew synths – generating a waveform in a microcontroller, adding a MIDI interface, and sending everything out to a speaker – are great projects that will teach you a ton about how much you can do with a tiny, low power uC. [Mark] created what is probably the most powerful homebrew synth we’ve seen, all while using a relatively low-power microcontroller.

The hardware for this project is an LPC1311 ARM Cortex M3 running at 72 MHz. Turning digital audio into something a speaker can understand is handled by a Wolfson WM8762, a stereo 24-bit DAC. Both of these chips can be bought for under one pound in quantity one, something you can’t say about the chips used in olde-tyme synths.

The front panel, shown below, uses 22 pots and two switches to control the waveform, ADSR, filter, volume, and pan. To save pins on the microcontroller, [Mark] used a few analog multiplexers. As far as circuitry goes, it’s a fairly simple setup, with the only truly weird component being the optocoupler for the MIDI input.

goom2

The software for the synth is written mostly in assembly. In a previous version where most of the code was written in C, everything was a factor of two slower. Doing all the voice generation in assembly allowed for twice as many simultaneous voices.

It’s a great project, and compared to some of the other synth builds we’ve seen before, [Mark]’s project is at the top of its class. A quick search of the archives says this is probably the most polyphonic homebrew synth we’ve seen, and listening to the sound sample on the project page, it sounds pretty good, to boot.

Making An ARM Powered MIDI Synthesizer

What you see in the picture above is a hand-made 4-oscillator synthesizer with MIDI input, multi-mode filter and a handful of modulation options. It was built by [Matt], an AVR accustomed electronics enthusiast who made an exception to his habits for this project. The core of the platform is a DIP packaged 32-bit Cortex-M0 ARM processor (LPC1114), stuffed with ‘hand’ written assembly code and compiled C functions. With a 50MHz clock speed, the microcontroller can output samples at 250kHz on the 12bit DAC while being powered by 3 AA batteries.

Reading [Matt]’s write-up, we discover that the firmware he created uses 4 oscillators (sawtooth or pulse shape) together with a low frequency oscillator (triangle, ramp, square, random shapes). It also includes a 2-pole state-variable filter and the ability to adjust the attack-release envelopes (among others). The system takes MIDI commands from a connected device. We embedded videos of his creation in action after the break.

Continue reading “Making An ARM Powered MIDI Synthesizer”

Breadboarding With A ARM Microcontroller

NXP’s LPC1114 ARM microcontroller is in a class all of it’s own. ARM microcontrollers are a dime a dozen, but this fabulous chip is the only one that’s housed in a hacker and breadboard friendly PDIP package. However, breadboard setups usually won’t have the luxuries of a true development platform such as flashing the part, single stepping through the code, and examining memory. [Steve] found an interesting solution to this problem that involves a Dremel and hacking up even more hardware.

[Steve] found a few LPC1769 dev boards that include a debugger and a way to program these chips. Simply by hacking off the programmer and debugger portion of this dev board with a Dremel tool, [Steve] had an easy to use interface for his breadboardable ARM.

After connecting the power rails to his breadboarded chip, [Steve] connected his programmer up and set up a gcc toolchain. For about $25, he has a breadboard friendly ARM microcontroller with full debugging capabilities.

This isn’t the first time we’ve seen a few people play with this DIP28 ARM chip; someone even milled this 600 mil chip down to 300 mils for even easier prototyping. Still, this is the best and cheapest way we’ve seen yet to turn this ARM into a proper prototyping platform.