Etching Press Aims To Impress

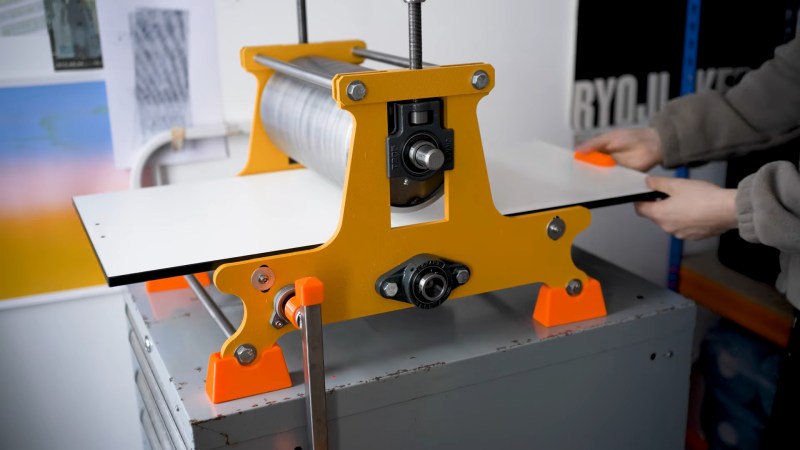
There’s an old joke about inviting somebody up to your dorm room to ‘look at your etchings’ — but if you’re going to do that, you’d best have some etchings, lest they call your bluff. Even better would be to have prints available, so you might share your hard work with adoring fans. Over on YouTube, [This Designed That] shows building the perfect little etching press  so you need never invite anyone to your room again: you can crank out enough prints on this bad boy to hand out your etchings on a street corner!

Crank is the right word, because it’s hand-cranked, with the rollers chain-driven off a separate driveshaft. It works like, well, a roller press: two steel rollers squeeze a platen holding your inked etching and a of paper together to put an image onto. His choice of an off-cut of steel pipe to use as the top roller is inspired, even if he did have to turn it down quite a bit to get an even radius and smooth surface finish. The whole thing is very well made, and all of it hand-machined except for off-the-shelf bearings and the yellow side plates, which were commercially CNC’d.

We also appreciate that [This Designed That] took the time to prove the merit of his machine by showing the press in work, and the resulting prints.  We’re not art critics, but we are willing to say this makes a good impression.

[This Designed That] is both printer and machinist, and we’ve seen his print projects before, like using resin prints for foil stamping or a DIY proofing press that seems to share some DNA with this larger project.
Continue reading “Etching Press Aims To Impress” →

Hand-Machined Stake Sharpener Just In Time For Dracula Season

Vampires aren’t as common as they once were, but in most places they aren’t fully protected and it’s still possible to get a tag for legal hunting come October — at least if you’re using traditional weapons, like a good old wooden stake.

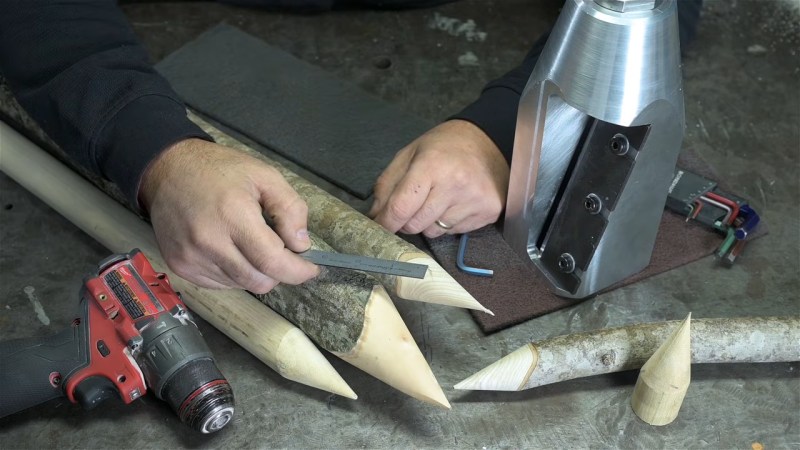
[This Old Tony] on YouTube didn’t have a good old wooden stake handy, but he does have a machine shop. Does he turn stakes on a lathe? Hardly. He turns an aluminum block into a giant pencil sharpener so he can use his drill to make vampire-removers out of any stick he finds.

If you thought that intro was too silly, you can skip the video. [Tony] is a funny guy, and is obviously enjoying himself in the voice over. He also obviously knows his way around a machine shop, and the 22 minute video shows every step of making a tool from a solid block of aluminum and some steel plate. It isn’t as soothing as some machinist’s videos are, though, as roughing out the 30 degree interior cone that will hold the stake against the steel blade is somewhat nerve-wracking to watch. Getting the blade mount tangent to the cone may have been trickier machining overall, but [Old Tony] nails every step. He’s now ready to dust any Nostferatu or Lasombra who darkens his door, assuming he has the strength to hammer the 3″ stakes he’s making through their undead ribs.

We’ve been enjoying [Old Tony] since we saw him build his own CNC table, only to ignore it in favour of his hard-earned skills. If you like that sort of thing, take a look — [Tony]’s cutting wit can make even videos about boring tools entertaining.

Continue reading “Hand-Machined Stake Sharpener Just In Time For Dracula Season” →

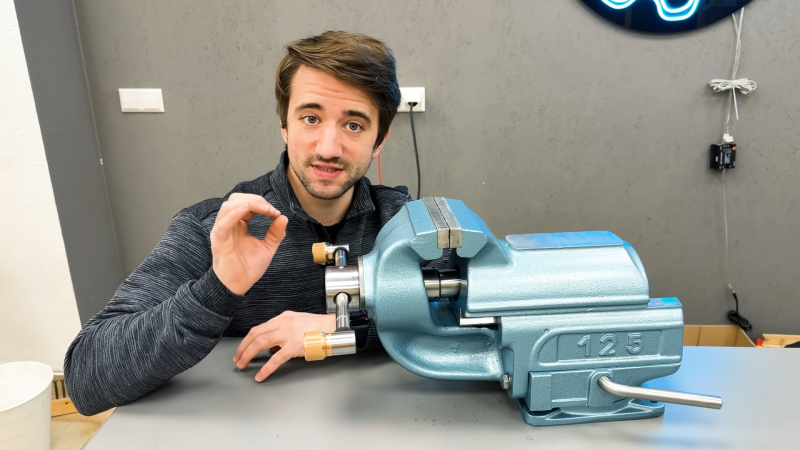
refurbished baby blue vice next to its refurbisher

Vice Of Old Brought To The Modern Age

People say they don’t make em’ like they used to, and while this isn’t always the case, it’s certainly true that old vices rarely die with time. This doesn’t mean they can’t use a refresh. [Marius Hornberger] recently backed that up when he decided to restore an old vice that had seen better days.

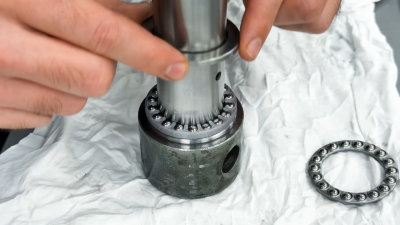
custom bearing and rod
Customized axial bearing assembly

When refreshing old tools, you’ll almost always start the same: cleaning up all the layers of grease and ruined paint. The stories that each layer could tell will never be known, but new ones will be made with the care put into it by [Marius]. Bearings for the tightening mechanism had become worn down past saving, requiring new replacements. However, simply swapping them with carbon copies would be no fun.

[Marius] decided to completely rethink the clamping mechanism, allowing for much smoother use. To do this was simple, just machine down new axial bearings, design and print a bearing cage, machine the main rod itself, and finally make a casing. It’s simple really, but he wasn’t done and decided to create a custom torque rod to hammer in his vicing abilities. Importantly, the final finish was done by spraying paint and applying new grease.

Old tools can often be given new life, and we are far from strangers to this concept at Hackaday. Make sure to check out some antique rotary tools from companies before Dremel!

Continue reading “Vice Of Old Brought To The Modern Age” →

Adjustable Allen Key After All These Years

The Allen key turns 115 this year. It’s strange to believe that in all that time, no one has come up with an adjustable version, but apparently true. Luckily [Chronova Engineering] has taken up the challenge in his latest video.

The video is a fascinating glimpse at the toolmaker’s art–manual machining and careful human judgement. Humans being the fallable creatures we are, the design goes through a few iterations. After the first failure in metal, [Chronova] falls back on 3D printing to rapidly prototype the next six iterations. Given how much work goes into manually machining the designs, we can only imagine the time savings that represents.

The final version is has classic hexagonal rod split in two, so that a chisel-shaped rod can spread the two prongs out to engage the sides of the Allen bolt. Even with that settled, the prongs and wedge had to be redesigned several times to find exact shape and heat-treatment that would work. At this point the range is anything between 4 mm and 6 mm, which is admittedly narrow, but [Chronova Engineering] believes the mechanism has the potential to go wider.

The design is not being patented, but the drawings are available via the [Chronova Engineering] Patreon if you really need an adjustable Allen key and don’t feel like reverse-engineering the mechanism from video. It’s a much larger project than we’ve featured from this channel before– enormous, really, compared to steam engines that fit on pencil erasers or electric motors that squeeze through the eye of a needle.

Our thanks hall-of-fame tipster [Keith Olson] for letting us know about this one. If you want a slice of that fame for yourself, the tips line is always open. Continue reading “Adjustable Allen Key After All These Years” →

Antique Mill Satisfies Food Cravings

Everyone knows what its like to get a hankering for a specific food. In [Attoparsec]’s case, he wanted waffles. Not any waffles would do, though; he needed waffles in the form of a labyrinth. Those don’t exist, so he had to machine his own waffle maker.

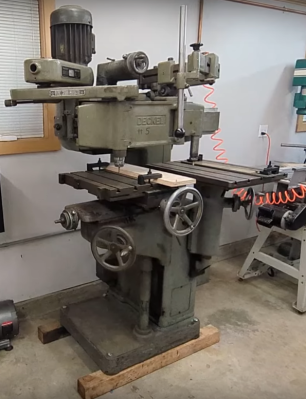
Antique pantograph mill
When computers were the size of rooms, these stood in where we’d use CNC today.

Most of us would have run this off on a CNC, but [Attoparsec] isn’t into CNCing–manual machining is his hobby, and he’s not interested in getting into another one, no matter how much more productive he admits it might make him. We can respect that. After a bit of brain sweat thinking of different ways to cut out the labyrinth shape, he has the opportunity to pick up an antique Deckle pantograph mill.

These machines were what shops used to do CNC before the ‘computer numeric’ part was a thing. By tracing out a template (which [Attoparsec] 3D prints, so he’s obviously no Luddite) complex shapes can be milled with ease. Complex shapes like a labyrnthine wafflemaker. Check out the full video below; it’s full of all sorts of interesting details about the machining process and the tools involved.

If you don’t need to machine cast iron, but are interested in the techniques seen here, a wooden pantorouter might be more your speed than a one-tonne antique. If you have a hankering for waffles but would rather use CNC, check out these design tips to help you get started. If pancakes are more your style, why not print them?

Shoutout to [the gambler] for sending this into the tip line. We think he struck the jackpot on this one. If you have a tip, don’t be shy. Continue reading “Antique Mill Satisfies Food Cravings” →

Man holding brass bar stock with several polygons turned on end

Polygons On A Lathe

Most professionals would put a polygon on the end of a turned part using a milling machine. But many a hobbyist doesn’t have a mill. And if the polygon needs to be accurately centered, remounting the stock costs accuracy.

[Mehamozg] demonstrates you can turn a polygon on a lathe.

Polygons on shaft ends are surprisingly common, whether you are replacing a lost chuck key, need an angular index, or need a dismountable drive. As the video shows, you can definitely make them on the lathe.

But how the heck does this work? It seems like magic.

Lets start by imagining we disengage and lock the rotating cutter in [Mehamozg]’s setup and run the lathe. If the tool is pointed directly at the center we are just turning normally.  If we angle the tool either side of center we still get a cylinder, but the radius increases by the sin of the angle.

Now, if we take a piece of stock with a flat on it and plot radius versus angle we get a flat line with a sin curve dip in it. So if we use [Mehamozg]s setup and run the cutter and chuck at the same speed, the cutter angle and the stock angle increase at the same time, and we end up with a flat on the part.  If the cutter is rotating an even multiple of the chuck speed, we get a polygon.

The rub in all this is the cutter angle.. At first we were convinced it was varying enormously. But the surface at the contact point is not perpendicular to  the radius from center to contact. So it cancels out, we think.  But our brains are a bit fried by this one. Opinions in the comments welcomed.

We like this hack. It’s for a commonly needed operation, and versatile enough  to be worth fiddling with the inevitable pain of doing it the first time.  For a much more specialized machining hack, check out  this tool that works much the same in the other axis.

Custom Lathe Tool Cuts Complex Oil Grooves

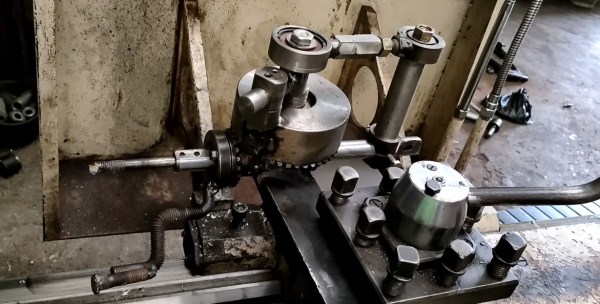
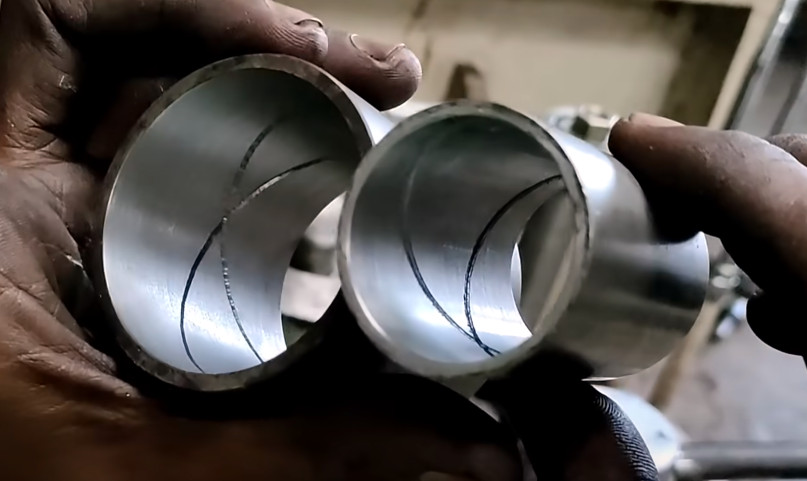
Oil grooves are used to lubricate the inside of a bearing, and can come in many forms — from a single hole that takes a few drops of oil, to helical patterns that distribute it over the entire internal surface. The ideal arrangement is a looping figure eight pattern similar to an oscilloscope Lissajous figure, but cutting these is a nightmare. That is, unless you’ve got the proper tool.

We figure [Machine Mechanic] must need to cut a lot of them, as they spent quite a bit of time perfecting this custom lathe attachment to automate the process. Through an assortment of clever linkages and a rod-turned-crank that was welded together in-situ, the device converts the rotational motion of the lathe into a reciprocating action that moves the cutting tool in and out of the bearing. Incidentally the business end of this gadget started life out as a bolt, before it was turned down and had a piece of tool steel brazed onto the end.

With a little adjustment, it seems like this device could also be used to carve decorative patterns on the outside of the workpiece. But even if this is the only trick it can pull off, we’re still impressed. This is a clever hack for a very specialized machine shop operation that most would assume you’d need a four-axis CNC to pull off.

Lathes seem at first like rather single purpose machines, we’re always pleased to discover strange and wonderful things being done with them, like this seemingly impossible-to-turn piece, and this combo wire EDM and lathe.

Continue reading “Custom Lathe Tool Cuts Complex Oil Grooves” →