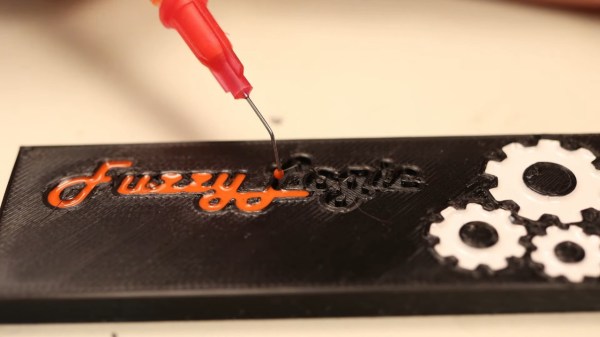
Syringe with diluted nail polish used to fill into cursive "FuzzyLogic" letters extruded into a surface of a 3D-printed block of plastic, as a demonstration.

Brighten Up Your Prints With This Nail Polish Approach

It’s not enough to 3D-print a part – there’s a myriad of things you can do from there! [FuzzyLogic] shows us his approach of adding inlay labels, icons and text to a 3D print, by extruding them into the print and filling the resulting cavity with nail polish! This makes for colorful and useful prints, as opposed to dull single-color parts we typically end up with.

The devil’s in the details, and [FuzzyLogic] has got the details down to a technique. Nail polish has to be diluted with acetone so that it flows well, and a particular combination of syringe and needle will be your friend here. Of course, don’t forget to factor surface tension in – even with well-diluted nail polish, you cannot make the grooves too thin. A bit more acetone on a q-tip helps in case of any happy little accidents, and a coat of clear acrylic spray paint seals the lettering firmly in place. The five-minute video tells you all about these things and a quite few more, like the basics of extruding text and icons in a typical CAD package, and has a bit of bonus footage to those watching until the end.

Adding markings to our prints is a lovely finishing touch! If you’re looking for more of that, here’s a custom tool-changing printer with a pen attachment making beautiful custom enclosures for the Pocket Operator.

Continue reading “Brighten Up Your Prints With This Nail Polish Approach”

Hackaday Links: June 22, 2014

hackaday-links-chain

Solar Freakin’ Roadways! There’s been a lot of talk about how solar freakin’ roadways are an ill-conceived idea, and now [Dave Jones] is weighing in on the subject. Highlights include a quarter of the solar power generated being used to light the LEDs that form the lane markers, something that could easily be accomplished with paint. Oh, the solar freakin’ roadway campaign is over. Just over $2.2 million, if you’re wondering.

The Game Boy Micro is the best way to play GBA games, but finding one for a reasonable price just isn’t going to happen. [John Sparks] is making his own Macro Micros by casemodding a DS Lite.On the subject of Game Boy mods, [koji-Kendo] is improving the common frontlight Game Boy Color mod with optically clear UV curing glue. Without glue on the left, with glue on the right.

Need to label a panel with the function of all your switches and dials? Yeah, you could drop the panel into an engraver, till the engraved letters with enamel, or do some electroetching. You can also buy a pack or rub-on letters, available in any Michaels, Hobby Lobby, or the like.

MSI Afterburner is a utility that allows you to play with settings and monitor performance on MSI graphics cards. [Stephen] made a little device for MSI Afterburner that displays the current FPS and GPU load on an external LCD. Handy, seeing as how FPS and GPU load is the one thing you’ll want to know when you’re gaming fullscreen.

Realtime cloudmaps of the Earth. Using reasonably recent images take from five geostationary satellites, you can stitch together a real-time cloud map of the entire Earth. Here’s the software to do it. Now all you need is a projector and pair of frosted acrylic hemispheres, and you have a real-time globe.

Say you have a Kickstarter in the works, and you’re trying to figure out all the ways to get some buzz from the Internet public.. Here’s how you get it to the front page of hackaday.io using a bit of Perl. “So far, this page has been updated 02578 times.”