There’s a truism in the security circles that says physical security is security. It doesn’t matter how many bits you’ve encrypted your password with, which elliptic curve you’ve used in your algorithm, or if you use a fingerprint, retina scan, or face print for a second factor of authentication. If someone has physical access to a device, all these protections are just road bumps in the way of getting your data. Physical access to a machine means all that data is out in the open, and until now there’s nothing you could do to stop it.
This week at Black Hat Europe, Design-Shift introduced ORWL, a computer that provides the physical security to all the data sitting on your computer.
The first line of protection for the data stuffed into the ORWL is unique key fob radio. This electronic key fob is simply a means of authentication for the ORWL – without it, ORWL simply stays in its sleep mode. If the user walks away from the computer, the USB ports are shut down, and the HDMI output is disabled. While this isn’t a revolutionary feature – something like this can be installed on any computer – that’s not the biggest trick ORWL has up its sleeve.
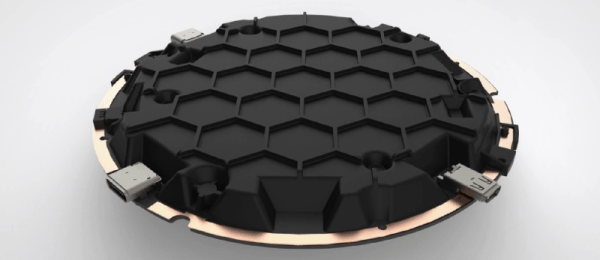
 The big draw to the ORWL is a ‘honeycomb mesh’ that completely covers every square inch of circuit board. This honeycomb mesh is simply a bit of plastic that screws on to the ORWL PCB and connects dozens of electronic traces embedded in this board to a secure microcontroller. If these traces are broken – either through taking the honeycomb shell off or by breaking it wide open, the digital keys that unlock the computer are erased.
The ORWL specs are what you would expect from a bare-bones desktop computer: Intel Skylake mobile processors, Intel graphics, a choice of 4 or 8GB of RAM, 64 to 512GB SSD. WiFi, two USB C ports, and an HDMI port provide all the connections to the outside world.
While this isn’t a computer for everyone, and it may not even a very large deployment, it is an interesting challenge. Physical security rules over all, and it would be very interesting to see what sort of attack can be performed on the ORWL to extract all the data hidden away behind an electronic mesh. Short of breaking the digital key hidden on a key fob, the best attack might just be desoldering the chips for the SSD and transplanting them into a platform more amenable to reading them.
In any event, ORWL is an interesting device if only for being one of the few desktop computers to tackle the problem of physical security. As with any computer, if you have physical access to a device, you have access to all the data on the device; we just don’t know how to get the data off one of these tiny computers.
Video below.
Continue reading “Physical Security For Desktop Computers” →


 The project took around 450 meters of RGB strips controlled by


