The Internet Of Dirt, A Texting Plant

We will all at some point have forgotten to water a plant. If we’re lucky then the limp vegetation we return to will magically revive when we rush to water it, if not then we have the shame of an empty plant pot to remind us of our folly.

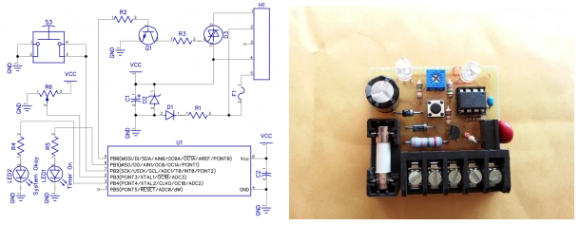
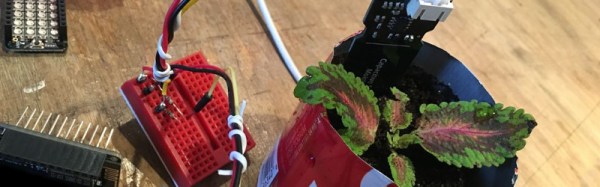
No matter, you might be thinking, we can bring technology to bear on the problem, and automate it with a microcontroller! [Bonnie] has done just that, with a capacitive soil sensor feeding an ESP8266-based Adafruit Feather HUZZAH, which in turn logs soil humidity data with the Adafruit IO online service. An IFTTT applet monitors the data, and triggers a notification when moisture falls to the point at which watering is required.

The Instructables write-up gives a comprehensive step-by-step guide to the whole process, including the code, so it’s a project that almost anyone could try as well as a basic introduction to using an online service with a piece of hardware. We can’t help asking, though, whether it might have been better to have had the system do the watering rather than merely administer a prod to its fleshy horticulturist creator. Perhaps that’s left to anyone else building one to add as an enhancement.

Quite a few plant watering automation projects have found their way onto these pages over the years, from this one using car parts to a system with an impressively simple valve made by compressing a flexible pipe. The ultimate watering device though has to be this fully autonomous greenhouse robot.

Neat DIY Valve for watering system

Automated Watering System Uses Neat DIY Water Valve

[Valentin] is an engineering student and hobbyist gardener. He was planning on going home for a 3 week semester break and certainly could not leave his balcony plants to fend for themselves. The clearly obvious solution was to make an automated watering system!

The most interesting part of this build is the valve. Anyone could have bought an off-the-shelf solenoid valve, not [Valentin], he designed his own. It is simple and just pinches the water supply tube to stop the flow of water coming from the elevated 20-liter water container. The ‘pinching’ arm is raised and lowered by an RC Car servo. When the valve is in the closed position, the servo does not need to continually apply pressure, the servo is powered down and the valve stays closed. This works because when the valve is closed, all forces are acting in a strictly radial direction on the servo’s drive disk. Since there is no rotation force, the drive disk does not rotate and the valve stays closed.

The servo is controlled by a microcontroller. Instead of rotating the servo to a certain degree, the servo rotates until it hits a limit switch. Those limit switches tell the microcontroller that the valve is either in the open or closed position. You must be asking yourself ‘what happens if the limit switch fails and the servo wants to keep rotating?’ [Valentin] thought of that too and has his code measure how long it is taking to reach the limit switch. If that time takes too long, the servo is powered down.

Video below.

Continue reading “Automated Watering System Uses Neat DIY Water Valve”

ATtiny Watering Timer Turns Off The Water When You Forget

ATtiny Water Timer

A pal of [Kyle’s] was regularly leaving his sprinkler on for too long. He also had forgotten to turn the water off while topping off his pool a couple of times, an embarrassing and wasteful situation. Being such a good friend, [Kyle] offered to make him a water timer. This isn’t a regular water timer that turns the water on and off at the same time every day. This device allows the user to push a button to have the unit switch on a solenoid valve, permitting water flow. After a predetermined amount of time the unit removes power to the solenoid valve which stops the water flow, successfully preventing pool overflows and excessive watering.

[Kyle] started off his design using a 555 chip to do the counting. He quickly became worried that timer lengths over 10 minutes would cause inconsistent functionality due to the leakage current of the capacitor and the charge current of the resistor. There are ways around this, but rather than complicate the design he switched to an ATtiny microcontroller. The added benefit of the ATtiny is that he could connect up a potentiometer to adjust the on-time without replacing parts or making a new unit. When the potentiometer is turned, the on-board LED will flash a number of times which corresponds with the delay in minutes. Ten flashes means a 10 minute delay. It’s a simple and clear interface.

As if the home etched PCB wasn’t cool enough, [Kyle] 3D printed up a case for the unit. The case permits access to the screw terminals and has provisions for the indicator LEDs. Check out the integrated flap in the top of the case. When this portion of the case is pushed in, it presses the PCB-mounted on/off switch.

If you are interested in making one, all of the files and code are available on [Kyle’s] site.

via [dangerous prototypes]

Arduino Tux Plant Care


Some of us need a little help keeping our green leafy friends happy. The Arduino Tux (translated) plant care system was built to make things a little easier.

The author had a broken tux toy laying around and wanted to do something fun with it. He cut a hole in the front to mount an LED matrix and connected it all to an Arduino. A couple of metal rods serve as a resistivity sensor in the plant’s dirt.

When you water the plant, tux flashes some hearts and a smiley face. As the moisture drops, tux gets less happy with the end result being a big frown.

These are the same people who brought you the Arduino Photolab.

[via Hack a Day Flickr Pool]