Voltset Multimeters At World Maker Faire

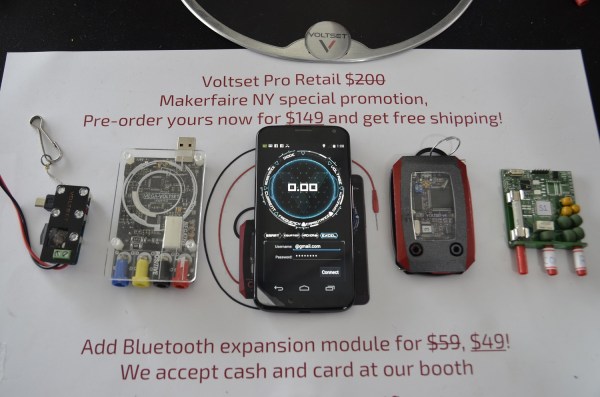
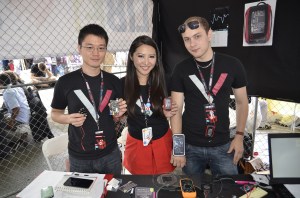
Many tents at World Maker Faire were divided up into booths for companies and various projects. In one of these tents, we found the Voltset booth. [Tom, Ran, and Michael] were on hand to show off their device and answer any questions. Voltset is essentially a multimeter which uses your phone as a display. It connects to an Android phone via USB or an optional Bluetooth module.

Now we’d be a bit worried about the risk of damaging our phones with a voltmeter electrically connected via USB. However, many people have an old phone or retired tablet kicking around these days, which would be perfect for the Voltset. The Bluetooth module alleviates this problem, too – though it doesn’t fix the issue of what happens to the multimeter when someone decides to call.

Voltset isn’t new; both the Voltset team and the similarly specced  Mooshimeter were also at World Maker Faire last year. In the interim, Voltset has had a very successful Kickstarter. The team is accepting pre-orders to be shipped after the Kickstarter backers are sent their rewards.

voltset-2[Tom] told us that the team is currently redesigning their hardware. The next generation prototype board with more protection can be seen in the far right of the top photo. He also mentioned that they’re shooting for 5 digits of accuracy, placing them on par with many bench scopes. We’re skeptical to say the least about 5 digits, but the team is definitely putting their all into this product. We’ll wait until the Kickstarter backers start getting their final devices to see if Voltset is everything it’s cracked up to be.

‘Duinos And VR Environments

At the Atmel booth at Maker Faire, they were showing off a few very cool bits and baubles. We’ve got a post on the WiFi shield in the works, but the most impressive person at the booth was [Quin]. He has a company, he’s already shipping products, and he has a few projects already in the works. What were you doing at 13?

[Quin]’s Qduino Mini is your basic Arduino compatible board with a LiPo charging circuit. There’s also a ‘fuel gauge’ of sorts for the battery. The project will be hitting Kickstarter sometime next month, and we’ll probably put that up in a links post.

Oh, [Quin] was also rocking some awesome kicks at the Faire. Atmel, I’m trying to give you money for these shoes, but you’re not taking it.

[Sophie] had a really cool installation at the faire, and notably something that was first featured on hackaday.io. Basically, it’s a virtually reality Segway, built with an Oculus, Leap Motion, a Wobbleboard, an Android that allows you to cruise on everyone’s favorite barely-cool balancing scooter through a virtual landscape.

This project was a collaboration between [Sophie], [Takafumi Ide], [Adelle Lin], and [Martha Hipley]. The virtual landscape was built in Unity, displayed on the Oculus, controlled with an accelerometer on a phone, and has input with a Leap Motion. There are destructible and interactable things in the environment that can be pushed around with the Leap Motion, and with the helmet-mounted fans, you can feel the wind in your hair as you cruise over the landscape on your hovering Segway-like vehicle. This is really one of the best VR projects we’ve ever seen.

Basement Wood-Drying Kiln

Once upon a time, a woodworker met another woodworker who happened to have a tree business. They struck a deal stating that the first woodworker would dry the sawn boards provided by the second and both would share the lumber. That’s exactly what happened to [Tim], which led to his entry in The Hackaday Prize.

[Tim] does a great job explaining his build of the kiln itself, his controls, and the gist of running the thing. The idea is to pull moisture out of the wood at just the right speed. Otherwise, the boards might check on the outside, honeycomb on the inside, or bear residual tension. He’s using a dehumidifier to pump dry air into the kiln and a control system to both monitor the relative humidity in the kiln and to dry the stock down to a moisture content in the 6-8% range.

kiln controls
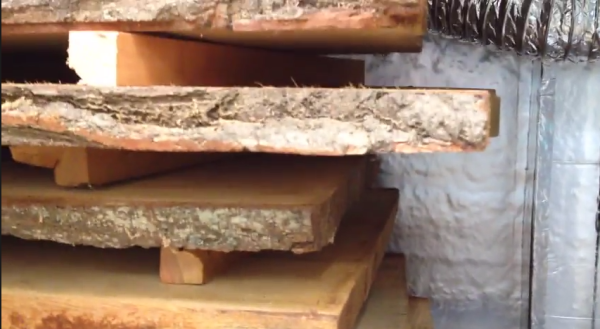
The kiln is built from slightly blemished pallet rack shelving that [Tim] cut to suit his needs. He skinned it with 1/2″ insulation boards sealed with aluminium tape and plans to add sheet metal to protect the insulation.

[Tim] wanted to control both a fan and the dehumidifier, monitor relative humidity in the kiln, log the data, and send it to the internets. For this, he has employed an Arduino Due, a DHT-22, an RTC, a relay board, an Ethernet shield, and an LCD to show what’s happening. The hardware is all working at this point, and the software is on its way. Check out his entry video below.


SpaceWrencherThis project is an official entry to The Hackaday Prize that sadly didn’t make the quarterfinal selection. It’s still a great project, and worthy of a Hackaday post on its own.


Continue reading “Basement Wood-Drying Kiln”

Doorbell

A 1920’s Doorbell Is Upgraded With 2010’s Technology

When you move into an old house, you are bound to have some home repairs in your future. [Ben] discovered this after moving into his home, built in 1929. The house had a mail slot that was in pretty bad shape. The slot was rusted and stuck open, it was covered in old nasty caulk, and it had a built-in doorbell that was no longer functional. [Ben] took it upon himself to fix it up.

The first thing on the agenda was to fix the doorbell. After removing the old one, [Ben] was able to expose the original cloth-insulated wiring. He managed to trace the wires back to his basement and, to his surprise, they seemed to be functional. He replaced the old doorbell button with a new momentary button and then hooked up a DIY doorbell using an XBee radio. [Ben] already had an XBee base station for his Raspberry Pi, so he was wrote a script that could send a notification to his phone whenever the doorbell was pushed.

Unfortunately, the old wiring just didn’t hold up. The push button only worked sporadically. [Ben] ended up purchasing an off the shelf wireless doorbell. He didn’t want to have to stick the included ugly plastic button onto the front of his house though, so [Ben] had to figure out how to trigger the new doorbell using the nice metallic button. He used the macro lens on his iPhone to follow the traces on the PCB until he was able to locate the correct points to trigger the doorbell. Then it was just a matter of a quick soldering job and he had a functional doorbell.

Once the electronics upgrades were complete, he moved on to fixing up the look of the mail slot. He had to remove the rust using a wire brush and sandpaper. Then he gave it a few coats of paint. He replaced the original natural insulation with some spray foam, and removed all the old nasty caulk. The final product looks as good as new and now includes a functional wireless doorbell.

We’re big fans of salvaging old-school home hardware. Another example that comes to mind is this set of door chimes with modernized driver.

WirePrint

WirePrint Is A Physical ‘Print Preview’ For 3D Printers

3D printers may be old news to most of us, but that’s not stopping creative individuals from finding new ways to improve on the technology. Your average consumer budget 3D printer uses an extrusion technology, whereby plastic is melted and extruded onto a platform. The printer draws a single two-dimensional image of the print and then moves up layer by layer. It’s an effective and inexpensive method for turning a computer design into a physical object. Unfortunately, it’s also very slow.

That’s why Hasso Plattner Institute and Cornell University teamed up to develop WirePrint. WirePrint can slice your three-dimensional model into a wire frame version that is capable of being printed on an extrusion printer. You won’t end up with a strong final product, but WirePrint will help you get a feel for the overall size and shape of your print. The best part is it will do it in a fraction of the time it would take to print the actual object.

This is a similar idea to reducing the amount of fill that your print has, only WirePrint takes it a step further. The software tells your printer to extrude plastic in vertical lines, then pauses for just enough time for it to cool and harden in that vertical position. The result is much cleaner than if this same wire frame model were printed layer by layer. It also requires less overall movement of the print head and is therefore faster.

The best part about this project is that it’s a software hack. This means that it can likely be used on any 3D printers that use extrusion technology. Check out a video of the process below to see how it works. Continue reading “WirePrint Is A Physical ‘Print Preview’ For 3D Printers”

Neat DIY Valve for watering system

Automated Watering System Uses Neat DIY Water Valve

[Valentin] is an engineering student and hobbyist gardener. He was planning on going home for a 3 week semester break and certainly could not leave his balcony plants to fend for themselves. The clearly obvious solution was to make an automated watering system!

The most interesting part of this build is the valve. Anyone could have bought an off-the-shelf solenoid valve, not [Valentin], he designed his own. It is simple and just pinches the water supply tube to stop the flow of water coming from the elevated 20-liter water container. The ‘pinching’ arm is raised and lowered by an RC Car servo. When the valve is in the closed position, the servo does not need to continually apply pressure, the servo is powered down and the valve stays closed. This works because when the valve is closed, all forces are acting in a strictly radial direction on the servo’s drive disk. Since there is no rotation force, the drive disk does not rotate and the valve stays closed.

The servo is controlled by a microcontroller. Instead of rotating the servo to a certain degree, the servo rotates until it hits a limit switch. Those limit switches tell the microcontroller that the valve is either in the open or closed position. You must be asking yourself ‘what happens if the limit switch fails and the servo wants to keep rotating?’ [Valentin] thought of that too and has his code measure how long it is taking to reach the limit switch. If that time takes too long, the servo is powered down.

Video below.

Continue reading “Automated Watering System Uses Neat DIY Water Valve”

THP Semifinalist: A Robotic Lawn Mower

For all the Roombas in the world, you have to wonder why robotic lawn mowers aren’t more common. Sure, you can go out and buy one, but mowing the typical suburban yard is a piece of cake for a robot; there aren’t stairs, there are relatively few obstacles, and a boundary wire system is much simpler than simply bouncing into things like an iRobot.

[Schuhumi]’s autoCut is the only household robot to make the semifinalists in The Hackaday Prize. Underneath, this bot is electric, has fully automatic operation, and even has a motor to change the height of the blades. The blades are actually designed more like a stringless weedwacker; the blades pivot back when they encounter a hard obstacle, although this safety cage is a really good idea

Instead of doing the random ‘bump and turn’ algorithm found in a roomba, there’s a lot of thought put into navigation with this bot. [schuhumi] is using ultrasonic navigation that triangulates the position of the bot in a yard. That’s a great idea; there’s no need to waste time or power rolling over what the bot has already cut.

You can check out [schuhumi]’s overview video and a demo below.


SpaceWrencherThe project featured in this post is a quarterfinalist in The Hackaday Prize. 

Continue reading “THP Semifinalist: A Robotic Lawn Mower”