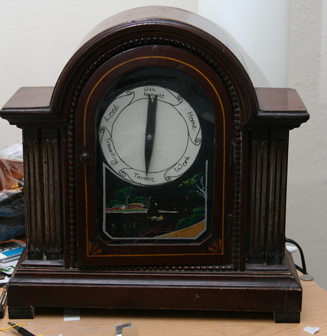
Raspberry Pi Hacking, Commando Style

raspberry-pi-and-notebook

If you’re lacking useful equipment for your Raspberry Pi hacking adventure, such as an HDMI monitor or power supply, this handy write-up will show you how to continue your hacking. All you’ll need is a laptop, the Raspberry Pi itself, an SD card, and an Ethernet and micro-USB cable. As noted in the article, it’s not really recommended to power the ‘Pi off of USB only, so this could potentially be a source of problems.

This hack begins by installing Linux on an SD card per this setup page, then using a Virtual Network Computing [VNC] setup to work with your Raspberry Pi. There are a few steps in between being able to do this, like setting up network sharing, and sleuthing out the IP address of the new processor, but everything is explained in detail for Mac and Linux. Windows users will have to do a bit of “sleuthing” of their own, but if you have some more information on this process, we’d love to hear about it in the comments!

Hackaday Links: December 5, 2012

PS1 hombrew competition

code

The PlayStation Development Network is hosting a six-month long competition to develop homebrew games for the original PlayStation.We don’t get many homebrew games for old systems in our tip line, so if you’d like to show something off, send it in.

This is how you promote a kickstarter

snes

[Andy] has been working on an SNES Ethernet adapter and he’s finally got it working. Basically, it’s an ATMega644 with a Wiznet adapter connected to the second controller port. The ATMega sends… something, probably not packets… to the SNES where it is decoded with the help of some 65816 assembly on a PowerPak development cartridge. Why is he doing this? To keep track of a kickstarter project, of course.

What exactly is [Jeri] building?

jeri

[Jeri] put up an awesome tutorial going over the ins and outs of static and dynamic flip-flops. There’s a touch of historical commentary explaining why dynamic registers were used so much in the 70s and 80s before the industry switched over to static designs (transistors were big back then, and dynamic systems needed less chip area). At the end of her video, [Jeri] shows off a bucket-brigade sequencer of sort that goes through 15 unique patterns. We’re just left wondering what it’s for.

Finally, a camera for the Raspberry Pi

camera

In case you weren’t aware, the camera board for the Raspberry Pi will be released sometime early next year. Not wanting to wait a whole month and a half, [Jouni] connected a LinkSprite JPEG serial camera to his Raspberry Pi. The whole thing actually works, but [Jouni] didn’t bother posting the code. Maybe we can encourage him to do so?

Blatant advertising? Yes, but fireballs

Nintendo gave [MikenGary] a Wii U and asked them to make a film inspired by 30 years of Nintendo lore and characters. They did an awesome job thanks in no small part to Hackaday boss man [Caleb](supplied the fire), writer [Ryan] (costume construction) and a bunch of people over at the Squidfoo hackerspace.

Raspberry Pi Model A Coming Soon

A

[Liz] over at the Raspberry Pi foundation took a trip over to the manufacturing facility in Wales and found some of the very first Model A Raspi samples. They’re just samples, but this means we should be seeing a few Model A Raspberry Pis pop up on Element 14 sometime very soon.

As the lower-cost model of the Raspberry Pi, the Model A lacks a few features of the more complete Model B. For starters, there is no Ethernet port or controller, and only one USB port, This greatly reduces the power requirements for the Model A, measured by the Raspi Foundation at about 1/3rd of the power draw of the Model B.

To save costs, the Model A is using the same PCB as the Model B – the Ethernet controller and port simply aren’t populated. It may seem like a downgrade, but if you’re planning on building a Raspi-powered autonomous drone, high-altitude balloon, or other robotics project, the reduced power draw will be a great feature.

Plan 9 On The Raspberry Pi

Yet another operating system has been ported to the Raspberry Pi. No, it’s not Haiku, sadly, but it is something just as weird and interesting. This time it’s Plan 9 from Bell Labs, an 80’s era OS from the same company that brought you C and Unix.

As a research operating system, Plan 9 has a bunch of really weird, but useful features. For one, everything about a computer running Plan 9 is distributed; the memory can be running on one machine, the processor on another, and the display can run on yet another machine. This modularity gives Plan 9 the honorable title of, ‘more Unix than Unix’.

Another great feature, although somewhat of a historical note, is that Plan 9’s graphics capabilities are written into the kernel, unlike Linux and X where the display manager is floating around in user space.

It’s an interesting system, and if you’ve got enough Raspis to build your own supercomputer you might want to install Plan 9 on a few of your nodes, just to see what the future computer of ages past looked like.

Raspberry Pi Quadcopter

[youtube=http://www.youtube.com/watch?v=TjXvzMdf8Nk&w=470]

It was bound to happen sooner or later, but that doesn’t diminish the awesomeness of [Matthew]’s Raspberry Pi-powered quadcopter.

[Matthew]’s quadcopter is similar to all the other flying drones we’ve seen before with one important difference – all the processing, from reading the gyroscopes to computing exactly how much power to give each motor – is handled by a Raspberry Pi. This task is usually the domain of a microcontroller, as these calculations need to happen in real-time. The Linux distro [Matt] is running on his Pi has a lot more overhead than a simple AVR or ARM microcontroller, so doing everything that needs to be done in real-time isn’t guaranteed. With a bit of clever programming, [Matthew] managed to make sure all the necessary tasks were taken care of in time. It’s still not a real-time operating system, but for this project at least, it’s good enough.

Since the Raspberry Pi in [Matthew]’s quadcopter is much more powerful than a microcontroller, there’s plenty of head room to SSH into the ‘copter while it’s flying. There may even be enough processing power to stream video to a web server; we honestly can’t wait to see what [Matthew] does with his flying Linux computer in the future.

You can check out [Matthew]’s code over on the git or watch a few flight test videos over on his youtube.


Minecraft Coming To Raspberry Pi

The folks over at the Raspberry Pi Foundation often gets asked “does it run Minecraft?” Mojang, the team behind the block building game, has announced that they will be releasing Minecraft: Pi Edition. This port will be based off the Pocket Edition of the game, but with a revised set of features.

So what does this have to do with hacking? Mojang has announced that the Pi Edition will have “support for multiple programming languages.” There aren’t too many details about what this support will entail, but it looks to be aimed at teaching programming by using the world of Minecraft.

Hopefully, it will be possible to interface with the RPi’s expansion header to allow external devices to get data and create objects in the Minecraft world. There’s a lot of potential for hacking and learning programming skills.

The best part? It will be a completely free download. We’re looking forward to the launch.

Tiny MAME Cabinet Built From Raspberry Pi

It’s been a while since we’ve seen [Sprite_tm] pull a project from thin air, and we haven’t seen him do anything with a Raspberry Pi yet. All things must pass, and finally [Sprite] has unleashed his tiny, pocket-sized MAME machine to the world.

The build uses a Raspi for all the Linux-ey and MAME goodness, but [Sprite_tm] didn’t want to fiddle around with the HDMI or analog video output. Instead, he chose to use an SPI-controlled TFT display that is only 2.4 inches across. This isn’t a new hack for [Sprite] – he figured out how to connect this display over GPIO pins with a Carambola earlier this year.

To make his cabinet portable, [Sprite] opted for using old cell phone batteries with a cleverly designed charging circuit. When the power supply is connected to +5V, the batteries charge. When this power is removed, an ATtiny85 provides 5V of power to the Raspi and display.

No arcade cabinet is complete without a marquee of some sort, so [Sprite] used an extremely tiny 128×32 white OLED to display the logo of the game currently being played. Everything in the Raspi is set up to be completely seamless when switching between games, automatically configuring the controls and marquee for the currently selected game.

You  can check out [Sprite]’s mini MAME booting straight into Bubble Bobble after the break along with some gameplay footage and finally switching it over to Nemesis. A very awesome build from an exceedingly awesome maker.

Continue reading “Tiny MAME Cabinet Built From Raspberry Pi”