Vintage Portable TV Turned Retro Gaming System

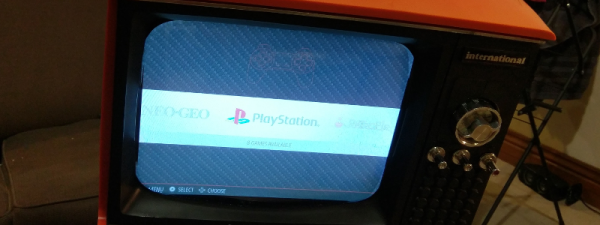
When [FinnAndersen] found an old TV set by the side of the road, he did what any self-respecting DIY/gaming enthusiast would do: He took it apart and installed a Raspberry Pi 3 running RetroPie in it in order to play retro games on a retro TV!

[Finn] took the CRT out of the TV before realizing that it actually worked. It was already too late, so [Finn] ordered a 12″ LCD screen to put in its place. He liked the idea of the curved screen the CRT had, though, so he molded a piece of acrylic around the CRT and, after some cutting and grinding, had it fitting in the screen’s space.

[Finn] also liked the idea of the TV still being able to view a television signal, so he bought a TV tuner card. After a couple of mods to it, he could control the card with the TV’s original channel changer. He used an Arduino to read the status of the rotary encoders the original TV used. After some trial and error, [Finn] was able to read the channel positions and the Arduino would send a signal to the channel up and down buttons on the tuner card in order to change the channel.

Next up was audio. [Finn] found a nicer speaker than came with the TV, so he swapped them and added an amplifier. The original volume knob is still used to control the volume. A USB Hub is hidden in the side of the TV at the bottom, to allow controllers to connect and finally, a power supply converts the mains voltage to 12V DC which runs both the Raspberry Pi and the TV Tuner.

[FinnAndersen] has built a great RetroPie cabinet reusing a great looking vintage TV. It’s unfortunate that he removed the CRT before figuring out that he could use it, but the replacement looks pretty darn good! And the added advantage? It’s portable, sort of. At least, without the CRT inside, it’s much lighter than it was. Here‘s another retro console inside an old TV, and this article is about connecting a Raspberry Pi to every display you can get your hands on.

Continue reading “Vintage Portable TV Turned Retro Gaming System”

RetroPie Game Gear

RetroPie Meets Game Gear, Again

If you’re a fan of video game systems of yesteryear then you are probably familiar with RetroPie. For those who aren’t, RetorPie is a collection of software and video game emulators that can run on a Raspberry Pi. The package makes it easy to get your fix of old games without having to own a bunch of consoles or loose your breath blowing on cartridges.

[brooksyx] already had a broken Game Gear, Raspberry Pi and a 4.3 inch LCD screen kicking around so he thought it would be a good idea to put them together into a handheld RetroPie. Clearly, the new screen was not going to fit in the old screen’s place. The Game Gear’s case was cut and the bezel from the new LCD screen was epoxied in place, gaps filled and finally sanded.

RetroPie Game Gear


The screen is not the only modifications done to the case. Down on the bottom right of the case front [brooksyx] added 4 buttons for the N64 C-buttons. Out back the battery compartments and cartridge slot were filled in.

This project isn’t done yet and we are excited to see how it comes out. If you’re digging this RetroPie portable, you may like this Game Gear with an unmodified case or this large-screened Game Boy.

Retro Gaming Console, Now With Internet Radio

RaspPi Retro Gaming Console with Internet Radio

Do you ever miss your gaming system of yesteryear? [yv3] did so he built a retro gaming console. Even though [yv3] likes his old school games, he didn’t want to be stuck listening to old school 8-track tapes while playing those games. The solution for him was to build a retro gaming console with integrated internet radio.

The gaming portion of the build relies on RetroPie. The RetroPie disk image contains all of the software and emulators needed to turn a Raspberry Pi into a dedicated retro gaming system. The RetroPie project supports a lot of gaming systems, [yv3] chose to include Atari, Sega Master System and Genesis, NES, SNES, and Turbografx-16.

Raspberry Pi Internet Radio manages the radio portion of this project and is set up to start playing automatically when the unit is powered on. There are 5 buttons to change the station, volume and settings. The radio stations are managed by a text file residing on the SD card. Audio from the radio can be directed to either the HDMI or the analog out of the RaspPi.

Continue reading “Retro Gaming Console, Now With Internet Radio”

RetroPie Portable Build Uses No Fancy Tools!

retro pie portable

RetroPie Portable builds are great fun, but lots of them make use of expensive tools like 3D printers and laser cutters, which tends to dismay — [Kaushlesh] proves you don’t need any of that!

To build his unit he’s using a Raspberry Pi, a USB controller, a 6 x 4″ project box, a cheap LCD screen, a hot glue gun, and various electrical components — you will still need some soldering skill to complete this project!

By modifying the case he assembled the control boards by taking apart the USB controller. Protoboard made for an easy way to mount his new buttons, with it simply hot glued in place. Quite a bit of soldering later and everything is connected. He notes you’d better make sure everything works as you go otherwise it will be hard to find out what’s wrong when it is assembled!

Future upgrades include a rechargeable li-ion pack and built in speakers (he’s currently using headphones). Take a look after the break!

Continue reading “RetroPie Portable Build Uses No Fancy Tools!”