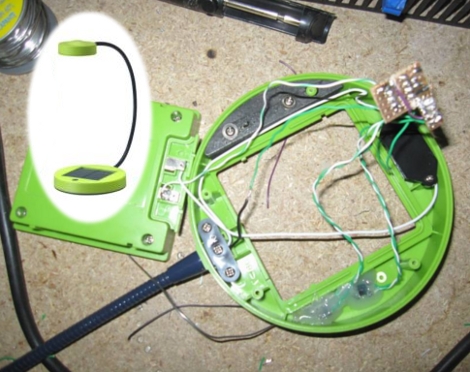
Solar-powered GameBoy Color Never Runs Out Of Juice

solar_gbc

Instructables user [Andrew] was given a free, but damaged GameBoy color by a friend. The friend’s dog had done quite a number on the outside of the handheld, but it was definitely usable.  After replacing some of the outer shell, [Andrew] decided that he would try tweaking the GameBoy to utilize a solar cell in order to keep the batteries topped off.

He bought a solar garden light for $5 and disassembled it, being careful not to damage the heavily-glued solar panel in the process. The GameBoy was pulled apart next, and the solar panel was soldered to the handheld’s battery leads. Once the wires were properly routed through the case, he reassembled the handheld and picked up a pair of rechargeable AA batteries to test things out.

[Andrew] tells us that the solar panel works nicely, and that simply setting it out face-down keeps his batteries charged and ready to go.

Stick around for a quick video demo of his solar-powered GameBoy.

Continue reading “Solar-powered GameBoy Color Never Runs Out Of Juice”

Solar-powered MP3 Playing Speaker

solar_speakers

[Valentin] bought a small battery-powered cube speaker with a built-in amp some time ago, but didn’t have much patience for replacing or recharging the batteries. It sat on the shelf for awhile until he decided to revive an old MP3 player he had sitting around.

He gutted a pair of solar garden lamps, retaining the solar panels, the built-in charging circuits, as well as the included rechargeable batteries. The MP3 player was disassembled, and its components were built into the speaker enclosure. The player’s buttons were relocated to the outer shell of the speaker box with a few pieces of wire, allowing him to easily control his music without having to build in a method for opening the case. Both the speaker and the MP3 player are powered by the batteries salvaged from the solar lamps, which is why he opted to mount both of the solar panels on the the side of the speaker enclosure rather than just one.

We like it even though the speaker looks a bit rough at the moment, especially where the MP3 player’s buttons were transplanted. After a few minutes of touch-up work however, it’ll look great.

If you’re interested in some more solar hacks, check out this solar-powered junkbot, these solar toys for kids, and this solar-powered WiFi repeater we featured in the past.

Tokyo Hackerspace Helping Disaster Victims

We, like the rest of the world, have watched in horror as footage of the recent earthquake-caused disaster has been reported from northern Japan. It’s easy to watch video and see nothing but distruction, however, life goes on and [Akiba] is looking for a way to help the recovery efforts. He mentions that one of the big needs in the disaster area right now is for light, as the power infrastructure has been heavily damaged. The mason jar seen above is a Kimono Lantern that was meant to accent a garden at night. It has a solar cell – one NiMH rechargeable battery – and one bright LED along with a charging circuit. It was designed in the Tokyo Hackerspace and they released the build files in hopes that a large number can be donated to those in need. With a reasonable amount of daylight, the single cell battery can be charged enough to provide 10 hours of light from the little device.

How can our hacks help others? That question has been on our minds for the last few days. Light is a great first step. But we’ve also wondered about information networks to help coordinate rescue and cleanup workers. There are hacks that bring WiFi using wind power or solar power. What other hacks do you think would be useful to aid in the recovery process?

555 Timer-based Charge Controller

555_charging_controller_circuit

Several years ago [Michael Davis] built a charge controller for his wind turbine and published his construction plans online. This build became quite popular, especially among people that live in remote regions. He states that he is flooded with email each day with questions about his charge controller from people trying to troubleshoot its construction or from people who are unable to source the proper parts.

In order to make things easier for people, he decided to revisit his controller design to see what could be improved, and more importantly, what could be removed. The revision was shelved for awhile, but while in the process of working on another project, he realized that most of his original circuit could be easily replaced with a 555 timer. Since the 555 chip is so ubiquitous, he figured it was a fantastic way to simplify his charger, even if he wasn’t using the chip in the manner for which it was originally designed.

He continued revising his charger, sourcing very basic components and simplifying the circuitry enough that even he was able to build it correctly the first time around. Needless to say, this charging circuit will be his entry in the 555 Design Contest.

Be sure to keep reading for a quick video of his charger in action.

Continue reading “555 Timer-based Charge Controller”

Solar-powered Junkbot

solar_powered_junkbot

Instructables user [martzsam] recently built a simple robot using miscellaneous junk he found around his house. The first parts he scrounged up were a pair of 1.5v electric motors and some wire scraps, after which, he went to work on an old garden light. He detailed how to carefully remove the light’s solar panel as well as the charging circuit, which he used to power his robot. The pieces were mounted on some old erector set parts after a bit of rewiring, then the bot was set in motion. [martzsam] also mentions that he tweaked the solar panel’s charging circuit and battery to run the motors at half speed until light is shone on the panel, at which point the robot runs at full speed.

This project would be great to do with kids as it teaches the concepts of re-purposing common household items as well as allows them to use their imagination in designing a fun, yet simple robot. Gather up some old junk and your kids/nieces/nephews and get going!

Continue reading to see a quick video of the robot in action.

Continue reading “Solar-powered Junkbot”

Disco Death Ray

Wielding the power to melt glass or instantly ignite most day to day materials can be intoxicating pretty fun. With a little math, a lot of patience, and 5,800  1cm pieces of mirror, this build requires welding glasses just to look at the 1-2cm focal point. With an idea rumored to date back to Archimedes, this more portable parabolic project is perfect for your home burning needs. Unfortunately, this setup seems to have burnt itself to death at some point, though that makes room for version two, which will reportedly bump the mirror count to 32,000 or so.

There are plenty of other ways to make a death ray out there as well, including using lasers or lenses. Think you have a better tool of destruction? Be sure to tell us about it.

Man Made Rainbow Uses ONLY Sunlight And Rainwater

This rainbow is and is not natural. It’s the product of rainwater and sunlight so in that respect it’s natural. But as you can see, it’s not raining. This is an art installation that uses captured rainwater, stored solar electricity, and irrigation equipment to float a heavy blanket of mist in the air. The prismatic effects of the suspended water particles separate the sunlight into various bands by wavelength and a rainbow springs into existence.

We’ve done this before with a garden hose in the back yard. It might be fun to try to build a version that recycles the water as this does, perhaps using a rain barrel as a reservoir. It would certainly be much easier than pulling off that water-based 3-D display we’ve been meaning to undertake.

[Thanks Xb0xGuru]