Laser Light Show Features Full XY Control Via Homemade Galvanometers

[Rich] over at NothingLabs has put together a really cool laser light show that you really must see in an effort to win a laser cutter from Instructables.

His walkthrough discusses the mechanics of laser light shows – specifically how galvanometers are typically used to precisely aim mirrors in order to draw images and write text. Commercial galvanometers tend to be pretty expensive, so he opted to build his own, using relatively cheap and easy to find parts.

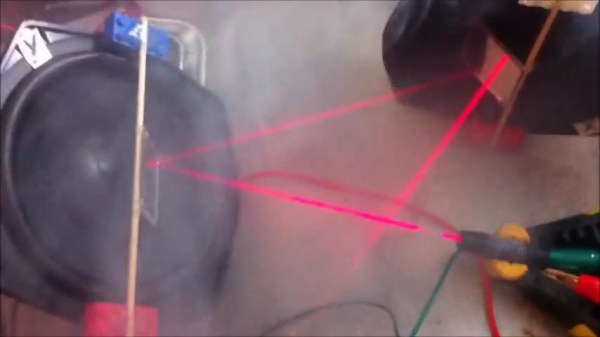
The galvanometers were constructed using a pair of old speaker woofers, a few Lego bricks, and some acrylic mirror squares. The mirrors were mounted on the speakers, which were then wired to an Arduino. He removed the batteries from a cheap red laser pointer and permanently wired it to the Arduino, which it now uses as a pulsed power source. Once he had everything built, he positioned the laser using a fog machine for guidance.

As you can see in the video below, the laser show is quite impressive. His homemade galvos provide a somewhat rough quality to the final projected image, and we like that a lot. It looks almost as if all of the text and images were hand drawn, which is a pretty cool effect.

Just as [Rich] mentions, we hope to see some cool hacks based off his work in the future.

If you are interested in some of our previous laser features, check these out.

Continue reading “Laser Light Show Features Full XY Control Via Homemade Galvanometers”

Ladyada To Be Featured In WIRED Magazine

ladyada_wired_cover

If you haven’t seen the news already, prolific maker [Limor Fried/Ladyada] is set to grace the cover of WIRED magazine in the upcoming April edition.

Not only is it a great day for the hacking/maker community as it puts a bright spotlight on the things we do every day, it’s a big day for female engineers as well. While WIRED has been around for 18 years as of this past January, this is the first time a female engineer has been featured on the cover. [Phillip Torrone] put it pretty well when he said, “She’s one of the most talented people in the world, she works harder than anyone else I know, she puts more value in the world than she takes.” – We couldn’t agree more, nor can we think of a better spokesperson to represent the community and inspire budding hackers around the world.

We would like to congratulate [Limor] on her accomplishment, and we encourage everyone to pick up a copy (or at least leaf through it at the bookstore) when it comes out.

If you’re still unconvinced as to how awesome she is, take a gander at some of her work we have featured in the past:

Kinect Open Source driver bounty

Non-lethal weaponry

The Wave Bubble

Minty Boost

RoboTouch Adds Physical Game Controls To The IPad

robotouch

[ProtoDojo] wanted to play a racing game on his iPad, but he was not a big fan of using the touch interface for this particular title. Instead, he put together a pretty neat little hack that allows him to play games on his iPad using an old NES controller.

He built a set of custom conductive arms which he mounted on three micro servos. The servos were attached to the iPad screen using small suction cups in the locations where it expects to receive button presses. They are also wired to an Arduino that interprets button presses from the attached NES controller. When the Arduino senses that the D-pad or buttons have been pressed, it triggers the servos, which in turn press the virtual buttons on the screen.

In the video below, you can see that after adjusting the servo positions, the setup seems to work pretty well. You might expect to see some sort of lag with a setup like this, but we didn’t notice any. The [ProtoDojo] web site is currently down due to heavy traffic, but you should be able to find some more build details there, once it becomes functional again.

Continue reading “RoboTouch Adds Physical Game Controls To The IPad”

Adding Digital Storage To An Analog Scope

This is a hack in the finest sense of the term. It not only allows you to capture data from an analog oscilloscope for later analysis, but provides you with a great tool if you’re posting on the Internet about your projects. [J8g8j] used an empty cashew container to add a camera mount to the front of his scope. This is possible because the bezel around the display has a groove in it. A bit of careful measuring helped him make an opening that was just right.

You can see that the red cap for the jar holds the camera and gave him a bit of trouble in the original prototype. This version has a tray where camera sits, which replaces the Velcro with didn’t hold the camera level the first time around. He’s also painted the inside of the clear plastic to reduce glare on the oscilloscope readout. Black and white images seem to come out the clearest, but it can be difficult to make out the grid lines. The addition of LEDs to help them stand out is one of the improvements we might see in the future.

Beginner Project: Super Cheap Magnetic Mixer

[wesdoestuff]’s mother needed a clean way to mix together fragrance oils. Being the stand up kinda guy he is, [Wes] threw together a few spare parts to make this Magnetic Stir Plate.

The whole setup is amazingly simple. Pry the fins off of an old computer fan, glue a couple magnets to the fan’s hub. Drill a hole for a DC connector, find some sort of cover and.. Bob’s your uncle! [Wes] advises that you test the spacing of the magnets on the hub before gluing them permanently, as they can be a bit tricky to align.

The stir bar for non food items is  a magnet bar from one of those crazy magnet and ball bearing toys, it is basically just a solid magnet covered in plastic.  Food safe bars can be acquired, though they are not as cheap.  With all that room under the hood we would love to see him throw in some kind of a PWM speed control but that could be a bit complicated. Most of us could throw this together from spare parts.  Video after the jump!

Continue reading “Beginner Project: Super Cheap Magnetic Mixer”

Giving “sight” To The Visually Impaired With Kinect

NAVI

We have seen Kinect used in a variety of clever ways over the last few months, but some students at the [University of Konstanz] have taken Kinect hacking to a whole new level of usefulness. Rather than use it to control lightning or to kick around some boxes using Garry’s Mod, they are using it to develop Navigational Aids for the Visually Impaired, or NAVI for short.

A helmet-mounted Kinect sensor is placed on the subject’s head and connected to a laptop, which is stored in the user’s backpack. The Kinect is interfaced using custom software that utilizes depth information to generate a virtual map of the environment. The computer sends information to an Arduino board, which then relays those signals to one of three waist-belt mounted LilyPad Arduinos. The LilyPads control three motors, which vibrate in order to alert the user to obstacles. The group even added voice notifications via specialized markers, allowing them to prompt the user to the presence of doors and other specific items of note.

It really is a great use of the Kinect sensor, we can’t wait to see more projects like this in the future.

Stick around to see a quick video of NAVI in use.

[via Kinect-Hacks – thanks, Jared]

Continue reading “Giving “sight” To The Visually Impaired With Kinect”

Cellphone Charger Has A USB Port Forced Upon It

We still can’t figure out why a standard charging scheme hasn’t been developed for handheld devices (other than greed). Certainly we understand that many devices have different electrical needs as far as voltage and current are concerned, but we still long for the ability to use one charger for many different doodads. [Rupin] is trying to narrow down the number of dedicated chargers he uses by adding a USB charging port to his Nokia cellphone charger. Since the USB standard calls for regulated 5V a hack like this can often be done just by patching into the power output coming off of the voltage regulator in the plug housing of the device. [Rupin’s] charger had 5V printed on the case, but when he probed the output he found well over 8 volts. He added a 7805 linear regulator to get the stable output he needed, then cut a hole in the case to house the connector.

Since [Rupin] wants to use this as an iPod charger he couldn’t just let the two data lines float. Apple uses a specific charger verification scheme which requires some voltage dividers to get the device to start charging.