A Toothbrush Hacked, In Three Parts

It’s official, we’re living in the future. Certainly that’s the only explanation for how [wrongbaud] was able to write a three-part series of posts on hacking a cheap electric toothbrush off of AliExpress.

As you might have guessed, this isn’t exactly a hack out of necessity. With a flair for explaining hardware hacking, [wrongbaud] has put this together as a practical “brush-up” (get it?) on the tools and concepts involved in reverse engineering. In this case, the Raspberry Pi is used as a sort of hardware hacking multi-tool, which should make it relatively easy to follow along.

Modified image data on the SPI flash chip.

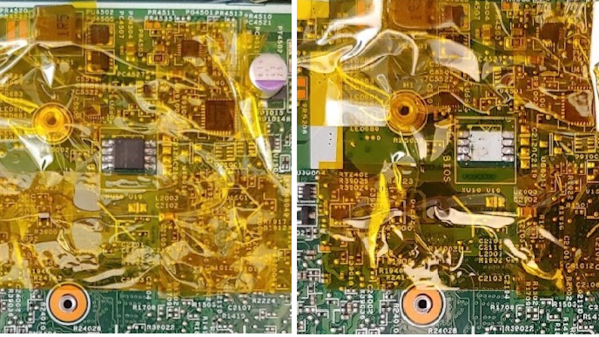
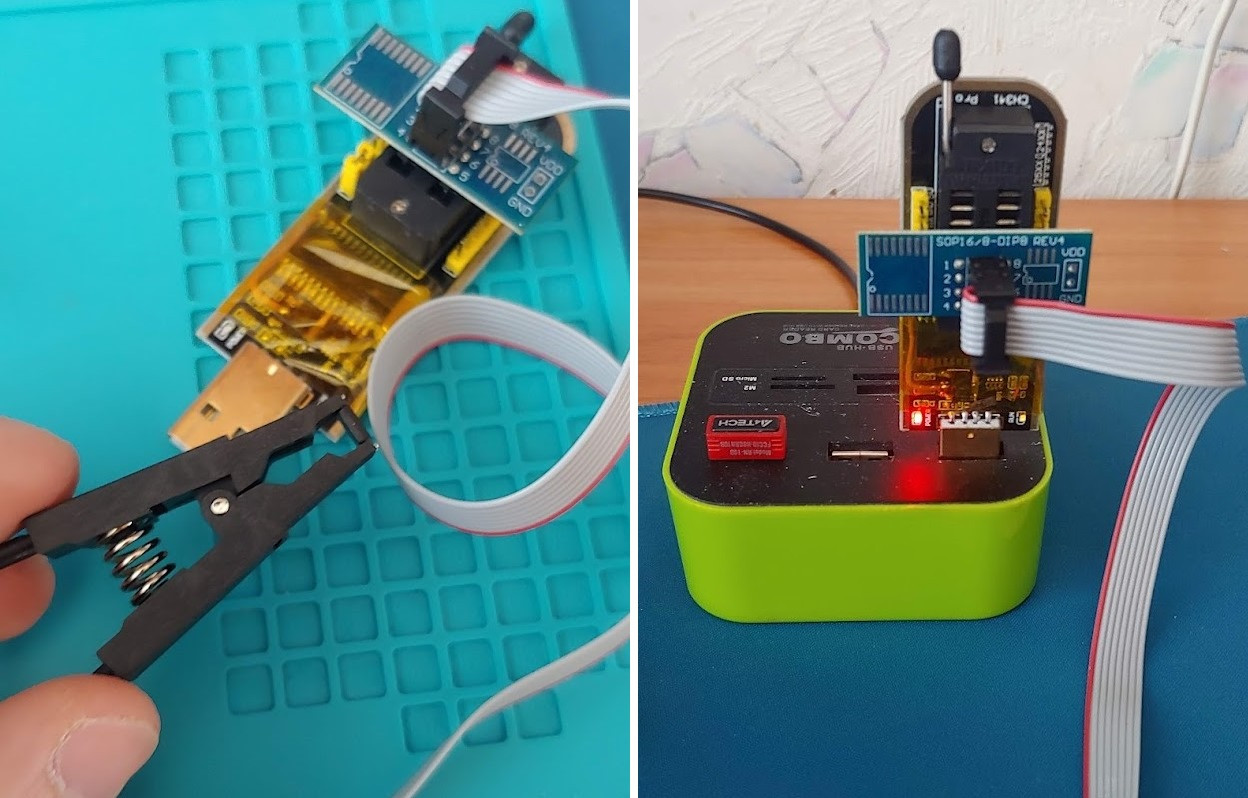
The first post in the series goes over getting the Pi up and running, which includes setting up OpenOCD. From there, [wrongbaud] actually cracks the toothbrush open and starts identifying interesting components, which pretty quickly leads to the discovery of a debug serial port. The next step is harassing the SPI flash chip on the board to extract its contents. As the toothbrush has a high-res color display (of course it does), it turns out this chip holds the images which indicate the various modes of operation. He’s eventually able to determine how the images are stored, inject new graphics data, and write it back to the chip.

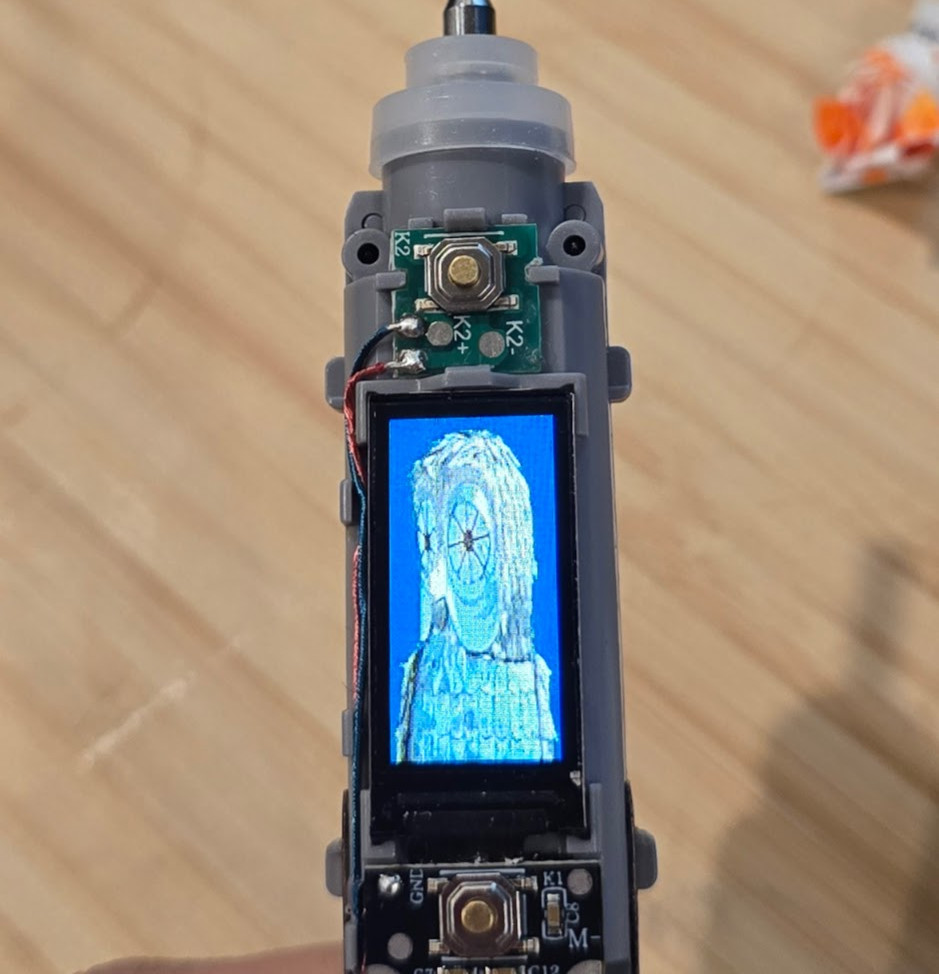
Being able to display the Wrencher logo on our toothbrush would already be a win in our book, but [wrongbaud] isn’t done yet. For the last series in the post, he shows how to extract the actual firmware from the microcontroller using OpenOCD. This includes how to analyze the image, modify it, and eventually flash the new version back to the hardware — using that debug port discovered earlier to confirm the patched code is running as expected.

If you like his work with a toothbrush, you’ll love seeing what [wrongbaud] can do with an SSD or even an Xbox controller.

Some SPI Flash Chip Nuances Worth Learning

Some hackers have the skills to help us find noteworthy lessons in even the most basic of repairs. For instance, is your computer failing to boot? Guess what, it could just be a flash chip that’s to blame — and, there’s more you should know about such a failure mode. [Manawyrm] and [tSYS] over at the Kittenlabs blog show us a server motherboard fix involving a SPI flash chip replacement, and tell us every single detail we should know if we ever encounter such a case.

They got some Gigabyte MJ11-EC1 boards for cheap, and indeed, one of the BIOS chips simply failed — they show you how to figure that one out. Lesson one: after flashing a SPI chip, remember to read back the image and compare it to the one you just flashed into it! Now, you might be tempted to take any flash chip as a replacement, after all, many are command-compatible. Indeed, the duo crew harvested a SPI chip from an ESP32 board, the size matched, and surely, that’d suffice.

That’s another factor you should watch out for. Lesson two is to compare the SPI flash commands being used on the two chips you’re working with. In this case, the motherboard would read the BIOS alright and boot just fine, but wasn’t able to save the BIOS settings. Nothing you couldn’t fix by buying the exact chip needed and waiting for it to arrive, of course! SPI flash command sets are fun and worth learning about — after all, they could be the key to hacking your “smart” kettle. Need a 1.8 V level shifter while flashing? Remember, some resistors and a NPN transistor is more than enough.

Two pictures of the mobo side by side, both with kapton tape covering everything other than the flash chip. On the left, the flash chip is populated, whereas on the right it's not

Enabling Intel AMT For BIOS-over-WiFi

Intel ME, AMT, SMT, V-Pro… All of these acronyms are kind of intimidating, all we know about them is that they are tied to remote control technologies rooted deep in Intel CPUs, way deeper than even operating systems go. Sometimes though, you want remote control for your own purposes, and that’s what [ABy] achieved. He’s got a HP ProDesk 600 G3 Mini, decided to put it into a hard to reach spot in his flat, somewhere you couldn’t easily fetch a monitor and a keyboard for any debugging needs. So, he started looking into some sort of remote access option in case he’d need to access the BIOS remotely, and went as far as it took to make it work. (Google Translate)

The features he needed are covered by Intel AMT — specifically, BIOS access over a WiFi connection. However, his mini PC only had SMT enabled from the factory, the cut-down version of AMT without features like wireless support. He figured out that BIOS dumping was the way, promptly did just that, found a suitable set of tools for his ME region version, and enabled AMT using Intel’s FIT (Flash Image Tool) software.

Now, dumping the image could be done from a running system fully through software, but apparently, flashing back requires an external programmer. He went with the classic CH341, did the 3.3 V voltmod that’s required to make it safe for flash chip use, and proceeded to spend a good amount of time making it work. Something about the process was screwy, likely the proprietary CH341 software. Comments under the article highlight that you should use flashrom for these tasks, and indeed, you should.

This article goes into a ton of detail when it comes to working with Intel BIOS images — whichever kind of setting you want to change, be it AMT support or some entirely different but just as tasty setting, you will be well served by this write-up. Comments do point out that you might want to upgrade the Intel ME version while at it, and for what it’s worth, you can look into disabling it too; we’ve shown you a multitude of reasons why you should, and a good few ways you could.