Hackaday Prize Entry: Piezo Gait Analysis

Go into a fancy drug store, and you might just find one of the most amazing sales demonstrations you’ll ever see. Step right up, take your shoes off, and place your feet onto the magical Dr. Scholl’s machine, and you’ll get a customized readout of how your feet touch the ground. As an added bonus, you’ll also get a recommendation for a shoe insert that will make your feet feel better and your shoes fit better.

There is, of course, one problem with this setup. You don’t stand on a footprint measuring device all day. A better solution to the problem of measuring how your feet hit the ground is doing it while you walk. That’s where [chiprobot]’s Alli-Gait-Or Analysis comes in. It’s that Dr. Scholl’s machine tucked into the sole of a shoe. It can be worn while you walk, and it can tell you exactly how your feet work.

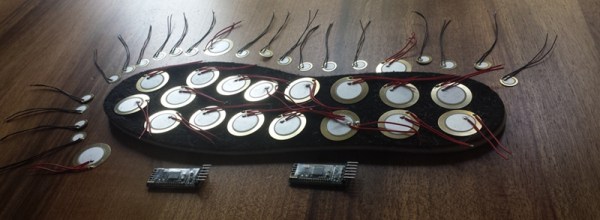
[chiprobot]’s robotic shoes consist of a 3D printed insert that holds eighteen piezo transducers per shoe. These are connected to ADCs, which feed into a microcontroller which sends the data out to a computer. That’s simple enough, but making sense of the data is the real problem.

To turn this data into something that could be used for selecting orthotics or simply finding a better shoe, [chiprobot] is plugging this data into Blender and creating some very cool visualizations. It’s good enough to get some serious data off a shoe, and since this Alli-Gait-Or is wearable, the data is much more valid than a machine sitting in a drug store.

Hackaday Prize Entry: A Simple Spectrophotometer

Building on the work of other Citizen Science efforts, [doctek]’s entry for the Hackaday Prize promises to detect pollution, identify chemicals, and perform other analyses with a simple handheld device. It’s a spectrophotometer, and [doctek] is putting some real engineering into this build.

A spectrophotometer is one of the simplest devices able to perform spectroscopy, requiring only a light source, a photoresistor, and some means of producing monochromatic light. By putting a sample in front of the photoresistor, the absorption spectrum of the sample can be measured. With this data, it’s a simple matter to identify the sample.

A light and a photoresistor are simple enough, but as with every precision measurement device, the devil is in the details. [doctec] is using new, low-noise, low-offset opamps, and precision references to get his data. Some of the parts in the schematic were actually designed in this century – a far cry from the ‘plug the photoresistor into the analog input’ projects we see so often.

[doctec] is using a Teensy 3.0 to drive the electronics and collect the data, and he already has the mechanics of this build pretty much figured out. It’s a great project that shows off some engineering skill, making it a great entry for The Hackaday Prize.

Hackaday Prize Entry: An Internet Of Things Microscope

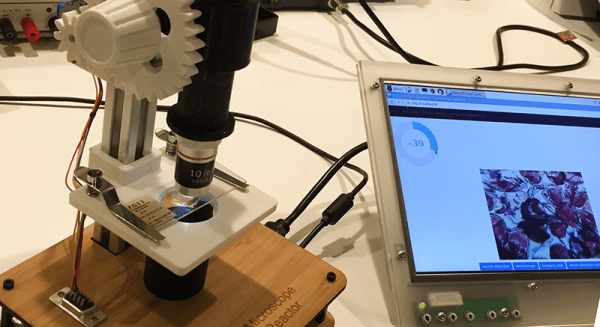
For their entry into the Citizen Scientist portion of the Hackaday Prize, the folks at Arch Reactor, the St. Louis hackerspace, are building a microscope. Not just any microscope – this one is low-cost, digital, and has a surprisingly high magnification and pretty good optics. It’s the Internet of Things Microscope, and like all good apparatus for Citizen Scientist, it’s a remarkable tool for classrooms and developing countries.

When you think of ‘classroom microscope’, you’re probably thinking about a pile of old optics sitting in the back of a storage closet. These microscopes are purely optical, without the ability to take digital pictures. The glass is good, but you’re not going to get a scanning stage when you’re dealing with 30-year-old gear made for a classroom full of sticky-handed eighth graders.

The Internet of Things Microscope includes a scanning stage that moves across the specimen on the X and Y axes, stitching digital images together to create a very large image. That’s a killer feature for a cheap digital microscope, and the folks at Arch Reactor are doing this with a few cheap stepper motors and stepper motor drivers.

The rest of the electronics are built around a Raspberry Pi, Raspberry Pi camera (which recently got a nice resolution upgrade), and a some microscope eyepieces and objectives. Everything else is 3D printed, making this a very cheap and very accessible microscope that has some killer features.

Hackaday Prize Entry: The Cheapest Logic Analyzer

There are piles of old 128MB and 256MB sticks of RAM sitting around in supply closets and in parts bins. For his Hackaday Prize project, [esot.eric] is turning these obsolete sticks of RAM into something useful – a big, fast logic analyzer. It’s cheap, and simple enough that it can be built on a breadboard.

If using old SDRAM in strange configurations seems familiar, you’re correct. This project is based on [esot.eric]’s earlier AVR logic analyzer project that used a slow AVR to measure 32 channels of logic at 30 megasamples per second. The only way this build was possible was by hacking an old stick of RAM to ‘free run’, automatically logging data to the RAM and reading it out with an AVR later.

This project expands on the earlier projects by using bigger sticks of RAM faster, with the ultimate goal being a 32-bit, 133MS/s logic analyzer that is more of a peripheral than a single, monolithic project. With a Raspberry Pi Zero, a stick of RAM, and a few miscellaneous logic chips, this project can become anything from a logic analyzer to a data logger to an oscilloscope. It’s weird, yes, but the parts to make this very handy tool can be found in any hackerspace or workshop, making it a great trick for the enterprising hardware hacker.

Hackaday Prize Entry: What The Flux

Electromagnetism is the most difficult thing teach. Why is electromagnetism hard to teach? Well, when you’re asking a ‘why’ question (obligatory Richard Feynman video)

[Adam Smallcomb] might not be able to explain electromagnetism with perfect clarity, but he does have an idea to give students a hands-on feel for electrons and magnets. He’s building an Electromagnetic Teaching Aid that turns 30 gauge wire, springs, Lego, and bits of metal into a toolset for understanding magnets, solenoids, current, and magnetic fields.

The devices explained via [Adam]’s toolkit include a DC motor, stepper motor, speaker, solenoid, relay, transformer, microphone, and generator. That’s not to say [Adam] is building all these devices – a DC motor is just a generator in reverse, a relay is a solenoid with more electrical connections, and everything in this toolkit is basically just wire and magnets.

So far, [Adam] has a bunch of interesting applications for magnets, wire, and Lego including a DIY stepper motor and a nifty little tool that measures magnetic flux with a Hall effect sensor. Will it teach schoolkids electromagnetism? Very few things could, but at least this little toolkit will allow students to intuit electromagnetism a little better.

Hackaday Prize: 20 Projects That Make Us All Citizen Scientists

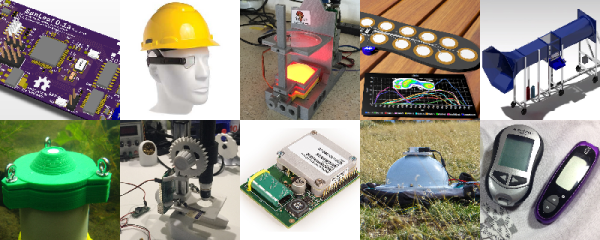
We live in a time of unparalleled access to technology and this has the power to make life better for everyone. Today we are excited to announce twenty spectacular builds that use access to technology to move scientific exploration within the reach of all. These are the winners of the Citizen Scientist challenge of the 2016 Hackaday Prize. Themes tackled in this round include blood glucose monitoring, insole sensing for analyzing your footfalls, lab equipment like automated microscopy, sensors to measure the world around us, and more.

The winners for the Citizen Scientist portion of the Hackaday Prize are, in no particular order:


The Hackaday Prize is the greatest hardware competition on earth. We want to see the next great Open Hardware project benefit everyone. We’re working toward that by recognizing people who build, make, and design the coolest and most useful devices around.

These twenty projects just won $1000 and will now move on to the final phase of The Hackaday Prize, to be judged by our fourteen celebrity judges. Awesome! Now get to work: there’s a lot the hackers behind these projects need to do before the final judging in October where they’ll compete for the grand prize of $150,000 and four other top prizes.

AutomationIf your project didn’t make the cut, there’s still an opportunity for you to build the next great piece of hardware for The Hackaday Prize. The Automation Challenge is currently under way. It encourages everyone to build devices that make your life easier.

Automate your life; build a device that makes your breakfast, a robot to mow your lawn, or software that does your taxes. Build a device that automatically tracks laundry detergent, automates washing the dishes, or a robot that obeys every command.

Like the Design Your Concept, Anything Goes, and Citizen Science rounds of The Hackaday Prize, the top twenty projects will each win $1000, and move on to the Hackaday Prize finals for a chance to win $150,000 and a residency at the Supplyframe DesignLab in Pasadena.

If you don’t have a project up on Hackaday.io, you can start one right now and submit it to The Hackaday Prize. If you’re already working on the next great piece of hardware design, add it to the Automation challenge using the dropdown menu on the sidebar of your project page.

Hackaday Prize Entry: A Better Way Of Cheating

Believe it or not, some video games are still developed for the PC. With video games come cheat codes, and when they’re on the PC, that means using a keyboard. You can easily program any microcontroller to send a string of characters over a USB port with the touch of a button. Believe it or not, a lot of people haven’t put these two facts together. [danjovic] has, leading him to build a simple and cheap USB keystroke generator for quickly typing in cheat codes.

[danjovic] is basing his build around a Digispark, a cheap, USB-enabled ATtiny85 dev board. This, of course, means there’s not a lot of pins to play with – there are only four I/O pins, and one of them is connected to ground by a LED. That leaves only three I/O pins, but [danjovic] managed to put seven different cheats in his project using diodes and something that is almost charlieplexing.

If you’re wondering, this is a very inexpensive project. [danjovic] is using a Chinese digispark clone, a handful of 1N4148 diodes, and a few tact switches. Anyone with a well-stocked part drawer or a tenner on eBay could build this. If you want the proof of work for this project, you can check out the demo video below.

Continue reading “Hackaday Prize Entry: A Better Way Of Cheating”