Scope GUI Made Easier

Last time, I assembled a Python object representing a Rigol oscilloscope. Manipulating the object communicates with the scope over the network. But my original goal was to build a little GUI window to sit next to the scope’s web interface. Had I stuck with C++ or even C, I would probably have just defaulted to Qt or maybe FLTK. I’ve used WxWidgets, too, and other than how many “extra” things you want, these are all easy enough to use. However, I had written the code in Python, so I had to make a choice.

Granted, many of these toolkits have Python bindings — PyQt, PySide, and wxPython come to mind. However, the defacto GUI framework for Python is Tkinter, a wrapper around Tk that is relatively simple to use. So, I elected to go with that. I did consider PySimpleGUI, which is, as the name implies, simple. It is attractive because it wraps tkinter, Qt, WxPython, or Remi (another toolkit), so you don’t have to pick one immediately. However, I decided to stay conservative and stuck with Tkinter. PySimpleGUI does have a very sophisticated GUI designer, though.

About Tkinter

The Tkinter toolkit lets you create widgets (like buttons, for example) and give them a parent, such as a window or a frame. There is a top-level window that you’ll probably start with. Once you create a widget, you make it appear in the parent widget using one of three layout methods:

  1. Absolute or relative coordinates in the container
  2. “Pack” to the top, bottom, left, or right of the container
  3. Row and column coordinates, treating the container like a grid

The main window is available from the Tk() method:

import tkinter as tk
root=tk.Tk()
root.title('Example Program')
button=tk.Button(root, text="Goodbye!", command=root.destroy)
button.pack(side='left')
root.mainloop()

That’s about the simplest example. Make a button and close the program when you push it. The mainloop call handles the event loop common in GUI programs.

Continue reading “Scope GUI Made Easier”

Australian Raspberry Pi Tutorials

There’s a new and very detailed video tutorial about the Raspberry Pi available from the Australian firm Core Electronics.  There are 30 videos and 5 chapters in total. A few of the introduction videos are short, but the detail videos range from 3 to 16 minutes.

The instructor [Michael] starts out at the very beginning — loading NOOBS on the Pi — and then moves on to Python, shell scripting, and building GUI applications with TkInter. It also covers using Particle Pi for IoT applications that integrate with IFTTT.

We do realize that most people reading Hackaday have probably used a Raspberry Pi at least once or twice. However, we also know that we all get asked to recommend material for beginners, or — in some cases — we are using material to teach classes in schools or hackerspaces.

Continue reading “Australian Raspberry Pi Tutorials”

Picture Frame That Scrapes Train Times From The Web

rpi-train-times-fixture

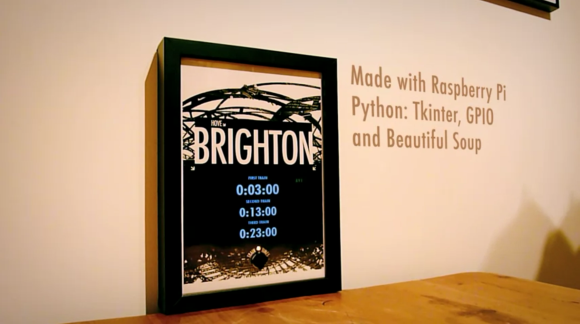
Whenever [Gareth James] needs to catch a train he has only to push a button on this frame and the next three departure times will be displayed. As you can see from the post-processing in the photo, this is accomplished by a Raspberry Pi board using a few familiar tools.

Let’s take a look at the hardware first. He acquired a 7″ LCD display which he removed from its plastic case. The bare screen will easily fit inside of the rather deep wood frame and its composite video input makes it quite simple to interface with the RPi board. There was a little work to be done for power. The LCD needs 12V so he’s using a 12V wall wart to feed the frame, and including a USB car charger to power the RPi. The last thing he added is a button connected to the GPIO header to tell the system to fetch a new set of times.

A Python script monitors the button and uses Beautiful Soup to scrape the train info off of a website. To get the look he wanted [Gareth] wrote a GUI using tkinter. Don’t miss the demo after the jump.

If you need a bit of a primer on scraping web data take a look at this guide.

Continue reading “Picture Frame That Scrapes Train Times From The Web”

PyMCU Test Project Looks Like A Minecraft Mob

pymcu-controlled-blockhead

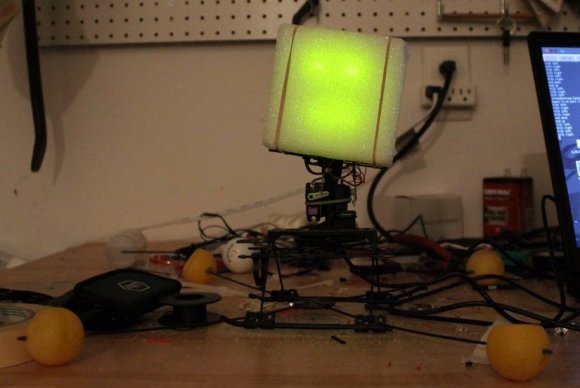
Hackaday’s own [Jeremy Cook] has been testing out the pyMCU board and managed to put together an animated block head that looks like it could be a foe in Minecraft. That’s thanks mostly to the block of foam he’s using as a diffuser. The face of the project is a set of LEDs. These, along with the servo motors that move the neck are controlled using Python code which you can glance at after the break (there’s a video demo there too).

We first saw pyMCU early in the year. The PIC 16F1939 offers plenty of IO and acts as a USB connected bridge between your hardware and your Python scripts. Speaking of hardware, the test platform used to be an RC helicopter. [Jeremy] scrapped most of it, but kept the servo motors responsible for the pitch of the rotors. The board makes these connections easy, and the concept makes controlling them even easier. In fact, there’s only about 17 lines of code for the functions that control the servos. The rest is a simple UI built with Tkinter.

Continue reading “PyMCU Test Project Looks Like A Minecraft Mob”