Scope GUI Made Easier

Last time, I assembled a Python object representing a Rigol oscilloscope. Manipulating the object communicates with the scope over the network. But my original goal was to build a little GUI window to sit next to the scope’s web interface. Had I stuck with C++ or even C, I would probably have just defaulted to Qt or maybe FLTK. I’ve used WxWidgets, too, and other than how many “extra” things you want, these are all easy enough to use. However, I had written the code in Python, so I had to make a choice.

Granted, many of these toolkits have Python bindings — PyQt, PySide, and wxPython come to mind. However, the defacto GUI framework for Python is Tkinter, a wrapper around Tk that is relatively simple to use. So, I elected to go with that. I did consider PySimpleGUI, which is, as the name implies, simple. It is attractive because it wraps tkinter, Qt, WxPython, or Remi (another toolkit), so you don’t have to pick one immediately. However, I decided to stay conservative and stuck with Tkinter. PySimpleGUI does have a very sophisticated GUI designer, though.

About Tkinter

The Tkinter toolkit lets you create widgets (like buttons, for example) and give them a parent, such as a window or a frame. There is a top-level window that you’ll probably start with. Once you create a widget, you make it appear in the parent widget using one of three layout methods:

  1. Absolute or relative coordinates in the container
  2. “Pack” to the top, bottom, left, or right of the container
  3. Row and column coordinates, treating the container like a grid

The main window is available from the Tk() method:

import tkinter as tk
root=tk.Tk()
root.title('Example Program')
button=tk.Button(root, text="Goodbye!", command=root.destroy)
button.pack(side='left')
root.mainloop()

That’s about the simplest example. Make a button and close the program when you push it. The mainloop call handles the event loop common in GUI programs.

Continue reading “Scope GUI Made Easier”

How To Talk To Your Scope

It used to be only high-end test equipment that had some sort of remote control port. These days, though, they are quite common. Historically, test gear used IEEE-488 (also known as GPIB or, from the originator, HPIB). But today, your device will likely talk over a USB port, a serial port, or a LAN connection. You’d think that every instrument had unique quirks, and controlling it would be nothing like controlling another piece of gear, especially one from another company. That would be half right. Each vendor and even model indeed has its unique command language. There has been a significant effort to standardize some aspects of test instrument control, and you can quickly write code to control things on any platform using many different programming languages. In a few posts, I will show you just how easy it can be.

The key is to use VISA. This protocol is defined by the IVI Foundation that lets you talk to instruments regardless of how they communicate. You do have to build an address that tells the VISA library how to find your device. For example: “TCPIP::192.168.1.92::INSTR.” But once you have that, it is easy to talk to any instrument anywhere.

I say that thinking it is a problem is half right because talking to the box is one task of the two you need to complete. The other is what to say to the box and what it will say back to you. There are a few standards in this area, but this is where you get into problems. Continue reading “How To Talk To Your Scope”

Controlling Your Instruments From A Computer: Doing Something Useful

Do you know how to harvest data from your bench tools, like plotting bandwidth from your oscilloscope with a computer? It’s actually pretty easy. Many bench tools make this easy using a standard protocol with USB to make the connection.

In the previous installment of this article we talked about the National Instruments VISA (Virtual Instrument Software Archetecture) standard for communicating with your instruments from a computer, and introduced its Python wrapper with a simple demonstration using a Raspberry Pi. We’ll now build on that modest start by describing a more useful application for a Raspberry Pi and a digital oscilloscope; we’ll plot the bandwidth of an RF filter. We’ll assume that you’ve read the previous installment and have both Python and the required libraries on your machine. In our case the computer is a Raspberry Pi and the instrument is a Rigol DS1054z, but similar techniques could be employed with other computers and instruments.

Continue reading “Controlling Your Instruments From A Computer: Doing Something Useful”

How To Control Your Instruments From A Computer: It’s Easier Than You Think

There was a time when instruments sporting a GPIB connector (General Purpose Interface Bus) for computer control on their back panels were expensive and exotic devices, unlikely to be found on the bench of a hardware hacker. Your employer or university would have had them, but you’d have been more likely to own an all-analogue bench that would have been familiar to your parents’ generation.

A GPIB/IEEE488 plug. Alkamid [CC BY-SA 3.], via Wikimedia Commons
A GPIB/IEEE488 plug. Alkamid [CC BY-SA 3.], via Wikimedia Commons.
The affordable instruments in front of you today may not have a physical GPIB port, but the chances are they will have a USB port or even Ethernet over which you can exert the same control. The manufacturer will provide some software to allow you to use it, but if it doesn’t cost anything you’ll be lucky if it is either any good, or available for a platform other than Microsoft Windows.

So there you are, with an instrument that speaks a fully documented protocol through a physical interface you have plenty of spare sockets for, but if you’re a Linux user and especially if you don’t have an x86 processor, you’re a bit out of luck on the software front. Surely there must be a way to make your computer talk to it!

Let’s give it a try — I’ll be using a Linux machine and a popular brand of oscilloscope but the technique is widely applicable.

Continue reading “How To Control Your Instruments From A Computer: It’s Easier Than You Think”

Defeating Chip And PIN With Bits Of Wire

One of many ways that Americans are ridiculed by the rest of the world is that they don’t have chip and PIN on their credit cards yet; US credit card companies have been slow to bring this technology to millions of POS terminals across the country. Making the transition isn’t easy because until the transition is complete, the machines have to accept both magnetic stripes and chip and PIN.

This device can disable chip and PIN, wirelessly, by forcing the downgrade to magstripe. [Samy Kamkar] created the MagSpoof to explore the binary patterns on the magnetic stripe of his AmEx card, and in the process also created a device that works with drivers licenses, hotel room keys, and parking meters.

magspoof
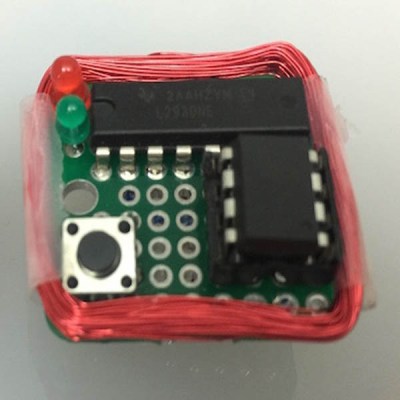
The electronics for the MagSpoof are incredibly simple. Of course a small microcontroller is necessary for this build, and for the MagSpoof, [Samy] used the ATtiny85 for the ‘larger’ version (still less than an inch square). A smaller, credit card-sized version used an ATtiny10. The rest of the schematic is just an H-bridge and a coil of magnet wire – easy enough for anyone with a soldering iron to put together on some perfboard.
By pulsing the H-bridge and energizing the coil of wire, the MagSpoof emulates the swipe of a credit card – it’s all just magnetic fields reversing direction in a very particular pattern. Since the magnetic pattern on any credit card can be easily read, and [Samy] demonstrates that this is possible with some rust and the naked eye anyway, it’s a simple matter to clone a card by building some electronics.

[Samy] didn’t stop there, though. By turning off the bits that state that the card has a chip onboard, his device can bypass the chip and PIN protection. If you’re very careful with a magnetized needle, you could disable the chip and PIN protection on any credit card. [Samy]’s device doesn’t need that degree of dexterity – he can just flip a bit in the firmware for the MagSpoof. It’s all brilliant work, and although the code for the chip and PIN defeat isn’t included in the repo, the documents that show how that can be done exist.

[Samy]’s implementation is very neat, but it stands on the shoulders of giants. In particular, we’ve covered similar devices before (here and here, for instance) and everything that you’ll need for this hack except for the chip-and-PIN-downgrade attack are covered in [Count Zero]’s classic 1992 “A Day in the Life of a Flux Reversal“.

Thanks [toru] for sending this one in. [Samy]’s video is available below.

Continue reading “Defeating Chip And PIN With Bits Of Wire”