The Ghost Detector 9000 Is A Fun Spirit-Chasing Game

Halloween may have come and gone for another year, but we’re still finding neat spooky projects lurking out on the Interwebs. Case in point, the Ghost Detector 9000 from [Jules].

Effectively, what you’re looking at here is a fun interactive ghost-detecting game. It consists of a Raspberry Pi Zero hooked up with an IMU sensor that can detect the rig’s movement and orientation. As the user moves the Ghost Detector 9000 around, it outputs lights and sound when it’s aimed at a so-called “ghost-signal”. The user then pulls the trigger to “capture” the ghost. The whole rig is built inside a flashlight which presented a useful form factor for modification.

For those eager to dive into the nitty-gritty, [Jules] has shared the project files on GitHub. There’s some nifty stuff going on, like Rust code that interfaces with I2C devices hooked up to the Pi, and a sensor-fusion algorithm to make the most out of the data from the 9-axis IMU.

It’s a fun build that probably taught [Jules] a great deal along the way, even if it’s a game at heart. If you prefer to shoot zombies instead of capture ghosts, we’ve seen a build that lets you go hunting with a laser crossbow, too.

Continue reading “The Ghost Detector 9000 Is A Fun Spirit-Chasing Game”

A brown, wooden picture frame with a white matte holds a slightly pixelated photo of gaming miniatures. It is sitting on a wooden table.

A Colorful Take On The E-Ink Photo Frame

Everyone loves sharing photos, and with most pictures being taken on smartphones now, digital frames are more convenient than finding a photo printer. [Wolfgang Ziegler] used an e-ink screen to create a colorful digital picture frame.

Starting with a seven color e-ink HAT he’d forgotten he had, a spare Pi Zero, and analog photo frame, he pieced the parts together into a pretty slick, sunlight readable photo frame. [Ziegler] details how he set up the frame to display new images using the Pimoroni inky library. He set a fifteen minute refresh interval since the color e-ink display takes 30 seconds to refresh to keep it from looking weird too often.

With the holidays coming up, this might make a perfect gift for family that wants to see the latest from your travels without blasting it to the whole internet. We’ve covered a few different options from a lightweight ESP8266 build, to this one that can rotate, and even issues with some of the commercial options.

Building An Animated Turn Signal For The Mazda MX-5

Turn signals in most of the world are mandated to be a flashing orange light, distinct from other bulbs on a vehicle. However, there has been a trend in the modern era to go for fancier animated turn signals using great numbers of LEDs. [ssh16] decided to whip up a set of their own to suit their late-model Mazda MX-5.

Fully lit, the replacement is brighter than the original bulb by some margin.

While many builds go down the route of using addressable LEDs, [ssh16] instead went for garden variety OSRAM yellow LEDs in a 3×12 array, driven via a shift register. A small PIC microcontroller is then used to command the shift register to light the rows of LEDs in turn, generating the sequential lighting effect that sweeps from one side to the other. The LEDs are are installed on a 4″ board designed to install in place of the Mazda’s standard indicator bulb, with the animation spreading from the centerline of the vehicle out towards the direction of the turn.

It’s a fun build that modernizes the rear turn signals of the Mazda. We’ve seen some other neat turn signal builds before, too; it almost seems to be a trend amongst Mazda enthusiasts. Meanwhile, if you’ve built your own automotive lighting mods, don’t hesitate to send them in to the tipsline.

Simple CMOS Circuit Allows Power And Data Over Twisted-Pair Wiring

If you need to send data from sensors, there are plenty of options, including a bewildering selection of wireless methods. Trouble is, most of those protocols require a substantial stack of technology to make them work, and things aren’t much easier with wired sensors either. It doesn’t have to be that complicated, though, as this simple two-wire power-and-data interface demonstrates.

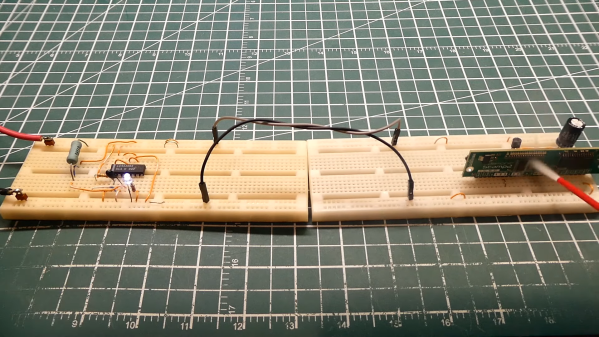
As with all things electronic, there are tradeoffs, which [0033mer] addresses in some detail in the video below. The basic setup for his use case is a PIC-based sensor — temperature, for this demo — that would be mounted in some remote location. The microcontroller needs to be powered, of course, and also needs to send a signal back to a central point to indicate whether the monitored location is within temperature specs. Both needs are accommodated by a single pair of wires and a tiny bit of additional circuitry. On one end of the twisted pair is a power supply and decoder circuit, which sends 9 volts up the line to power the PIC sensor. The decoder is based on a CD4538 dual monostable multivibrator, set up for an “on” time of one second. A trigger input is connected to the power side of the twisted pair going to the sensor, where a transistor connected to one of the PIC’s GPIO pins is set up to short the twisted pair together every half-second. Power to the PIC is maintained by a big electrolytic and a diode, to prevent back-feeding the controller. The steady 0.5-Hz stream of pulses from the sensor keeps resetting the timer on the control side. Once that stream stops, either through code or by an open or short condition on the twisted pair, the controller triggers an output to go high.

It’s a pretty clever system with very simple and flexible circuitry. [0033mer] says he’s used this over twisted-pair wires a couple of hundred feet long, which is pretty impressive. It’s limited to one bit of bandwidth, of course, but that might just be enough for the job. If it’s not, you might want to check out our primer on current-loop sensors, which are better suited for analog sensors but still share some of the fault-detection features.

Continue reading “Simple CMOS Circuit Allows Power And Data Over Twisted-Pair Wiring”

Computer Gear With — Um — Gears

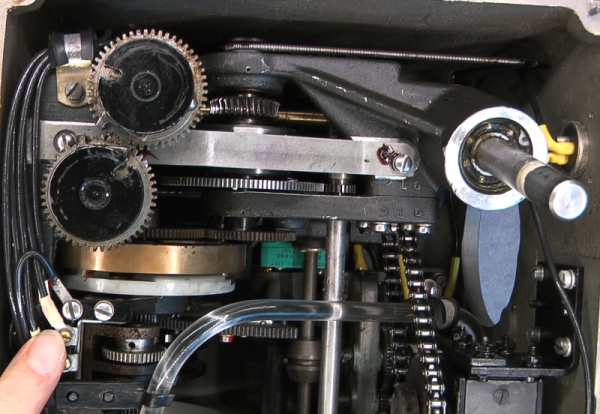
Analog computers have been around in some form for a very long time. One very obvious place they were used was in military vehicles. While submarine fire computers and the Norden bombsight get all the press, [msylvain59] has a lesser-known example: an M13A1 ballistic computer from an M48 tank that he tears down for us in the video below.

The M48, known as a Patton, saw service from 1952 to 1987. Just looking at the mechanical linkage to the tank’s systems is impressive. But inside, it is clear this is a genuinely analog computer. The thing is built — quite literally — like a tank. What was the last computer you opened that needed a hammer? And inside, you’ll find gears, bearings, and a chain!

We don’t pretend to understand all the workings. These devices often used gears and synchros (or selsyns, if you prefer) to track the position of some external thing. But we are guessing there was a lot more to it than that. It’s probably an exciting process to see something like that designed from scratch.

We did think of the Norden when we saw this. Hard to imagine, but there were “general purpose” analog computers.

Continue reading “Computer Gear With — Um — Gears”

How To Talk To Your Scope

It used to be only high-end test equipment that had some sort of remote control port. These days, though, they are quite common. Historically, test gear used IEEE-488 (also known as GPIB or, from the originator, HPIB). But today, your device will likely talk over a USB port, a serial port, or a LAN connection. You’d think that every instrument had unique quirks, and controlling it would be nothing like controlling another piece of gear, especially one from another company. That would be half right. Each vendor and even model indeed has its unique command language. There has been a significant effort to standardize some aspects of test instrument control, and you can quickly write code to control things on any platform using many different programming languages. In a few posts, I will show you just how easy it can be.

The key is to use VISA. This protocol is defined by the IVI Foundation that lets you talk to instruments regardless of how they communicate. You do have to build an address that tells the VISA library how to find your device. For example: “TCPIP::192.168.1.92::INSTR.” But once you have that, it is easy to talk to any instrument anywhere.

I say that thinking it is a problem is half right because talking to the box is one task of the two you need to complete. The other is what to say to the box and what it will say back to you. There are a few standards in this area, but this is where you get into problems. Continue reading “How To Talk To Your Scope”

PicoGUS: For All Your ISA Sound Card Needs

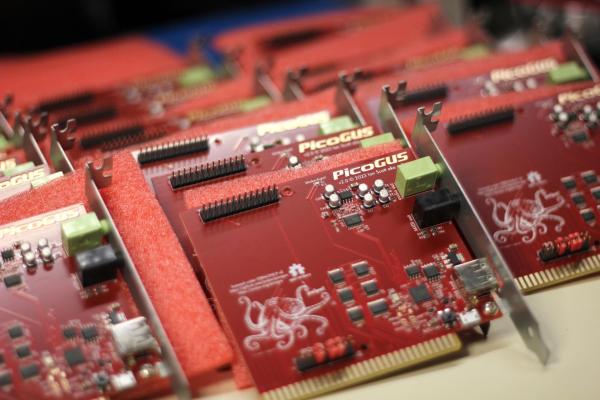
Sound cards used to be a big part of gaming machines in the 90s and 2000s but have largely gone extinct in the wake of powerful CPUs doing the sound themselves. Sound cards were expensive back then and, because the good ones weren’t very common, are expensive still for the retro gamer. But if you don’t need the real thing, [polpo] has you covered with his RP2040-based ISA sound card.

The PicoGUS, as he calls it, primarily serves to replace the Gravis UltraSound with modern components at a low cost. It uses the RP2040’s PIO to attach to an ISA bus and the RP2040’s dual-core power to synthesize the audio for its primary target, but also the AdLib (OPL2), CMS/Game Blaster and Tandy 3-Voice. [polpo] sells the PicoGUS on his Tindie store, but since it’s open source, you can of course just make your own.

Although “work-in-progress”, the PicoGUS is very useful to the right person and a perfect demonstration of how the RP2040’s PIO can be used to interface with almost any type of protocol.

Of couse, that’s not the only way to use the PIO, you can also create a CAN bus or even add another USB port.