The insides of an oscilloscope

Oscilloscope Probes Itself To Add Video

Modern oscilloscopes are often loaded with features, but every now and then you run into a feature that seems easy to implement yet isn’t available. [kgsws] wanted to use his Rigol DS1074 to show live measurements in his YouTube videos, but found out that this scope doesn’t support video output. Not to be deterred, [kgsws] decided to add this feature himself. In the video embedded below, he describes in detail the process of adding a USB Video Capture (UVC) interface to his oscilloscope.

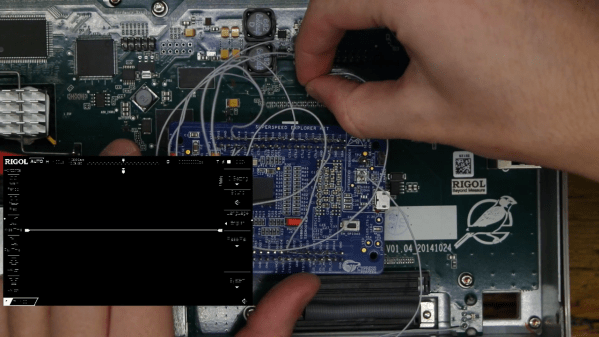
The basic idea was to find the signals going into the scope’s display and read them out using a Cypress EZ-USB board. This is a development board that can be used to design USB devices, and supports the UVC mode. However, with no documentation of any of the Rigol’s internal circuitry [kgsws] had to probe the display connector to find out which pin carried which signal. And since he had no other scope available than this Rigol, he hooked up the various bits of the disassembled instrument so that it could (awkwardly) probe its own internal signals.

After mapping out its own display signals, it was time to hook them up to the EZ-USB board. [kgsws] achieved this by soldering about two dozen tiny wires to SMD pads on the motherboard. The EZ-USB board itself was placed in the back of the scope’s case, but had to be stripped of unneeded components in order to save space and power. A very clever trick was the addition of a reed switch, which allowed [kgsws] to set the EZ-USB board to programming mode without having to open the scope’s case, by simply holding a magnet near the switch.

After soldering a USB connector into a spare slot in the RF shield the project was complete. The Rigol can now be connected to a PC and will simply appear as a video capture device, ready to be streamed or captured for [kgsws]’s future project videos. We’ve seen other hacks on the Rigol DS1000Z series to capture a series of screenshots or to enable additional bandwidth and features, but adding a live video output was not one of the options so far. Continue reading “Oscilloscope Probes Itself To Add Video”

Yet Another Rigol DS1054Z Viewer

Tired of squinting at the small numbers on the oscilloscope display, [Alfred] aka [Gaze@] decided to take matters into his own hands and wrote yet another tool to remotely view images from a Rigol DS1054Z. At least that was the initial idea. But, it grew unexpectedly — as [Alfred] says, “the more the project turned out to be fun, the more it got out of hand”. We know the feeling well.

In addition to being able to simply view and export the screen, the program implements waveform measurements (we’re not sure if it is using the measurement ability of the ‘scope, or actually performing measurements in the program). And as you can see in the animated GIF of the program in operation over on the GitHub repository, the numbers are certainly clear and legible. His problem of squinting at the small screen has indeed been solved.

This is coded in Pascal (FPC Lazarus), but we weren’t able to browse the program because [Alfred] hasn’t posted the source code yet. It is written only for Linux, and he has tested it on Ubuntu, Debian, Fedora, and Manjaro. The project relies on Python, PyVisa, and gtk2, and talks to your DS1054Z over USB or LAN. The installation instructions are well documented, but as [Alfred] himself warns, if you encounter trouble arising from subtle dependency version conflicts, you may need to be a nerd and/or a pensioner with unlimited time on your hands to solve them. There is no users guide nor extensive help according to [Alfred]. However, simple hints might be found in hover text or by pressing F1. Disclaimers aside, this looks like an interesting project to try out.

As [Alfred] notes, there are many other tools available to fetch data and images from your Rigol oscilloscope. [Jenny List] wrote a two-part series on using Python to control your test instruments, and here’s an example of a simple Python script that does a screen grab. Do you have a favorite way to remotely operate your oscilloscope? Let us know in the comments below.

Grab An Image From Your O-scope The Easy Way

The Rigol DS1054Zed is the oscilloscope you want. If you don’t have an oscilloscope, this is the scope that has the power and features you need, it’s cheap, and the people who do hardware hacks already have one. That means there’s a wealth of hardware hacks for this oscilloscope. One small problem with the ‘Zed is the fact that capturing an image from the screen is overly complicated, and the official documentation requires dedicated software and a lot of rigolmarole. Now there’s a simple python script that grabs a screen cap from a Rigol scope.

The usage of this python script is as simple as plugging the DS1054Z into your USB port and running the script. A PNG of whatever is on the screen then appears on your drive. Testing has been done on OS X, and it probably works on Linux and Windows. It’s a simple tool that does one job, glory and hallelujah, people are still designing tools this way.

This work was inspired by the efforts of [cibomahto], who spent some time controlling the Rigol with Linux and Python. This work will plot whatever is being captured by the scope in a window, in Linux, but sometimes you just need a screencap of whatever is on the scope; that’s why there were weird Polaroid adapters for HP scopes in the day.

Yes, it’s a simple tool that does one job, but if you need that tool, you really need that tool. [rdpoor] is looking for a few people to test it out, and of course pull requests are accepted.

Controlling Your Instruments From A Computer: Doing Something Useful

Do you know how to harvest data from your bench tools, like plotting bandwidth from your oscilloscope with a computer? It’s actually pretty easy. Many bench tools make this easy using a standard protocol with USB to make the connection.

In the previous installment of this article we talked about the National Instruments VISA (Virtual Instrument Software Archetecture) standard for communicating with your instruments from a computer, and introduced its Python wrapper with a simple demonstration using a Raspberry Pi. We’ll now build on that modest start by describing a more useful application for a Raspberry Pi and a digital oscilloscope; we’ll plot the bandwidth of an RF filter. We’ll assume that you’ve read the previous installment and have both Python and the required libraries on your machine. In our case the computer is a Raspberry Pi and the instrument is a Rigol DS1054z, but similar techniques could be employed with other computers and instruments.

Continue reading “Controlling Your Instruments From A Computer: Doing Something Useful”

How To Control Your Instruments From A Computer: It’s Easier Than You Think

There was a time when instruments sporting a GPIB connector (General Purpose Interface Bus) for computer control on their back panels were expensive and exotic devices, unlikely to be found on the bench of a hardware hacker. Your employer or university would have had them, but you’d have been more likely to own an all-analogue bench that would have been familiar to your parents’ generation.

A GPIB/IEEE488 plug. Alkamid [CC BY-SA 3.], via Wikimedia Commons
A GPIB/IEEE488 plug. Alkamid [CC BY-SA 3.], via Wikimedia Commons.
The affordable instruments in front of you today may not have a physical GPIB port, but the chances are they will have a USB port or even Ethernet over which you can exert the same control. The manufacturer will provide some software to allow you to use it, but if it doesn’t cost anything you’ll be lucky if it is either any good, or available for a platform other than Microsoft Windows.

So there you are, with an instrument that speaks a fully documented protocol through a physical interface you have plenty of spare sockets for, but if you’re a Linux user and especially if you don’t have an x86 processor, you’re a bit out of luck on the software front. Surely there must be a way to make your computer talk to it!

Let’s give it a try — I’ll be using a Linux machine and a popular brand of oscilloscope but the technique is widely applicable.

Continue reading “How To Control Your Instruments From A Computer: It’s Easier Than You Think”

How To Get 50 More Zed From Your Rigol DS1054Z

[Chris] has been spending a lot of time in the wife’s sewing room lately, and things got pretty serious late last night as he hacked his shiny new Rigol DS1054Z to unlock the 1104Z capabilities lurking within.

The rumors are true, and ungoverning the software is as simple as looking up your serial number and knowing the right URL for generating a valid license. [Chris] ran into a dud site, but that’s the price of doing business in the shadowy parking garage basements of the interwebs. Once he knocked on the right door and uttered the secret word, however, he became the proud owner of 50MHz additional bandwidth, decoders for SPI, I²C, and RS-232, twice the storage depth, and all teh triggers that ship with the 1104Z.

Can’t rationalize the purchase even at the ridiculously low price point? Here’s one way to make it happen. You’ll laugh, you’ll cry, you’ll learn some French.

Continue reading “How To Get 50 More Zed From Your Rigol DS1054Z”

How To Reverse Engineer, Featuring The Rigol DS1054Z

For a few years now, the Rigol DS1052E has been the unofficial My First Oscilloscope™. It’s cheap, it’s good enough for most projects, and there have been a number hacks and mods for this very popular scope to give it twice as much bandwidth and other interesting tools. The 1052E is a bit long in the tooth and Rigol has just released the long-awaited update, the DS1054Z. It’s a four-channel scope, has a bigger screen, more bells and whistles, and only costs $50 more than the six-year-old 1052E. Basically, if you’re in the market for a cheap, usable oscilloscope, scratch the ~52E off your list and replace it with the ~54Z.

With four channels of input, [Dave Jones] was wondering how the engineers at Rigol managed to stuff two additional front ends into the scope while still meeting the magic price point of $400. This means it’s time for [Dave] to reverse engineer the 1054Z, and give everyone on the Internet a glimpse at how a real engineer tears apart the worth of other engineers.

The first thing [Dave] does once the board is out of the enclosure is taking a nice, clear, and in-focus picture of both sides of the board. These pictures are edited, turned into a line drawing, and printed out on a transparency sheet. This way, both sides of the board can be viewed at once, allowing for a few dry erase marker to highlight the traces and signals.

Unless your voyage on the sea of reverse engineering takes you to the island of despair and desoldering individual components, you’ll be measuring the values of individual components in circuit. For this, you’ll want a low-voltage ohms function on your meter; if you’re putting too much voltage through a component, you’ll probably turn on some silicon in the circuit, and your measurements will be crap. Luckily, [Dave] shows a way to test if your meter will work for this kind of work; you’ll need another meter.

From there, it’s basically looking at datasheets and drawing a schematic of the circuit; inputs go at the left, outputs at the right, ground is at the bottom, and positive rails are at the top. It’s harder than it sounds – most of [Dave]’s expertise in this area is just pattern recognition. It’s one thing to reverse engineer a circuit through brute force, but knowing the why and how of how the circuit works makes things much easier.

Continue reading “How To Reverse Engineer, Featuring The Rigol DS1054Z”