Back Up The Band With Some RGB Stage Lights

Fresh off the 72-hour madness of the Red Bull Creation contest some of the folks a North Street Labs took on a stage lighting project. It’s for a local performing venue that just opened up, and despite the time crunch the team pulled off another great build.

Sixteen meters of LED strip make the electronics for the project a whole lot easier. The strips run up the center of a cabinets built as stand-alone columns which will end up at the back of the stage. Each cabinet has its own 5V 4A power supply (note the burnout issues they mention when using cheap eBay PSUs). Each column has its own Arduino Uno driving the LEDs, with an RS485 shield to connect back to a main Arduino Mega 2560 controller. It uses a PSX controller to switch between different lighting modes.

The seven towers boasting 688 LEDs isn’t all that’s shedding light on the show. There’s also about 300 feet of EL wire at work.

Continue reading “Back Up The Band With Some RGB Stage Lights”

Robot Servo Control Using Smartphone Audio Jack

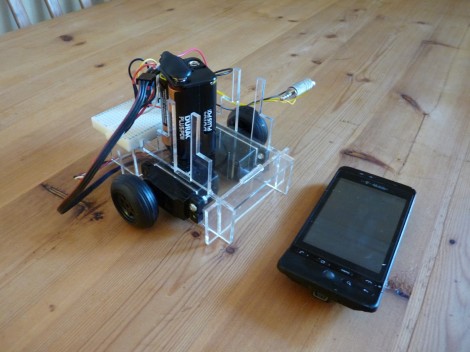
[Jim] has an old Android phone he’d like to use as a Robot brain. It’s got a lot of the things you’d want in a robot platform; WiFi, Bluetooth, a camera, an accelerometer, etc. But he needed some way to make the mobile, mobile. What he came up with is a chassis with servos that can be controlled by the phone’s audio port.

To start his adventure he crafted a square wave audio file in Audacity and then played it back on the Android music player. By monitoring the output on an oscilloscope he found the wave was well produced, with peaks of about 1V. With that in mind he designed a circuit using two transistors to amplify the signal, thereby creating a usable input for the servo motors. Each motor has one of these circuits connected to it, with the left and right channels from the audio jack driving them separately. In the clip after the break you can see he even wrote a simple Android app to extend the idea to a more usable level.

This is a similar technique as used by the recon robot we saw about a year ago.

Continue reading “Robot Servo Control Using Smartphone Audio Jack”

Toorcamp: MC Hawking Robotic Wheelchair

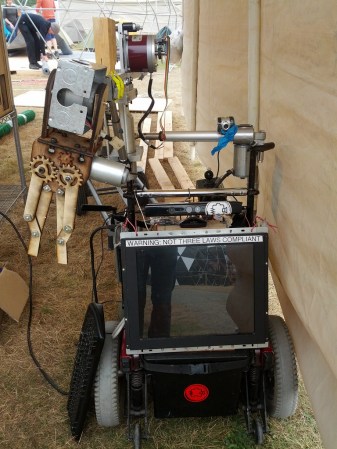
This is the MC Hawking robot built by the Noisebridge hackerspace in San Francisco. It’s a robotic electric wheelchair outfitted with a PC, an XBox Kinect, and an Arduino. On the software side, it uses Ubuntu and the open source ROS platform. A few folks from Noisebridge were hacking away on the robot at Toorcamp to add a robotic arm and other upgrades.

One goal of the project was to build a hardware platform that lets software hackers work on autonomous applications without having to delve in to the complexities of the hardware. Since an autonomous wheelchair could get dangerous, it clearly boasts that it does not behave by Asimov’s three laws.

An example of an autonomous application for the MC Hawking is a facial tracking. This uses the Kinect’s sensors to follow people around. The platform is now being used to develop the DORA Opensource Robot Assistant project, which hopes to use the robotic arm to grab a soda from the fridge 51 days from now.

[Jake] from Noisebridge pointed out that they are seeking people who are interested in working on the software side of the project. If you are in the Bay Area and haven’t visited Noisebridge, you need to. Check their website for lots of information on the group.

Check out a video of MC Hawking partying at Toorcamp after the break.

Continue reading “Toorcamp: MC Hawking Robotic Wheelchair”

How To Design Your Own LED Driver

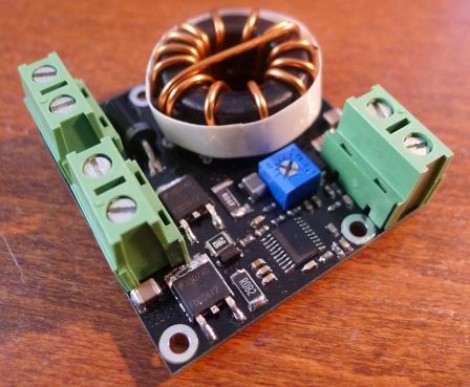
If you find yourself in need of a driver for a high power string of LEDs this is a must read. [Limpkin] just designed this driver as a contract job. He can’t show us the schematic, but he did share some tips on how to build an LED driver around a MAX16834 chip.

As you move to higher power designs the barriers to success pile up rather quickly. Using a chip like the MAX16834 really helps to simplify the task as it can be used as a boost or buck converter, it includes functionality that allows for dimming, and it’s a constant currents solution. There are board design issues that need to be accounted for in these designs. [Limkin] included links to a few calculators that will help you determine trace width based power levels used with the driver. He also recommends using copper pours on both sides of the board connected with vias to help dissipate heat. To that end he used an IR thermometer for feedback during testing.

It’s too bad he doesn’t have any photos of the device at work. If you build something similar please take some pictures and tip us off about it.

Toorcamp: The American Hacker Camp

Toorcamp is all wrapped up after four great days of talks, hacking, and parties. Located in Neah Bay, Washington, Toorcamp was a four day event modelled after European hacker camps. This is the second time Toorcamp has been run, and it’s clear that both the organizers and attendees know how to throw an awesome stateside hacker camp.

The camp featured talks, including keynotes by [Joe Grand] and [George Dyson], and villages for hardware hacking, lock picking, crafting, and welding. Workshops ranging from Arduino for Total Newbies with [Mitch Altman] to Wifi Hacking with [Darren Kitchen] let attendees get their hands dirty in a variety of activities. Hackerspaces and other collectives set up fantastic campsites featuring full kitchens, ham radios, questionably legitimate wifi networks, and bike jousting.

Some of the highlights include a giant laser that required FAA approval to fire into the sky, an elaborate tribute to the classic arcade game Robotron: 2084, and a working hand-held Tesla Gun. Stay tuned for coverage about these hacks and more.

If you missed Toorcamp, you’ll be glad to know that the organizers plan to run it on alternating years, which means the next one will be in 2014. You should also check out Toorcon San Diego in October and WorldToor in Antarctica. It looks like Toorcamp will only get better with time, and Toorcamp 2014 should be a great open air hacking event that you won’t want to miss.

Work Station Includes A Smartcard Lock For USB Ports

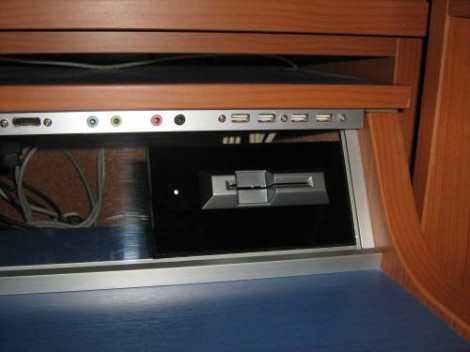
The USB ports on this work station are locked. In order to use a USB device you’ll need to insert a Smartcard into the reader seen above. The interesting thing here is that this shouldn’t affect your ability to charge a USB device. When you visit the link above make sure to check out the worklog tab as it contains nine pages worth of build information.

The device is conceived of in two parts. There is one board which does the USB switching, and another that takes care of the Smartcard reader. That reader is based on a PIC 16F1939. It readers the Smartcard, verifies the data, then controls the USB switching board via SPI. An ADG714 chip completes the circuit on eight data lines making up the four USB ports. There is also a mechanical relay on the board which can cut USB power. Since this is separate from the data switching, the power could be left on for charging or toggled separately by a card that has permission to charge but not to use the data ports. You can see a demonstration of the system embedded after the break.

Continue reading “Work Station Includes A Smartcard Lock For USB Ports”

RGB Chandelier May Not Fly With The Wife

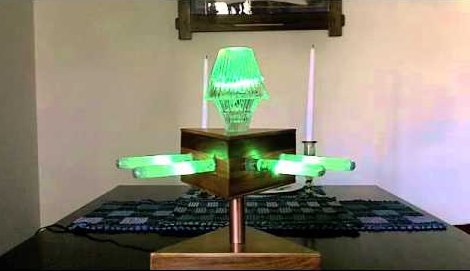
We understand where [Craig] is coming from, leaving no stone unturned when looking for new electronic projects to occupy his time. He tried to convince his wife that they needed a light show to accompany dinner, and while she was skeptical he went ahead and built this remote control RGB chandelier anyway.

He recently purchased fifteen feet of RGB LED strip and has since been trying to use it in his projects. What’s interesting is that he didn’t make direct use of the strip. Just 10 of the LED packages were used. He desoldered and extended each wire leads and used one of the driver chips to address them all. The main body of the light fixture is a triangle, and out of each side two test tubes host one LED each. To diffuse the light [Craig] mixed up some resin and laced it with glitter. Once hardened the resin holds the LEDs firmly in place. The glass shade in the center of the fixture hides four more LEDs.

[Craig] uses a remote control from a Roku box to control the chandelier. An IR receiver is monitored by an Arduino which drives the LEDs accordingly. After the break you can see a demonstration of the completed project. Unfortunately it doesn’t provide as much light as they need. We’d suggest an upgrade along these lines.

Continue reading “RGB Chandelier May Not Fly With The Wife”