While most of the time the name of the game is to remove a lot of metal, etching is an entirely other process. If you just want to put a logo on a piece of steel, or etch some labels in a piece of aluminum, You need to think small. Mills and CNC routers will do, but they’re expensive and certainly not as easy to work with as a small, homebrew electrochemical etcher.
This etchinator is the brainchild of [Gelandangan], and gives the techniques of expensive commercial etchers to anyone who can put together a simple circuit. This etcher can etch with both AC and DC thanks to a H bridge circuit, and can be fabbed up by anyone who can make their own circuit board.
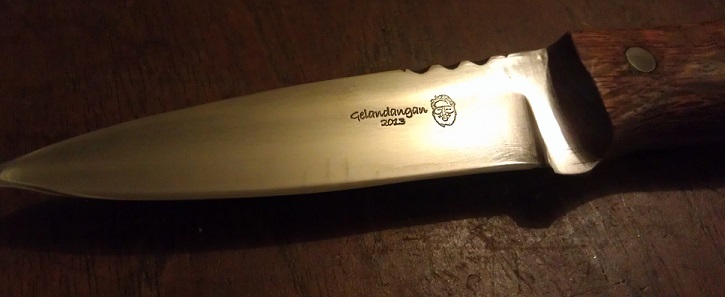
To actually etch a design in a piece of metal, simply place the piece on a metal plate, put the stencil down, and hold a felt-covered electrode moistened with electrolyte down over the stencil. Press a button, and in about 30 seconds, you have a wonderfully etched piece of metal.
[Gelandagan] has some templates that will allow you to make your own electro etcher, provided you can etch your own boards and can program the PIC16F1828 microcontroller. All this info is over on the Australian blade forum post he put up, along with a demo video below.


Very, very cool! I’ve linked this article to a friend of mine who does metalworking and makes custom knives, he’ll be very keen on it!
Thst PIC is used just as a fancy timer, and to display whether you’ve selected AC or DC etching.. A 555 and a DPDT switch would take care of that. And his “improved” model has its own DC/AC inverter: “(it made its own AC current, and thus fully insulated and much safer to use)”. If you’re running off an AC wallwart this is just superfluous.
Furthermore: no code for the PIC that I can find, and his “schematic” is close to unreadable due to it being posted as a jpeg. I won’t comment on the asking price for the kits or the finished version.
Yes and no. Who said that microcontrollers never do mundane tasks? But you could not store your timing-settings with a 555 and dpdt. Nor store more than one material, nor make a fancy PWM profile that eats out a little metal, then deposits oxide in it, so it is a lot harder to brush off. There are plenty of things possible when you add a uC, no use trying a 555 for that.
Nor could the 555 connect to a display to show the selected values.
People often crack down on the use of a µC in simple circuits, but a µC is often good to have for development, you can change values and functions without resoldering parts.
Now if you were making 10 000 units of something with a simple timer function, a µC would be dumb, but for one-offs and small volume…
I have almost given up using logic except when i absolutely know i need a specific function, when i’m not absolutely sure in goes an ATT48 or so.
There are a myriad of reasons to use programmable devices in lieu of analog timers and such. Storing and recalling multiple settings, general flexibility [including driving a display], functional modifications with no hardware modifications are all reason enough to go digital when it’s viable. Also, in real production quantities, PCB real estate and the additional cost of support components [passives, etc] often favors the use of a µC. I have replaced entire discrete subsystems with their many components with a single µC and decoupling cap that are field upgradeable, cost less than the components it replaced, and reduced the PCB footprint considerably. A 555 is also far more susceptible to variances in component tolerances. +5% here, -10% there…you can easily end-up with a marginal device.
The only real advantage I can see in favor of a 555 circuit over an equivalent µC implementation, is that there is no programming of the device required when manufacturing…so that shaves a tiny bit of cost from the device.
A controller using a 555 may not be as nifty as one with a microcontroller, but it can be built by anyone who knows the hot end of a soldering iron from the cold end. For a PIC or AVR you need a programmer, and code (which for this case you have to figure out for yourself as well; it is nowhere to be found). So there’s quite a difference in the skills needed to build one or the other. Times can be marked against the potmeter scale, and details noted on a piece of paper.
Oh, and need PWM? Just add a second 555.
Use a 556 if you need two timers ;D
Of course, using a programmable device requires programming. Not arguing that fact. There are certainly applications where a 55x timer is fine for the task. Just saying that there are significant benefits to using a µC.
Well, I do know the hot tip from the cold handle for a soldering iron, and I would not be able to draw up the schematic for a 555 variant of this machine as I have never worked with them. An AVR version would not be too hard though: get an H-bridge from sparkfun, copy + change the code to your liking and connect a few wires.
So it goes to show that not everyone has the same skill set as you, nor is a your ranking /*555 is easier than µC*/ anything more than personal.
Gelandangan’s web page reveals more as to why a micro-controller is used. I didn’t see any indication there was an intent to release this open hardware, perhaps that’s the reason the code and an easier to read schematic wasn’t provided? I really wouldn’t know for sure.
Looks like it, yes. But in that case, he should just say “I’ll be offering it as a kit and as readybuilt”. His choice, surely, and there are probably enough knife enthousiasts who’d buy one anyway. But also showing an (as good as unreadable) schematic is half-assed, and IMO the lack of detailed info makes it undeserving of a HAD mention.
I couldn’t agree more. It’s interesting that he thanks several people for their input regarding AC and DC aspects of etching (I would think pretty basic information for someone to know if they are knowledgable in this area) but then goes on to develop a sophisticated PIC based system that has the names of various alloys “optimum settings” programmed in. Pretty steep learning curve on that one! I looked to see if there were tables of pulse width/duration/etc for this subject, but I came up blank.
I doubt there is much to this beyond a timer with memory. Maybe that is a deluxe leap forward in metal etching, but I have my doubts.
Nitrous
Thanks for your comment.
It seems that you are a very smart person.
I look forward to you sharing your awesome inventions.
Cheers
gelandangan
How he is doing it has been a normal process for a very long time for artisan metal smiths to brand their work.
It is a nice thing to highlight even though it is mundane. You can even reverse the process to convert rust to iron for easy removal or to suck copper to the top of brass plating. All that is needed is a manual, no safety feature, battery charger and some saltwater.
It is an imprecise process even for professional grade equipment and needs monitoring to get desired results. Adding a microcontroller or a timer of any sort to this activity is like adding a chocolate bar to your soldering station. Nice, maybe even convenient, but isn’t the slightest bit related.
no, the µC adds features. Even though they are mundane features, they are nice to have and give repeatable results and are easiest to implement with a µC.
Why are you so opposed to µC’s? Do you think it is too hard for you, don’t you like the Arduino crowd that does not recognise your skills, or did you just not have your coffee yet?
If you are a tinkerer, you will love learning new things. You have just identified a new thing to learn, hurray!
Does anyone know what kind of film he is using for the stencil?
i think it’s a piece of a screen for silkscreen printing
When & how
did this trend of sending out
kitchen knives with nearly cold chisel edge angles get started ???
Even worse is the simple rounded
(convex) and steep angle from just running it down a sanding belt.
Not singling out this guy per say,
just that I’ve grown annoyed at being at a friends house and finding knives that have been used on glass cutting boards and ceramic plates.
Upon asking for something a bit sharper, they hand me something
that they paid a good bit for
and it’s got an edge like a honed cold chisel.
to me at least, even a pedestrian “home owner grade”
knife should at least be able to hold
an angle at least as steep as
a good block (wood cutting) plane blade, if not narrower.
meh, maybe that’s why we’re calling them “artisan” nowdays….
They look nice but should be on the wall with all those Fantasy Knives
from the home shopping channels.
i.e. look slick, etc
but really aren’t usable.
Convex edges are stronger, less likely to chip. They have become quite popular as it is sharper at the edge with similar strength to dual bevel blades. It is all about your market. Sure you can sharpen knives on plate glass to 2000 grit. But why would you do that and then sell it to the masses? People would not use them properly, the edges would chip, and you would have expensive returns on your hands with piles of steel having junk edges.
To think that “home owner grade” as you say should be in the same category as plane iron is shocking. It takes skill, finesse, fine tools, and constant upkeep to keep planes tuned and ready for service. Would you put up with kitchen knives that cost $90 apiece, cannot be used on anything but wood cutting boards, rust in ten minutes without protection, and need precision sharpening after…every…single…session…of…use?
Most people wouldn’t. So they don’t.
I suppose you could buy one or make your own with a 55 degree straight bevel and see how long it lasts. I’d guess, depending on the temper, it would be chipped, folded, or rusty before long unless it was babied and only used to cut cheese or vegetables.
LOL,
I made that knife a few months ago, it is a bush knife type.
It is the 73rd knife I made.
It is concave ground out of O-1 steel, and diferentially heat treated to 60 HRC on the cutting edge, and 50 HRC on the spine.
I am not sure what you mean by “Cold Chisel” edge angles, but there are a few type of grinds used in knifemaking, for example,
The “SCANDI” grind that is flat ground from the flat of the knife down to the cutting edges, these are popular for woodwork but not so good for kitchen job because the cut item tends to stick to the blade.
Concave ground knives are done where the cuttings are not stuck to the blade.
Convex ground at the cutting edges gives higher strength to the cutting edge by affording a lot more foundation.
The knife shown have been tested to CHOP through a 2 x 4 pine lumber and still shaving sharp at the end of the test.
It can flex up to 10 degree either way and would straighten back without any curving.
I am quite happy with the knife.
More pictures on this link
http://www.australianbladeforums.com/vb4/showthread.php?10737-Productive-weekend
“If you just want to put a logo on a piece of steel, or etch some labels in a piece of aluminum, You need to think small.”
How exactly does this even work with aluminum?
The same way as with any other metal. The chemical process is different from acid-etching, see here for an explanation:
http://www.nontoxicprint.com/electroetching.htm
I’ve had great success etching aluminum with salt water and a 13.8V power supply.
Good link that, with lots of info. Thanks.
What electrolyte is he using?
It’s probably a saline sulfates olution. See here for more detail, including recipe:
http://www.nontoxicprint.com/etchzincsteelaluminum.htm
The use of microprocessor is to be able to precisely adjust the output cycles of the etching unit.
True LM555 can be used for this, but to have it precisely adjusted to do both DC and AC requires either more than one LM555 or to stop half way and re set the system to to the other type of current.
Also, you cannot easily design LM555 to drive an LCD can you :P
Besides, the microprocessors are actually much cheaper than LM555 nowadays.
I have currently posted a larger and clearer schematic on the Australian Blade Forums, but the Hex files are only available to forum members.
The electrolyte I am using is a mixture of table salt, Copper sulfate, magnesium sulfate and iron sulfate.
Cheers.
Gelandangan
Well, and truthfully answered!
But if you have a site why not also put it up there though? Seems odd.
Thanks for the suggestion.
The metal marker is in my website now..
>>> http://www.gelandangan.netau.net <<<
No offense to any of this… But this is over complicating a reasonably easy manual task. A transformer, full wave bridge rectifier, dimmer switch DPDT and some wires will get you the same results as this without having to over complicate it. Etch for a sec, then mark for a sec. Plenty good enough for just about anyone. JS and MS judging included.
And the prices are retarded. I figured I would jump in the game with a ready made machine. Simple and manual, fully adjustable voltage… And a graphite wand… all for about 1/3 what even the cheapest machines cost… This should be one of those areas where it needs to be cheap enough that guys would rather just buy it than build it. Price it too high and they will be looking up the plans… The mark-up is stupid insane. Oh, and mine has a voltage display and foot pedal. Maybe even add PWM control and offer it as a full power supply…
Sorry, this is a nifty idea, but trying to automate things that are very easy manually adds price where price hurts… I think you’re missing the mark and a lot of customers in the process. I read your original build on that other site, and you made the statement that there are very few players in this market, and that mark-up is ridiculous. And planned to take advantage of it, which you seem to have done.
Best of luck but I really think this is a place where cost/sales price appropriateness would pick up a lot more customers. Otherwise they will just cut a wall-wart and use q-tips, or build the simple machine I first had.
-Eric
I would really like to know on what basis you determined the optimum settings for the various metals you have indicated are “preset” in your microcontroller. I too, don’t want to rain on any ones parade (or small business for that matter) but this reminds me of the “Gold Magnet” unit for sale on eBay. It has a battery, a bunch of components, lots of claims and a host of people who hope that the science is all wrong and you can, in fact make a special detector that can find gold, silver, oil, water….etc, etc. best yet is the price. $1299.99!!!!
As the old saying goes, if you can’t give it away, use snob pricing.
This really is a simple, commercial enterprise. I sure hope HAD doesn’t start featuring HP products or the new Dell releases. :)
I personally think that this doesn’t belong on HAD
Thanks for your comment.
I look forward to you fully sharing your awesome inventions.
Hollow drums beats the loudest.
Cheers
gelandangan