Microslice: The Tiny Arduino Laser Cutter

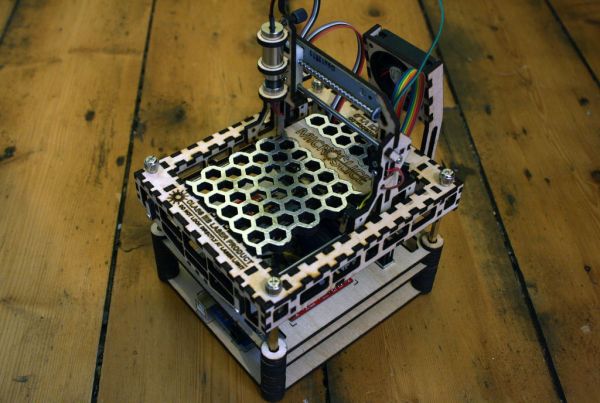
[SilverJimmy] already had a full-sized 50 watt laser cutter, but he decided to try his hand at putting together something smaller and microcontroller-driven. The result is this adorable little engraver: the MicroSlice.

To keep the design simple, [SilverJimmy] opted for a fixed cutting table, which meant moving the cutting head and the X-Axis as a unit along the Y-Axis. The solution was to take inspiration from gantry cranes. He snagged a couple of stepper motors with threaded shafts, designed the parts in Inkscape, then fired up his full-size cutter to carve out the pieces. An Arduino Uno and the relays for the laser and fans sit on the MicroSlice’s bottom platform, and two EasyDriver motor controllers sit above them on the next layer.

Swing by the Instructables for more details including the source code, and to see a video of the engraver below. [SilverJimmy] sourced his laser from eBay, but check out the engraver from earlier this year that used a DVD diode.

Continue reading “Microslice: The Tiny Arduino Laser Cutter”

Hackaday Links: October 27, 2013

hackaday-links-chain

[Kyle] came across a project which he thinks is “simply elegant”. If you don’t already have a PCB vice, here’s an easy way to build one of your own.

This one’s so good but alas it’s not a hack. Check out the slideshow tour at UC Boulder’s Fiske Planetarium. You get a really cool look at the hardware that makes the dome and projector such a great experience. [via Reddit]

Here’s a schematic and a couple of snapshots of [Trax’s] CAN bus hacking rig. He plans on doing a tutorial but decided to share this link after reading the first part of our own CAN hacking series.

These strings of LEDs bump to the tunes. [Alex] is using GrooveShark as a frequency analyzer, then pushing commands via Node.js to the Arduino controlling the lights. It’s all planned for the back porch during his Halloween party.

We remember drilling holes in the 3.5″ floppy discs (we even made a wood jig for this) to double their capacity. A similar blast from the past was to punch a notch in the larger 5.25″ versions to make them double-sided.

If you’re trying to learn about FFT [Ronald] highly recommends this website. We didn’t do too much poking around because it’s kind of strange. But if you do get sucked in and have fun with it leave a comment to let others know it’s worth their attention.

We suppose that using 39 Raspberry Pi boards and their camera modules isn’t the worst way to build a huge 3D model capture rig. The results certainly are impressive. [Thanks Wouter]

DIY Pellet Fed Boiler Is Hot Stuff

pelletburner

[Firewalker] has designed a great pellet burning boiler (translated). Wood and biomass pellets have gained popularity over the last few years. While freestanding stoves are the most popular method of burning the pellets, [Firewalker] went a different route. He’s converted a boiler from what we assume was oil to pellet power. An Arduino controls the show, but don’t hold it against him. [Firewalker] is just using the Arduino as an AVR carrier board.The software is all written in C using AVR studio. The controller’s user interface is pretty simple. A two-line character based LCD provides status information, while input is via buttons. Once the system is all set up, thermostats are the final human/machine interface.

Burning pellets requires a bit of prep. A cleanup of the burn chamber must be performed before each burn. The AVR is programmed to handle this. Once the chamber is clean, new pellets are fed in via an auger system. The burner is monitored with a standard flame sensor. When the fire is up the pellets feed in until the boiler gets up to temp. Then the system enters a standby mode where it feeds in just enough pellets to maintain the flame. When the thermostats stop calling for heat, the whole system shuts down, ready for the next burn.

Continue reading “DIY Pellet Fed Boiler Is Hot Stuff”

Hackerspacing In Europe: Technologia Incognita In Amsterdam

IMG_1095 (Custom)

Welcome to Technologia Incognita!

This is Amsterdam’s hackerspace. In Latin it means “Undiscovered Technology” — quite fitting for a hackerspace! It’s been around for about 2 years and has grown to a solid 50+ members, in fact, they are running out of room on the ever popular social nights!

They typically have a policy of no cameras but made an exception for us provided we didn’t photograph any projects or persons without permission, so while the gallery below may look like the space was empty… there was a good 20-30 people hanging out since it was the social night.

Continue reading “Hackerspacing In Europe: Technologia Incognita In Amsterdam”

[Charles’s] Epic “Total-Recap” GoKart Post

charlesEVPost

If you’ve built an electric vehicle in the past few years, you probably owe [Charles] a couple of beers. Now you can feel more indebted to him after you read his 17,500-word, 10-part post covering everything you need to know about electric go-kart design. You’ll want to grab a sandwich to keep you company.

You probably recall the Chibikart from posts earlier this summer, which is one of an endless list of EV projects [Charles] has up his sleeve. He’s been teaching MIT students how to build EV karts for a while now, and this total-recap “2.00gokart” novel is [Charles’s] way of sharing the wealth. This is more than a simple how-to guide, though. Instead, it reads like a teacher’s edition of GoKarting 101, with a few brief and important histories, walk-throughs of how the class evolved, exhaustive links to vendors, graphs, videos, and plenty of reference and documentation.

If you have even the slightest interest in electric vehicles, do yourself a favor and give it a browse. There are a couple of videos after the break, and if you need some more motivation, check out the EV skateboard that uses a lot of the same parts.

Continue reading “[Charles’s] Epic “Total-Recap” GoKart Post”

Electrochemical Etching With A Microcontroller

IMAG1459_zps68634c16

While most of the time the name of the game is to remove a lot of metal, etching is an entirely other process. If you just want to put a logo on a piece of steel, or etch some labels in a piece of aluminum, You need to think small. Mills and CNC routers will do, but they’re expensive and certainly not as easy to work with as a small, homebrew electrochemical etcher.

This etchinator is the brainchild of [Gelandangan], and gives the techniques of expensive commercial etchers to anyone who can put together a simple circuit. This etcher can etch with both AC and DC thanks to a H bridge circuit, and can be fabbed up by anyone who can make their own circuit board.

To actually etch a design in a piece of metal, simply place the piece on a metal plate, put the stencil down, and hold a felt-covered electrode moistened with electrolyte down over the stencil. Press a button, and in about 30 seconds, you have a wonderfully etched piece of metal.

[Gelandagan] has some templates that will allow you to make your own electro etcher, provided you can etch your own boards and can program the PIC16F1828 microcontroller. All this info is over on the Australian blade forum post he put up, along with a demo video below.

Continue reading “Electrochemical Etching With A Microcontroller”

Aluminum Unibody Nintendo 64

NES1

[Travis] wanted us to take a look at his N64 portable to see if it could be featured on Hackaday. By the looks of it, we’re going to say hell yeah. Everything on this portable N64, down to the buttons, is milled from aluminum. It’s an amazing build that raises the bar of what a portabalized game system can be.

Inside this anodized enclosure is the circuit board from an original N64. To cut down on the size, [Travis] milled a new heat sink for the CPU and GPU. All the games – quite possibly all the games ever released for the N64 – are stored on an SD card and accessed through an EverDrive 64. Two 5000 mAh Lipo batteries provide three hours of play time on a beautiful high-res screen.

What’s even more amazing is that [Travis] machined all the parts on an exceedingly small, manual mini-mill. Truly a portabalized console for the ages.

You can check out a gallery of pics [Travis] sent in and his demo video below.

Continue reading “Aluminum Unibody Nintendo 64”