When most of us think of forge work, the image that comes to our mind is likely to be a rather traditional one, of the village blacksmith’s shop, roaring coke-fired hearths, and an anvil ringing to the beat of hand-wielded hammers. Iron and steel, worked through the sweat of the human brow.
Precision metalwork probably doesn’t figure in there, yet there is another type of forging used to create some of the most highly stressed components on rockets, missiles, and aircraft as well as the more mundane ironwork of your garden fence. Drop forging allows reproducible shapes to be forged while maintaining tight control over the metallurgical properties of the finished product, exactly what is required for such high-performance applications.
The video below is a promotional film about drop forging in the aeronautical industry from the late 1950s, made for and about Wyman Gordon, still specialists in the field. With the charming optimism of the period and a very catchy title it goes into the detail of the plant, development, and quality control of a range of parts for the missiles and rockets of the day, and along the way shows the cutting edge of machine tooling in the days before CNC. A whole Periodic Table of metals are forged with an expertise probably not seen in many other places in the world.
There are also some sights you’d never see in today’s safety culture, for example a running press with men darting in to adjust the position of a forging while it is still moving. It’s not a short video, but definitely worth watching all the way through.
[OlegZero] has some pet fish in his basement, and decided to work on a little project for them — an aquarium light that mimics the outdoors. He calls it the FishLight project.
His goal was to create a light panel that could imitate the color of the outdoor sky (approximately) using an RGB LED strip. During normal operation, the LEDs cycle through the colors of day, from dusk to dawn using an ATmega88 microcontroller. After his girlfriend saw what it could do, she quickly came up with the idea to add a cityscape to the background to turn it into a piece of attractive decor for their home.
Still fail to see the point of going to this much effort for a few fish? Well, besides it turning into a rather nice artistic light for their basement, the concept can be applied to other animals as well. Like encouraging chickens to produce more eggs by making the days “longer” with artificial light. As it turns out chickens produce less eggs when the days get shorter — an easy fix with something like this!
The most collectible Game Boy, by far, would be the Game Boy Micro. This tiny Game Boy is small enough to lose in your pocket. It can only play Game Boy Advance games, the screen is tiny, but just look at the prices on eBay: it’s one of the few bits of consumer electronics that could be seen as an investment in retrospect.
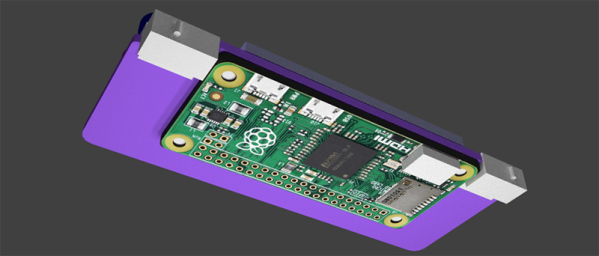
The popularity of the Game Boy Micro, the ability for the Raspberry Pi to emulate old game consoles, and the introduction of the Raspberry Pi Zero could only mean one thing. It’s the PiGrrl Zero, a modern handheld to play all your retro games.
The design goals for the PiGRRL Zero were simple enough: a 2.2 inch 320×240 display, a d-pad, four buttons on the face and two shoulder buttons. There’s a big battery, audio output, and a 3D printed case. This would be somewhat unremarkable if it weren’t for the PCB designed for PiGRRL Zero. It’s designed to be soldered directly onto the Raspberry Pi Zero, taking advantage of the mostly component-free back side of this tiny single board computer.
With this PCB, the Pi Zero is turned into a tiny battery-powered computer running emulations of all the classics. NES, SNES, Sega, and of course Game Boy Advance games are readily playable on this devices, and for a price that’s a fair bit lower than what a mint condition Game Boy Micro goes for. Our judges thought it was cool enough to be one of the winners of the Pi Zero Contest. Check it out!
The Raspberry Pi Zero contest is presented by Hackaday and Adafruit. Prizes include Raspberry Pi Zeros from Adafruit and gift cards to The Hackaday Store! See All the Entries
For his final project at the Copenhagen Institute of Interaction Design, [Andreas Refsgaard] decided to make something that matters : a system that allows anyone to control a musical instrument using only their eyes and facial expressions. Someone should enter this into a certain contest that’s running…
Dubbed the Eye Conductor, [Andreas] has created a highly customizable system that allows for a control interface that can be operated using only your eyes, and some facial expressions. Designed with the intent to allow everyone to enjoy playing music, [Andreas] user test the system at schools, housing communities for people with physical disabilities, and anyone he could find in a wheel chair. His intent is to continue the project so that all people can enjoy playing music.
The system is open, designed for inclusion and can be customised to fit the physical abilities of whoever is using it.
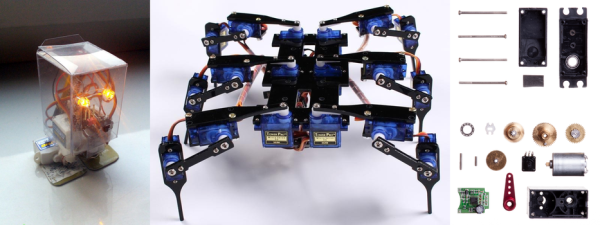
How do you make things move? You add in a motor that converts electrical energy into motion. That’s a simple idea, but how do you know where the motor is? That’s where the servo motor comes in. By adding a sensor and a controller to the mechanism, these motors can figure out how far they have rotated and maintain that setting without any need for external control.
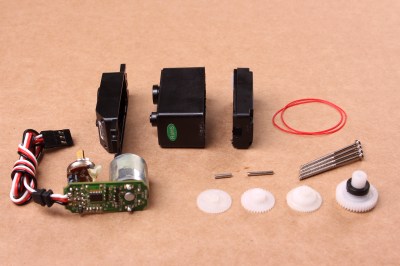
A disassembled servo motor showing the controller, motor, rotary encoder and gears. By oomlout, CC BY-SA 2.0
What is a Servo Motor?
These neat devices can be large or small, but they all share the same basic characteristics: a motor connected to a gearing mechanism and an encoder that detects the movement and speed of the motor. This combination means that the controlling device doesn’t need to know anything about the motor itself: the controller on the servo motor handles the process of feeding the appropriate power to the motor until it reaches the requested position. This makes it much easier to build things with servomotors, as the designer has already done all the hard work for you.
The first place that most people encounter a servo motor is in the small hobby servos that are used in remote control vehicles. Manufactured by companies like Hitec and Futaba, these drive a gear or arm that transfers the rotation of the motor to perform tasks like turning a wheel to steer a car, moving a control surface on an RC plane, or any task that requires a small range of motion at high precision. The gearing in the servomotor offers more torque than connecting the shaft directly to the motor. Most hobby servos of this type are restricted to a certain range of motion (usually 180 degrees) because the position encoder is a simple potentiometer connected to the output shaft.
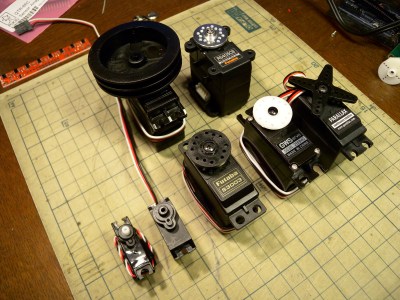
A selection of different sized servo motors. By Osamu Iwasaki
Servomotors usually have three connection wires: a power line, a ground line and a signal line. The signal line is fed a pulse width modulation (PWM) signal that determines the angle that the servomotor moves to. As the name suggests, the length of the pulse (or the width, if you look at it on an oscilloscope) is the thing that controls the angle that the servo moves to: a short pulse (1 millisecond) sets it to the zero angle, while a long pulse of 2 milliseconds sets it to the maximum angle. A pulse length between these two limits signals the servomotor to move to the corresponding angle: 1.5 ms would set it to 90 degrees.
It is important to note that servomotors and stepper motors are not the same thing. Both are used for positioning, but steppers usually run without feedback. Instead, steppers turn (as the name suggest) in discrete steps. To figure out where a stepper motor is requires a limit switch, then driving the stepper until this is triggered. Then if you keep count out the number of steps that it’s traveled, you know where it is. That’s why devices like inkjet or 3D printers will move to their limits when they start up, so the controller can detect the far limit of the mechanism being driven, and calculate the current position from that.
How Do You Use A Servomotor?
Because the designers of servomotors have done most of the hard work for you, servomotors are very easy to use. To drive them, you just need to feed them power (usually 5V) and feed the PWM signal to the servomotor. You can drive them directly from an Arduino or similar microcontroller using a library that converts an angle into a PWM signal on one of the output pins.
Each servomotor requires a dedicated output pin if they are being driven this way, though, so if you are driving a lot of servomotors, a dedicated controller makes more sense. Devices such as the Adafruit Servo Shield and the Pololu Maestro allow you to control multiple servos from a single output pin on the microcontroller: the microcontroller sends a signal to the device addressing each servo in turn, and the device converts this into the PWM signals for each. If you need to drive a lot of servos, the SD84 can control up to 84 servos at once from a single USB port.
What’s worse than coming in from the workbench for a sandwich only to discover that the bread has molded? That red bread mold–Neurospora crassa–can transform manganese into a mineral composite that may improve rechargeable batteries, according to a recent paper in Current Biology.
Researchers used the carbonized fungal biomass-mineral composite in both lithium ion cells and supercapacitors. The same team earlier showed how fungi could stabilize toxic lead and uranium. Mold, of course, is a type of fungus that grows in multi-cellular filaments. Apparently, the fungal filaments that form are ideal for electrochemical use of manganese oxide. Early tests showed batteries using the new material had excellent stability and exceeded 90% capacity after 200 discharge cycles.
The team plans to continue the use of fungus in various metallurgical contexts, including recovering scarce metal elements. This is probably good news for [Kyle]. This is quite an organic contrast to the usual news about graphene batteries.
A very good question came up on The EEVBlog forum that I thought deserved an in depth answer. The poster asked why would amplifier companies in the heyday of tube technology operate tubes in mass produced circuits well in excess of their published manufacturers recommended limits. The simple answer is: because the could get away with it. So the real question worth exploring is how did they get away with operating outside of their own published limitations? Let’s jump in and take a look at the collection of reasons.